
The OpenMV AE3: A Time-of-Flight Doorman for the NPU
Part two of the OpenMV series shrinks the board and the power to a quarter of a watt, while running YOLO. Built on Alif's Ensemble E3 with two Cortex-M55s and two Ethos-U55 NPUs, the AE3 also carries something its bigger sibling does not, a VL53L8CX 8x8 ToF depth sensor.

The AE3: A ToF AI Doorman for the NPU
This article is Part 2 of multi part series on OpenMV's new generation of AI cameras:
- The OpenMV N6: a MicroPython camera with a real NPU
- This guide: the OpenMV AE3, and letting a depth sensor decide when to think
Part 1 introduced the OpenMV workflow, thecsi/mlAPIs, and a people-counting application; this part assumes them and concentrates on what is different: the silicon, the power, and the second sensor.
Part 1 of this series ended with a question: how small can "the camera is the computer" get before something has to give? The OpenMV AE3 is an empirical answer, and the surprise is how little gives.
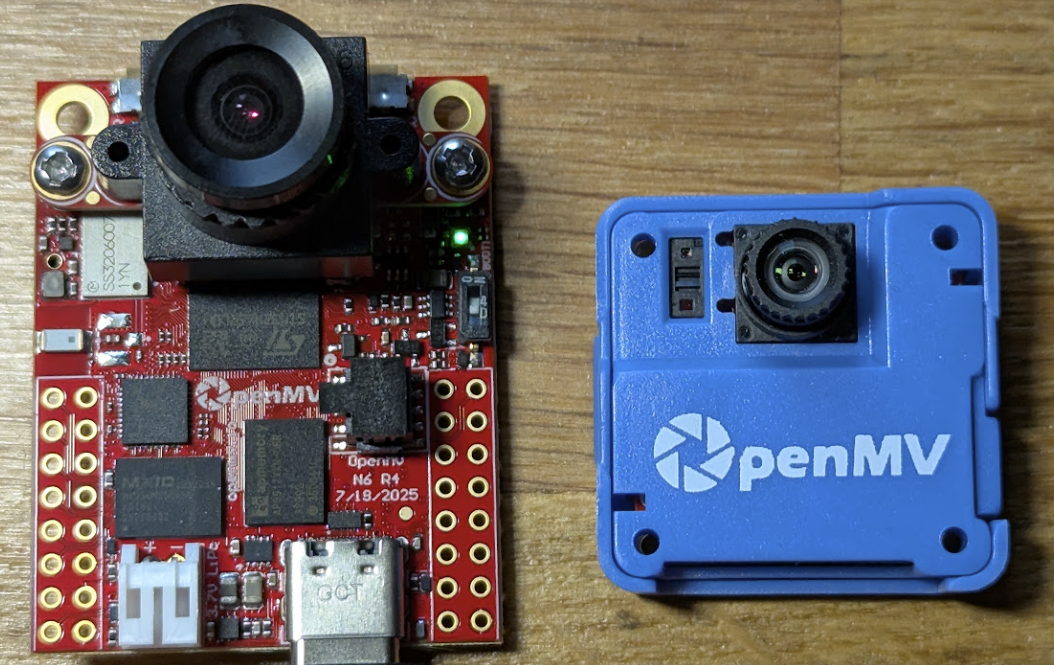
The board in Figure 1 is about 30 mm x 30 mm (just over one inch squared). It runs the same MicroPython firmware, the same IDE, the same csi and ml APIs as the N6. Part 1's YOLO example runs on it unmodified. It costs just over half the N6's price. And its power figures are impressive: 0.25 to 0.3 W while running YOLO object detection (50 to 60 mA at 5 V), 0.12 W idle, and a deep sleep of 80 µA at 3.3 V.
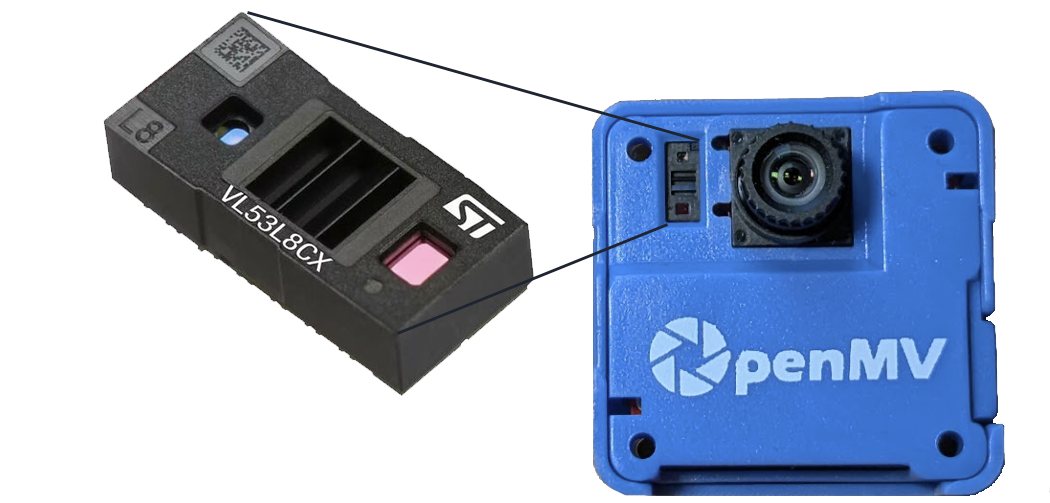
But the specification that shapes this article is not on the power line at all. The AE3 carries a second sensor that the N6 does not have: a VL53L8CX 8x8 multi-zone time-of-flight depth sensor, sitting beside the camera and looking in the same direction. It is nearly blind by the standards of the camera next to it. It cannot see colour, texture, or edges, and it could not tell you a person from a wheelie bin. What it can do, for a small fraction of the energy, is answer whether there is anything solid out there, and how far away is it?
That turns out to be the question worth asking first. A neural network that runs on every frame is a neural network that spends most of its life confirming an empty room, and the AE3's whole design philosophy, stated in its silicon and repeated in its peripheral list, is measure cheaply where cheap is possible, act expensively only when justified. So this article builds an AI doorman: the low power depth sensor watches continuously and cheaply, and the Ethos-U55 NPU is only permitted to look when something has actually arrived. The interesting output is not the detection, which Part 1 already covered, but the duty cycle: the fraction of the time the expensive half of the board needs to be awake at all.
/rom listing and the camera work below were captured on firmware v5.0.0, but the depth-sensor application was developed and validated on the development build that followed it (OpenMV 76b70280aa, MicroPython cf80cce8a0), after the released firmware refused to run OpenMV's own ToF examples on my board. The ToF, dual-core and low-power APIs here are all young: expect refinement, treat the official docs as the reference of record, and take firmware version as part of the specification.First, the model zoo
Before the tour, one line settles the portability question, because everything below depends on it. /rom is the read-only, memory-mapped model store Part 1 introduced for the N6, and this is what the AE3's firmware ships with:
import os

print(os.listdir('/rom'))
Gives the output:
['micro_speech.tflite', 'micro_speech.txt', 'audio_preprocessor.tflite',
 'fomo_face_detection.tflite', 'fomo_face_detection.txt',
 'person_detect.tflite', 'person_detect.txt',
 'yolo_lc_192.tflite', 'yolo_lc_192.txt', 'force_int_quant.tflite',
 'yolov8n_192.tflite', 'yolov8n_192.txt', 'blazeface_front_128.tflite',
 'face_landmarks_192.tflite', 'palm_detection_full_192.tflite',
 'hand_landmarks_full_224.tflite', 'movenet_singlepose_192.tflite',
 'haarcascade_eye.cascade', 'haarcascade_smile.cascade',
 'haarcascade_frontalface.cascade']

OpenMV v5.0.0; MicroPython v1.28.0-49; OpenMV-AE3 with AE302F80F55D5AE
Set that beside Part 1's listing and the comparison is more interesting than it first looks. The AE3's zoo is a superset of the N6's, on the same firmware version (v5.0.0): the same YOLO detectors, the same MediaPipe face and hand pipelines, the same MoveNet pose estimator, the same three 2000s-vintage Haar cascades, right down to the file names. So we have two different silicon vendors, two architecturally unrelated NPUs, and one identical model directory. Nothing was dropped to fit the smaller part, which is why Part 1's detector runs here unmodified.
Video 1. The same Hand Landmarks Single Hand demo running well on the OpenMV AE3 at 17 fps, against 22 fps on the N6. Note that the hand-landmark demo is a two-model chain, palm detection feeding a landmark model, so it runs slower than the single-shot YOLO figures quoted later on. Compare like with like when you read frame rates off either board.
What the AE3 adds is interesting: three files the N6 does not carry, and all three are audio. The micro_speech.tflite is a classic tiny keyword spotter (the TFLite Micro "yes/no" model, a few tens of kilobytes), micro_speech.txt is its label sidecar, and audio_preprocessor.tflite is the front end that turns raw microphone samples into the spectrogram the spotter expects, shipped as a network rather than as hand-written DSP code. That last choice is interesting, though do not assume it buys you NPU acceleration: OpenMV's own example describes the default preprocessor as the float one, and an Ethos-U55 is an integer engine, so the front end runs on the M55's Helium SIMD while only the quantised spotter reaches the NPU.
That is the board's approach in a directory listing. The AE3 has the camera as its bigger sibling and adds audio, because the always-on job this hardware exists for is frequently listening: keyword spotting is cheap enough to run continuously on the HE core and its 128-MAC NPU at single-digit milliwatts, waking the HP core and the big NPU only when a word justifies the expense. Notice that this is the same shape as the doorman built later, with a microphone in place of a ToF depth sensor. The board gives several cheap sentries and one expensive thinker.
An aside: the microphone in four lines of code
Those two audio files have a shipped example behind them, and it is the shortest machine-learning program in either part of this series. In the IDE it is at File → Examples → Machine Learning → TensorFlow → micro_speech.py, and this is all of it (trimmed of its licence header, with OpenMV's explanatory comments shortened):
import time
from ml.apps import MicroSpeech


def callback(label, scores):
    print(f'\nHeard: "{label}" @{time.ticks_ms()}ms Scores: {scores}')


# Defaults to the /rom audio_preprocessor + micro_speech pair. Either can be
# replaced: MicroSpeech(preprocessor=ml.Model(...), micro_speech=ml.Model(...),
# labels=["label", ...]).
speech = MicroSpeech()

# Given a callback, listen() starts the audio stream and loops forever, calling
# back on each detection. Given a timeout in ms instead, it returns if no
# keyword arrives before the timeout expires.
speech.listen(callback=callback, threshold=0.70)
Say "yes" and "no" at the board and the terminal fills up:
Heard: "No" @13019197ms Scores: array([0.0, 0.2788374, 0.02090993, 0.7003676], dtype=float32)
Heard: "Yes" @13023617ms Scores: array([0.0, 0.2519532, 0.7185202, 0.029871324], dtype=float32)
Heard: "No" @13025357ms Scores: array([0.01849725, 0.18347884, 0.09409464, 0.7039292], dtype=float32)
Heard: "Yes" @13027097ms Scores: array([0.02757353, 0.17474724, 0.715533, 0.08122702], dtype=float32)
Heard: "No" @13046477ms Scores: array([0.00827206, 0.2252987, 0.05503217, 0.711512], dtype=float32)
...
Three details in that output need some discussion. The four scores are [Silence, Unknown, Yes, No] and they are a softmax, so they sum to one: the model is not answering "did I hear yes?" but "which of four things was that?", and two of its four classes exist purely to say that was not a keyword. This is the standard defence against a classifier that would otherwise force every cough and door slam into "yes" or "no", and it is why the runner-up in almost every line is Unknown at 0.18 to 0.28. The model is hedging.
The winning scores cluster at 0.70 to 0.72, barely clearing the example's threshold=0.70, which tells you how much headroom a model of a few tens of kilobytes has: raise the threshold to 0.9 and you have built a device that never hears you. And MicroSpeech sits a level above anything in Part 1: no frame loop, no tensors, no post-processor to select, just an object that calls you back when it hears a word. The ml.apps structure is where OpenMV's abstractions are heading, and audio is there first. The large timestamps are time.ticks_ms(), milliseconds since boot, so read the differences rather than the absolutes: about 1.7 s between the closest pair above.
threshold=0.70 means the same thing across models and classes; and the outputs sum to exactly 1, so the classes compete, in that score can only be given to "Yes" by taking it away from the other three.That second property is what makes the full array worth printing rather than just the winning label. A "Yes" at 0.72 alongside
Unknown at 0.17 is the model saying "probably a keyword, and if so it was yes", whereas the same 0.72 sitting beside a large Silence share would mean something quite different about your microphone. The caveat worth noting: softmax outputs look like probabilities but are not calibrated ones. A 0.72 does not mean the model is right 72% of the time, and small quantised models tend to be over-confident. Read them as a ranking on a comparable scale, which is all a threshold needs, and not as a statement of probabilistic odds.The silicon: Alif's Ensemble E3, and why it is worth knowing
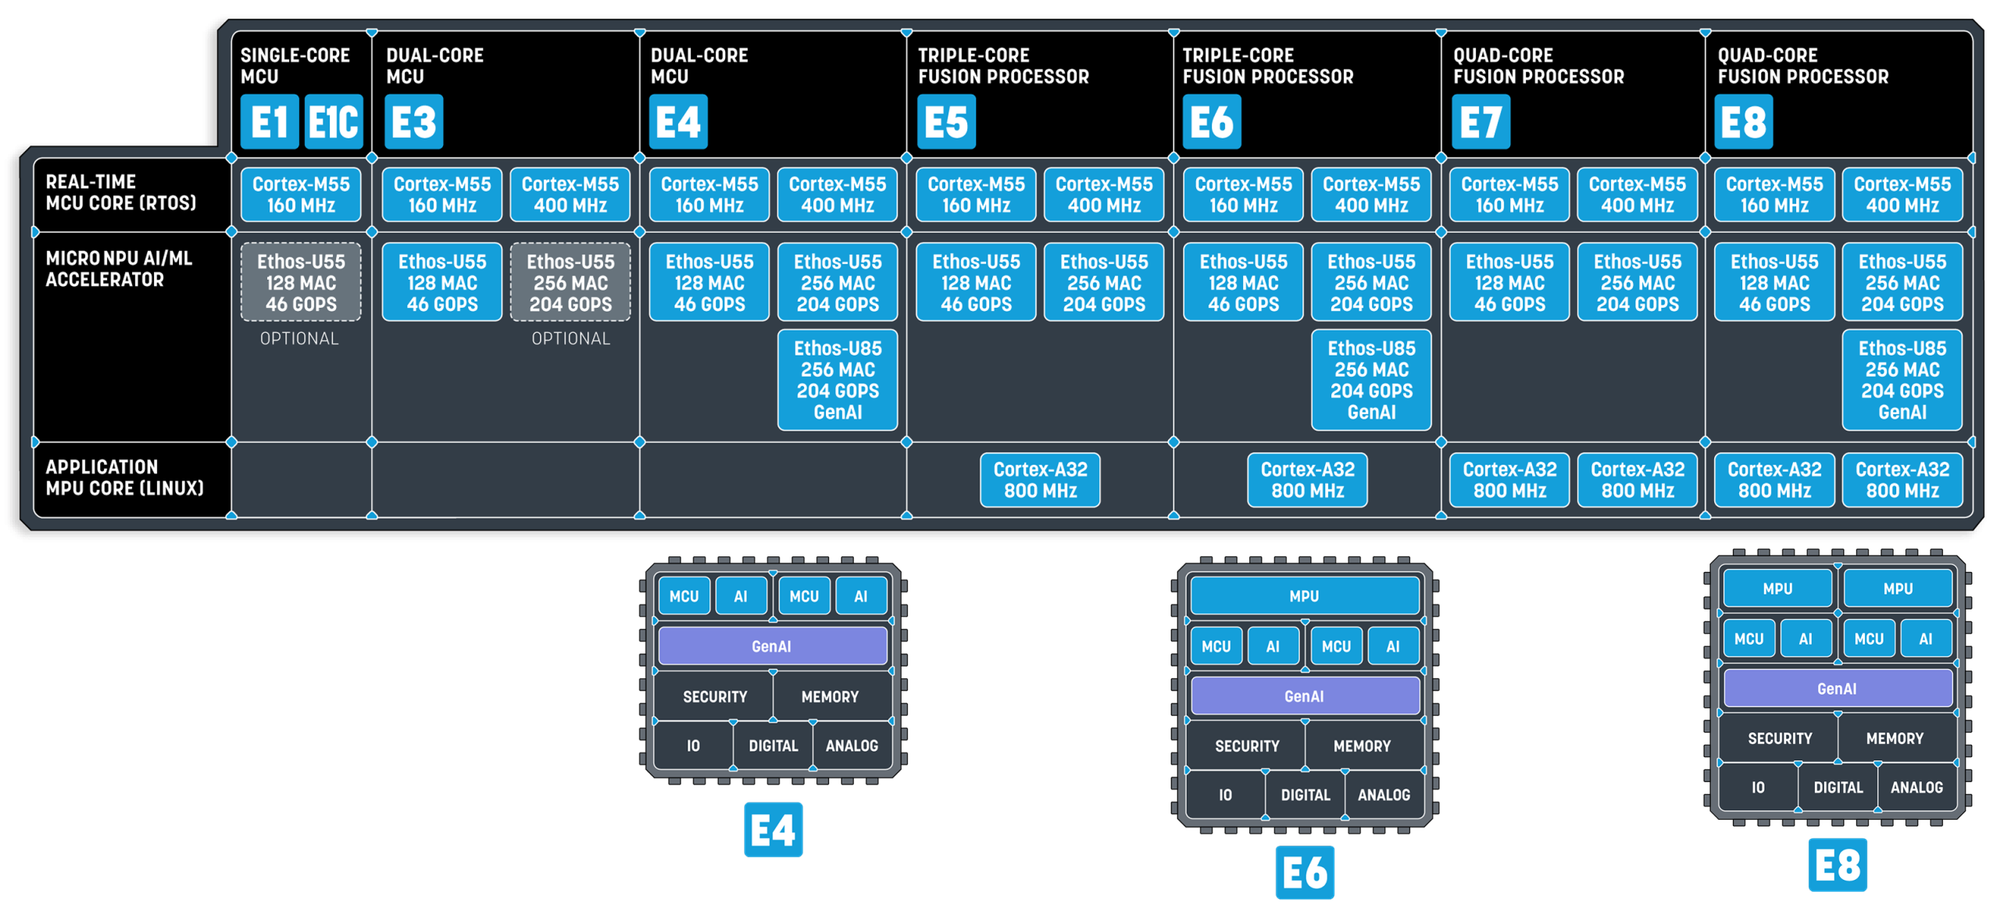
The N6 was built around ST's first NPU-bearing microcontroller. The AE3 is built around a chip from a company many embedded engineers have not met yet, and it merits introduction. Alif Semiconductor is a start-up that has spent the past few years shipping what the big vendors kept announcing: heterogeneous microcontrollers designed around AI and power management rather than with them bolted on. The Ensemble E3 in the AE3 packs, into a 6 × 7 mm package:
- Two Cortex-M55 cores: a High-Performance (HP) core at 400 MHz and a High-Efficiency (HE) core at 160 MHz, each with Helium SIMD and a double-precision FPU. OpenMV quote them at roughly 640 and 256 DMIPS, or CoreMark 1748 and 752, against about 3800 for a Raspberry Pi 3, which is a useful piece of calibration: the classical (non-NPU) parts of your program run at Pi-3-ish speed on the big core, and the NPUs are what carry the neural work.
- Two Ethos-U55 microNPUs, one paired with each core: a 256-MAC unit for the HP core, a 128-MAC unit for the HE core, together good for some 250 GOPS.
- 13.5 MB of SRAM, an enormous figure for a microcontroller, and enough that camera frames and models coexist without the N6's external DDR.
- 5.5 MB of MRAM as its non-volatile program store.
Two of those need discussion, because they carry the board's whole philosophy.
The big.LITTLE arrangement, with NPUs to match. Phones have paired fast and light cores for fifteen years; Alif brought the idea to microcontrollers and gave each core its own neural accelerator. The intended shape of an application: the HE core and its small NPU run always-on, low-rate work (listening for a wake word, watching a low-resolution stream for motion) in single-digit milliwatts, and wake the HP core and its big NPU only when something needs real attention. It is the UNO Q's dual-brain lesson from my other series, but at one-thousandth the power: measure cheaply where cheap is possible, act expensively only when justified. That concept is important here, because the AI doorman example below is its simplest expression, with a peripheral standing in for the second core.
MRAM instead of flash. The E3's program memory is magnetoresistive RAM: non-volatile like flash, but writable in place at RAM-like speeds without flash's block-erase ceremony and with effectively unlimited endurance. For our purposes its virtue is power and instant-on behaviour (no external flash to power up and stream from before the first instruction), which matters enormously for a device that wakes hundreds of times a day. The 32 MB external octal flash is still there, but as a model and data store, streaming networks at 200 MB/s, not as the boot medium. If you appreciated N6's flashless-SoC in the last blog discussion, you will appreciate the symmetry: ST solved "MCU flash is too small for AI" with external everything; Alif solved it with a different memory technology entirely.
Worth noting too that the microNPUs are options on these parts rather than fixtures, so the "two NPUs" story belongs to the specific device OpenMV chose rather than to every E3 in a catalogue. Across this Edge AI line, up to two U55s at 400 MHz is what produces the 250+ GOPS quoted for the AE3.
Then there is the newer tier, whose numbering interleaves awkwardly with the old one: the E4, E6 and E8 are Alif's Edge AI + Gen AI parts. What they did with the accelerators is the interesting part, because it is not a swap. The two Ethos-U55s stay, and a single Ethos-U85 is added beside them, rated at 204 GOPS at 400 MHz and taking the combined figure past 450 GOPS. The U85's value is not throughput: 204 GOPS from a 400 MHz clock implies a configuration of roughly 256 MACs on the usual two-operations-per-MAC reckoning, which is the same scale as the E3's larger U55. Its value is hardware acceleration for transformer networks, which the U55 generation does not have at all, and which Alif claim makes these the first microcontrollers to offer it. So U55 against U85 is the axis to shop along if a product might eventually want attention-based speech or language models running locally. Nothing in this post needs it, as YOLOv8 and MediaPipe are thoroughly convolutional, but the U55's fixed operator set is the other half of that thought: an unsupported layer does not fail loudly, it falls back to the CPU and quietly takes your frame rate with it, which is a good part of why a curated
/rom zoo is so much more pleasant than an arbitrary .tflite off the internet.This is a summary of the Alif product information at: https://alifsemi.com/products/ensemblegenai/
The OpenMV AE3 Hardware
From the OpenMV specs:
Here I focus on the rows that shape AE3 projects:
- The depth sensor is the key difference, and the reason for the rest of this article. It gets its own section below.
- The power column is the product, and OpenMV publish it in enough detail to design against rather than guess at: 50 to 60 mA at 5 V running (0.25 to 0.3 W), 24 mA idle (0.12 W, a figure their own specs mark "to be improved"), and 80 µA at 3.3 V asleep. To calibrate that last one, 80 µA is the consumption class of a decent LED alarm clock, on a device that opens its eye and runs a YOLO when asked. Be careful when you do arithmetic with these, though, because as far as I can see, the running figures are quoted at 5 V and the sleep figure at 3.3 V.
- 3.3 V, and no more. This is the row that damages hardware if skipped: the AE3's pins are not 5 V tolerant. It is 3.3 V in and 3.3 V out, up to 25 mA sourced or sunk per pin, and no more than 250 mA drawn in total from the 3.3 V rail (which the board itself will supply to your circuit when it is running from USB, unless something else is already driving it). Wire it directly to a 5 V Arduino Mega or Uno and you will damage it, so use a level shifter or talk only to 3.3 V parts. Qwiic is 3.3 V by definition, so the intended expansion path is safe by construction; the 250 mA budget is the number to hold on to once you start hanging sensors off the board.
- The lens numbers are interesting. The optic is specified for a 1/2.7" image circle and quoted at up to 79° horizontally, but the PAG7936 behind it is a 1/4" sensor, so what you actually get is the measured D72.5° / H63.8° / V42.3°: the optical lens over-covers the sensor and you live with the crop. Always take the sensor-and-lens figure rather than the lens figure when you are working out whether a doorway fits in frame, and at H63.8° this one spans about 2.5 m across at 2 m distance, which is a doorway and its frame. Keep that number, because we compare it with the depth sensor's cone shortly.
- What gave, then? Returning to Part 1's question, the answer is speed and wired infrastructure. 250 GOPS against 600, so the same YOLOv8n runs at about 17 FPS rather than 27; the sensor is the same PAG7936 but clocked at half the N6's rate in the binned modes and a quarter of it at full 1280×800 resolution; no Ethernet, no CAN, no µSD; and the optic is a smaller M8 mount with a fixed lens rather than the N6's M12 on a removable module. What did not give: the sensor is still 1 MP global shutter, the firmware and APIs are identical, the memory is arguably better balanced, and you gain a depth sensor the flagship N6 does not have.
The other sensor: a VL53L8CX, which is a depth camera in disguise
The AE3's second sensor is easy to under-sell, because "time-of-flight rangefinder" sounds like a part that reports one number. This one does not. The VL53L8CX is ST's 8×8 multi-zone direct time-of-flight sensor, and each frame it hands back 64 independent distance measurements arranged in a grid, each in millimetres, out to about 4 m. It is a depth camera with a very low resolution, and thinking of it that way rather than as a rangefinder is what unlocks the applications.
How it actually measures. Direct ToF is conceptually the radar you already understand: emit a pulse, time the echo, halve it, multiply by the speed of light. The VL53L8CX emits from a 940 nm VCSEL (a vertical-cavity surface-emitting laser, invisible to people and Class 1 eye-safe) and receives on an array of SPADs, single-photon avalanche diodes, each of which can register the arrival of one photon. Think about what this timing implies. Light covers about 30 cm in a nanosecond, so a round trip to a target 1 mm further away arrives just 6.7 picoseconds later. No microcontroller clock can resolve that directly. Instead the sensor fires the VCSEL many thousands of times per measurement and builds a histogram of photon arrival times per zone; the peak of that histogram is the target, and averaging over many photons buys the timing precision that no single measurement could. This is also why ambient light is the enemy: sunlight floods the SPADs with photons that belong to no pulse at all, which is exactly the axis on which this part improved over its predecessor.
Two metasurface lenses, and why they matter. The VL53L8CX carries a pair of metasurface lenses, one shaping the VCSEL's output into the 8×8 grid of illuminated patches and one over the SPAD array. That replaces the diffractive optics of the older VL53L5CX and gives a substantial improvement in bright light: in 5000 lux, roughly bright indirect sunlight, the VL53L8CX ranges to about 2.8 m where the VL53L5CX managed 1.7 m. For a doorman that has to work in a sunlit hallway rather than my research lab, that is the difference between a usable sensor and a frustrating one.
The numbers you will design against for this sensor:
Two of those rows need to be noted against the camera's specification a few paragraphs above.
The cones nearly match, and the depth cone is the smaller one. The camera as fitted sees 63.8° horizontally; the depth sensor sees 45°. So the volume the ToF watches is a narrower cone sitting inside the camera's frame, which is a convenient design, as anything the depth sensor notices should be comfortably within the picture the camera will take. It also sets the geometry of your gate. At 2 m, a 45° cone is about 1.66 m across, so a person walking through it is unmissable, while someone crossing the room at 4 m diagonally may clip only the edge zones. The two apertures are physically offset on the board, so there is a parallax error between them that matters at close range and vanishes at distance; worth checking at half a metre before you trust the alignment.
Resolution is not accuracy. The sensor reports millimetres. It does not measure to a millimetre. The quoted 1 mm figure is the granularity of the number it hands you, and the actual error depends on target reflectivity, distance, and how much sunlight is competing with your VCSEL. Treat the readings as good to a few centimetres in the near field and degrading with range, and design gates with margin rather than precision.
And some of the 64 numbers are not measurements at all. This is the single most important practical thing to know about the data that I experienced: zones that failed to find a target come back as negative distances. Pointing the board at an ordinary room, my frames arrived with minima around -500 mm and maxima around 4600 mm, the latter beyond the sensor's own 4 m specification. Both are the driver's way of saying no confident answer here, and neither is a distance. The consequence for your code is that a naive test such as if min(depth) < TRIGGER_MM is not just unreliable, it is guaranteed to fire, because a zone reporting -500 mm satisfies it perfectly. Every gate must be bounded at both ends.
What it can and cannot do
The depth sensor cannot identify anything. It has no colour, no texture, no edges, and 64 pixels. A person at 1.5 m and a cardboard box at 1.5 m are indistinguishable to it. That is not a shortcoming to work around, it is the division of labour:
- The VL53L8CX answers "is something there, and where?" cheaply, continuously, in the dark, and without caring what the thing is.
- The Ethos-U55 answers "what is it?" expensively, and only needs to be asked when the first question has already returned yes.
It is also worth comparing with the sensor this replaces in most designs. The classic trigger for a trail camera or a security light is a PIR, a passive infrared detector, which is cheaper still and draws almost nothing. But a PIR detects change in thermal radiation, which gives it three weaknesses the ToF does not share. It ignores a stationary person; it is fooled by warm air currents, sunlight moving across a floor, and small animals; and it reports a single bit, so you cannot ask it how far away or in which direction. The VL53L8CX measures geometry instead of heat, so it sees the person who has stopped moving, it gives you a distance you can gate on, and its 64 zones let you write logic a single bit cannot support:
- Range gating. Trigger only between 0.5 m and 2 m, so the corridor beyond the doorway is ignored entirely.
- Approach detection. Watch the minimum distance across successive frames. Falling means approaching, rising means leaving, and only one of those is worth a photograph.
- Direction and rough size. Which columns of the grid are occupied tells you left or right; how many zones are occupied separates a person from a cat.
- Noise rejection. Requiring several adjacent zones to agree throws away the single-zone glitches that would otherwise trigger your NPU for a moth.
The OpenMV tof software module
OpenMV exposes the sensor through a module called tof, and it is as small an API as the camera's:
import tof

tof.init()                                   # autodetects the onboard sensor
print(tof.width(), "x", tof.height())        # 8 x 8

depth, dmin, dmax = tof.read_depth(timeout=200)
print(len(depth), "zones,", dmin, "mm to", dmax, "mm")
read_depth() returns a three-element tuple: the list of per-zone distances in millimetres, then the minimum and maximum of that frame. It also takes hmirror, vflip and transpose arguments, which exist because a depth grid has an orientation and it may not match the camera's until you tell it to. There is tof.reset() and tof.deinit() for lifecycle, and a constant tof.TOF_VL53LX naming this 8×8 sensor family.
There are two further functions that render the depth field as an image, tof.snapshot() and tof.draw_depth(), the first returning a false-colour image.Image and the second compositing a depth array onto an existing frame. They are the obvious way to watch the sensor's view in the IDE, and on the firmware I tested they are also the one part of this module that does not seem to work.
OpenMV 76b70280aa), any call into the depth-rendering path took the AE3 down hard: no output, no frame buffer, an unresponsive board, and then Windows reporting Unknown USB Device (Device Descriptor Request Failed) until I power-cycled it. Reading depth is completely reliable. Twenty consecutive read_depth() calls ran without a stumble, and the person detector alongside them was fine. OpenMV's own shipped tof_overlay.py example fails in exactly the same way on the same board, so this is a firmware bug rather than anything you can code around.Two lessons travel beyond this specific bug. The first is that a
try/except around it buys you nothing: the driver faults in C, below the interpreter, and a hard fault is not a Python exception, so the handler never runs. When a call can take the whole board down, defensive Python is the wrong instrument and the right one is not calling it. The second is a debugging trap. Because print() output travels over the same USB that dies, everything still sitting in the buffer is lost, so a crash presents as a board that produced no output at all rather than as a board that stopped after a particular line. Put a short time.sleep_ms() after each diagnostic print while you are bisecting, or you will be reading an empty terminal and drawing the wrong conclusions.The application below therefore visualises the depth field as ASCII in the terminal, which needs no driver rendering at all. That turned out to be a happy accident: 64 zones is small enough to print as eight lines of text, and text pastes into an article far better than a screenshot of a heat-map.
Setup, and what is different from Part 1 on the N6
Setup is Part 1's five minutes verbatim: same IDE, same connect-update-run flow, same live frame buffer. The portability is impressive too. I only had to open Part 1's yolo_v8_detector.py (the OpenMV example even carries the note "requires an OpenMV Cam with an NPU like the AE3 or N6"), press run, and the AE3 draws boxes around people, the Ethos-U55 doing exactly what the Neural-ART did on the N6. Two boards from different silicon vendors, with architecturally unrelated NPUs, behind one four-line Python idiom, clearly resulting from OpenMV's decade of development.
Run Part 1's people counter if you like (as in Figure 4); it works at the AE3's more modest frame rate of about 17 fps (compared with 27 fps on the N6), and for a doorway that is still plenty.
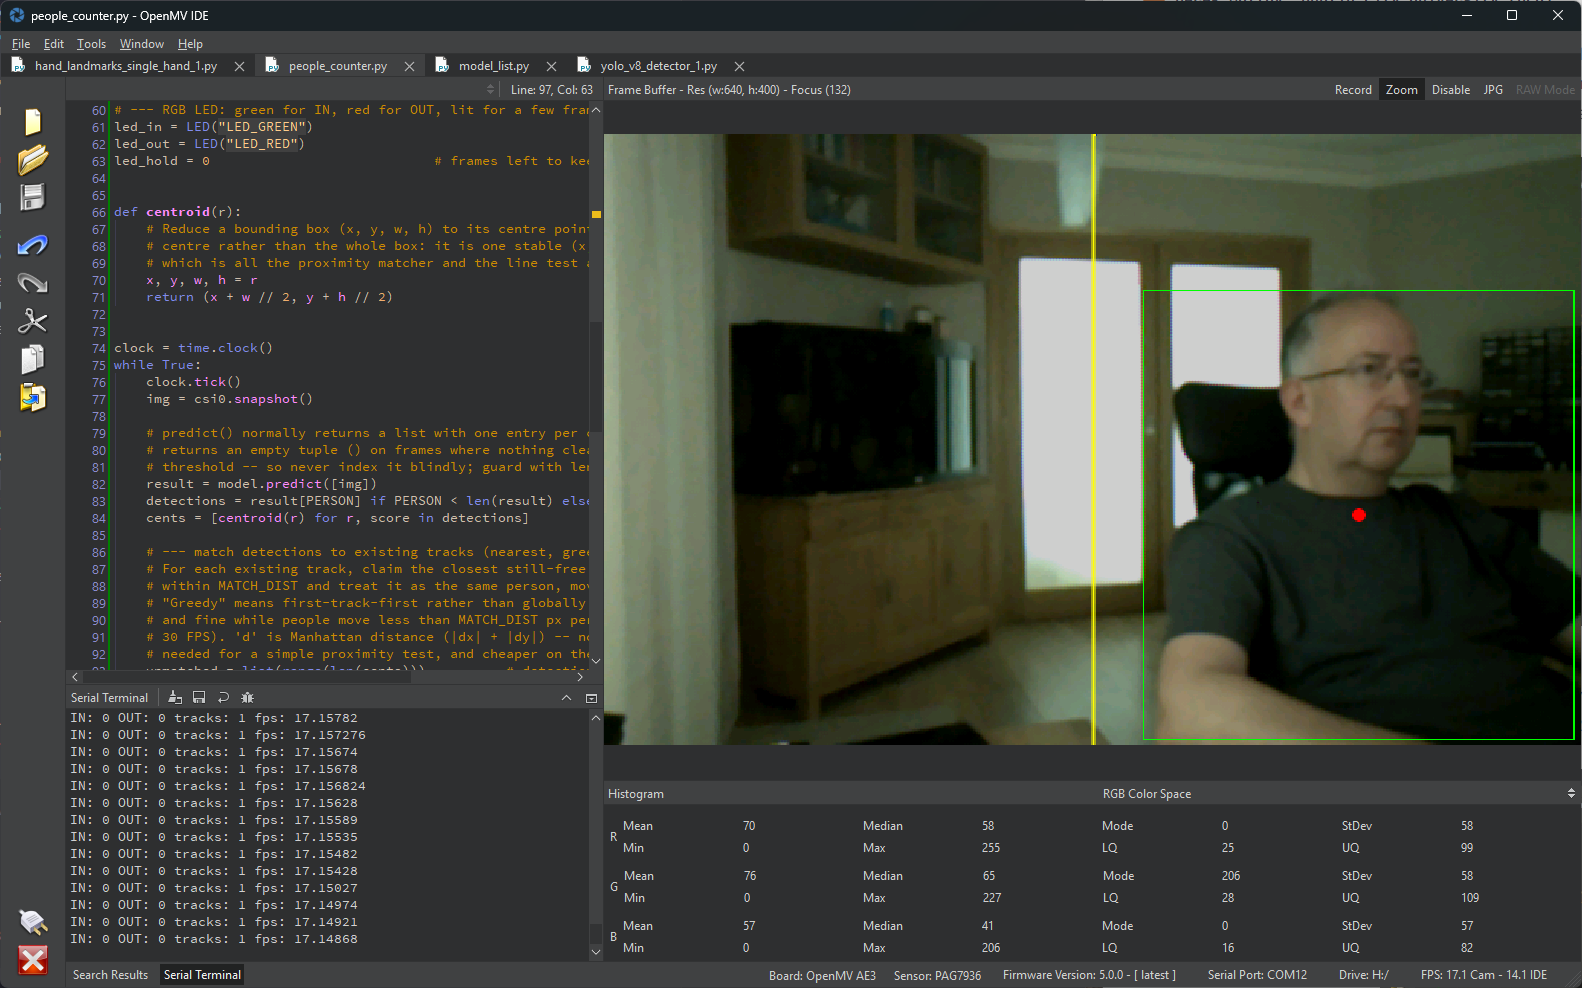
One detail worth catching while you are here, because it will cause problems if you write coordinates by hand. csi0.framesize(csi.VGA) does not give you 640×480 on this board. The IDE's frame buffer reports 640×400, because the PAG7936's binned mode is 640×400 and the firmware gives you the sensor's native geometry rather than padding it out to a 4:3 rectangle that does not exist in hardware. If you port Part 1's people counter across and its counting line sits at LINE_X = 320 you will be fine, but anything indexed against an assumed 480-pixel height will be quietly wrong. Print img.height() once and believe it rather than assuming the constant's name.
But benchmarking the AE3 as a slower N6 misses the product, and 17 fps of continuous YOLO is precisely the thing we are about to stop doing.
The application: an AI doorman for the NPU
Here is the AE3-shaped problem. Watch a doorway. Run a person detector only when there is something to detect, and prove how rarely that is.
The design falls out of the two sensors' relative costs. The depth sensor polls continuously, which is cheap. When several of its 64 zones report something solid within a plausible visitor range, and not in the last few seconds, the camera takes a frame and the NPU runs YOLOv8 on it. Every pass through the loop prints what the gate decided and the running duty cycle, so the terminal is a live readout of how much work the board is not doing.
Crucially, all of this runs in a while True: loop with USB attached, so you can watch it, tune the thresholds by walking towards the board, and see the depth field in the frame buffer while you do. Nothing here disconnects the IDE, which is the practical difference between this application and the sleeping variant discussed at the end.
# tof_doorman.py -- OpenMV AE3 (derekmolloy.ie)
# The VL53L8CX decides WHEN to look; the Ethos-U55 decides WHAT is there.
#
# Five steps, once per pass:
#   1. POLL  - read 64 distances from the depth sensor. Cheap.
#   2. GATE  - decide whether anything worth photographing has arrived.
#   3. LOOK  - only if the gate opened: one frame, one YOLO inference.
#   4. REPORT- the decision, the running duty cycle, and the zone grid.
#   5. WAIT  - rate-limit the poll. See the notes: this one matters.

import time
import tof
import csi
import ml
from ml.postprocessing.ultralytics import YoloV8

# --- the gate policy: these numbers ARE the application ---
NEAR_MM = 1800          # a visitor is something closer than this...
FLOOR_MM = 150          # ...and FURTHER than this. Zones that found no
                        # target return NEGATIVE distances, so the lower
                        # bound is what tells measurements from failures.
MIN_ZONES = 3           # ...seen in at least this many of the 64 zones.
                        # One zone is noise; three is an object. This line
                        # alone rejects most moths.
COOLDOWN_MS = 3000      # after a look, stand down. Without this, one
                        # visitor standing still triggers every pass.
POLL_MS = 100           # ~10 Hz. Polling faster than the sensor produces
                        # frames just re-reads the frame you already had.
THRESHOLD = 0.55        # YOLO confidence, as in Part 1
GRID_EVERY = 10         # print the ASCII zone grid every N quiet polls

RAMP = ".:-=+*#%@"      # far '.' to near '@'. NO space in the ramp: a
                        # blank cell must mean "no reading" and nothing
                        # else, or a visitor at the far edge of the window
                        # is indistinguishable from an empty doorway.


def depth_ascii(depth, w, h):
    """The depth field as eight lines of text.

    The driver's own rendering calls crash the board on current firmware
    (see the warning above), and this needs none of them. Each character is
    one zone, the ramp runs far to near, and a space means the zone had no
    valid reading.
    """
    rows = []
    span = NEAR_MM - FLOOR_MM
    for r in range(h):
        line = ""
        for c in range(w):
            d = depth[r * w + c]
            if d < FLOOR_MM or d > NEAR_MM:
                line += " "                     # no valid reading
            else:
                frac = 1.0 - (d - FLOOR_MM) / span      # 1.0 = nearest
                i = min(int(frac * len(RAMP)), len(RAMP) - 1)
                line += RAMP[i]
        rows.append("    |" + line + "|")
    return rows


# --- the energy cheap ToF sensor ---
tof.init()                                  # VL53L8CX, autodetected
TW, TH = tof.width(), tof.height()          # 8 x 8

# --- the energy expensive sensor, configured but idle ---
cam = csi.CSI()
cam.reset()
cam.pixformat(csi.RGB565)
cam.framesize(csi.VGA)

model = ml.Model("/rom/yolov8n_192.tflite", postprocess=YoloV8(threshold=THRESHOLD))

# Resolve "person" defensively, the same lesson as Part 1: model.labels
# comes from a sidecar .txt file that can be empty or carry stray whitespace,
# so clean it and fall back to class 0 rather than a bare .index().
_labels = [s.strip().lower() for s in (model.labels or [])]
PERSON = _labels.index("person") if "person" in _labels else 0

polls = 0                       # times the depth sensor was read
looks = 0                       # times the NPU actually ran
detections = 0                  # times it found a person
last_look = time.ticks_ms() - COOLDOWN_MS

print("doorman running -- walk towards the sensor")

while True:
    polls += 1
    t0 = time.ticks_ms()

    # --- 1. POLL ---------
    # 64 distances in mm, plus the frame min and max. vflip/hmirror align
    # the grid with the camera's orientation. Guarded because OpenMV guard
    # it in their own example.
    try:
        depth, dmin, dmax = tof.read_depth(vflip=True, hmirror=True)
    except Exception as e:
        print("read_depth failed:", e)
        time.sleep_ms(POLL_MS)
        continue

    # Filter FIRST. dmin is tempting as "the nearest thing" but it includes
    # the invalid zones, and those are negative, so dmin < NEAR_MM is true
    # on essentially every frame whether anyone is there or not.
    hits = [d for d in depth if FLOOR_MM < d < NEAR_MM]
    nearest = min(hits) if hits else 0

    # --- 2. GATE -----
    # This branch is the entire point of the application: it is the
    # difference between running a neural network ten times a second and
    # running it when somebody actually turns up.
    now = time.ticks_ms()
    rested = time.ticks_diff(now, last_look) > COOLDOWN_MS
    open_gate = len(hits) >= MIN_ZONES and rested

    people = []
    if open_gate:
        last_look = now
        looks += 1

        # --- 3. LOOK ---
        img = cam.snapshot()
        result = model.predict([img])
        # predict() returns an empty tuple () rather than a per-class list
        # when nothing clears the threshold, so never index it blindly.
        people = result[PERSON] if PERSON < len(result) else []
        if people:
            detections += 1
            for r, score in people:
                img.draw_rectangle(r, color=(0, 255, 0))

    # --- 4. REPORT ---
    if open_gate:
        print("LOOK  %2d zones, nearest %4d mm -> %d people   "
              "[NPU %d of %d polls = %.2f%%]"
              % (len(hits), nearest, len(people), looks, polls,
                 100 * looks / polls))
    elif polls % GRID_EVERY == 0:
        print("watch %2d zones, nearest %4d mm   "
              "[%d polls, %d looks, %d detections]"
              % (len(hits), nearest, polls, looks, detections))
        for row in depth_ascii(depth, TW, TH):
            print(row)

    # --- 5. WAIT ---
    spent = time.ticks_diff(time.ticks_ms(), t0)
    if spent < POLL_MS:
        time.sleep_ms(POLL_MS - spent)
Running it and standing in front of the board gives this, which is the whole application in one screenful:
watch 44 zones, nearest  333 mm   [2310 polls, 75 looks, 70 detections]
    |   +*@%*|
    |   * %**|
    |* **+++*|
    | * + ++*|
    |     ***|
    | *+ ****|
    |  ++****|
    |+++**+**|
LOOK  48 zones, nearest  359 mm -> 1 people   [NPU 76 of 2318 polls = 3.28%]
watch 46 zones, nearest  780 mm   [2320 polls, 76 looks, 71 detections]
    |   * ***|
    |* * ++**|
    |* *++++*|
    | ++ +++*|
    |  + +*+*|
    |  + ****|
    |  + ****|
    |+++**+**|
Reading the grid. Each character is one of the 64 zones, laid out as the sensor sees them, and the ramp runs from far to near:
With FLOOR_MM = 150 and NEAR_MM = 1800, the nine symbols divide that 1650 mm window into buckets of about 183 mm each, so @ is roughly 150 to 330 mm, + is around 880 to 1070 mm, and . is the far edge near 1.8 m. Adjust either constant and the whole scale stretches with it, which is the point: the picture is always scaled to the range you care about rather than to the sensor's four-metre maximum.
A blank is the one symbol that is not a distance. It means the zone returned nothing usable, which on this sensor means a negative reading or something beyond the window, and it is why the invalid values discussed earlier never need special handling in the display: they simply do not draw.
Video 2. I wrote a short Python matplotlib script to plot the ASCII data above based on the ASCII art depth key. The code is available at the bottom of this page.
Read the two frames against that key and they tell a small story. In the first, most of the field is * and +, so a body occupying the view between roughly 0.7 and 1.1 m, with one @ and a pair of % cells clustered at the top right: something within about 350 mm, far closer than everything around it. The nearest 333 mm on the header line is that cluster, and it agrees with the grid to the millimetre. Ten polls later, in the second frame, the near cluster has gone entirely, nothing reads closer than *, and nearest has jumped to 780 mm. The grid and the summary line are telling you the same thing twice, which is exactly what you want from a diagnostic.
Note also the scattering of blanks throughout both frames, in a scene that is plainly occupied. That is normal and worth expecting. Dark clothing, tight angles and low-reflectivity surfaces all return too few photons to range, so a zone can find nothing even with a person directly in front of it. It is a useful reminder that this sensor measures returned light rather than presence, and it is one more argument for MIN_ZONES over trusting any single cell.
And here it is running – note: the video display should be discontinous if the application is working correctly, as explained below:
Video 3. The doorman at work. The camera view carries YOLO's annotations; the depth grid at the bottom left is what decides whether YOLO runs at all.
One detail in that video requires attention. The depth panel at the bottom left leads the camera image rather than accompanying it, because the depth reading is what triggers the inference in the first place. So what you are watching is the gate reaching its decision, followed by the picture that decision produced. I start in frame but off to the right (i.e., fish tank on the left), then move away from the camera, and the zone grid registers both movements a moment before the annotated frame catches up with them. That visible lag is not a glitch – it is the architecture of the whole application, demonstrated.
The duty cycle lands where the arithmetic says it should
Examining that middle line: 76 looks in 2318 polls, or 3.28%. Working out why is the important part of this application. I was in front of the sensor for the whole run, so the gate was permanently satisfied: something was always within range, in far more than MIN_ZONES zones. This is the pathological case, the one that breaks a naive gate, and in it the only thing limiting the NPU is the cooldown. So the ceiling is forced:
- One poll every
POLL_MS= 100 ms, so ten polls per second. - At most one look every
COOLDOWN_MS= 3000 ms. - Therefore one look per thirty polls at most: 1/30 = 3.33%.
The measured 3.28% sits just below that, and the small shortfall is itself explicable rather than noise. The cooldown is only tested when a poll comes round, so a 3000 ms cooldown effectively rounds up to the next poll boundary: depending on where the timer falls relative to the loop, successive looks are 30 or 31 polls apart, which brackets the duty cycle between 3.23% and 3.33%. Landing at 3.28% is precisely the middle of that bracket. This is worth a moment because it is a general property of gates driven by a polled clock rather than an interrupt: your effective interval is always the requested one rounded up to the polling grid, and if that matters to your design you should be sampling faster or timing differently.
Either way the important claim holds. A person standing in front of this camera indefinitely cannot push the NPU past one inference per cooldown period, so the worst case is bounded by construction. Change those two constants and you define your own ceiling: a 10 s cooldown at the same poll rate caps it near 1%.
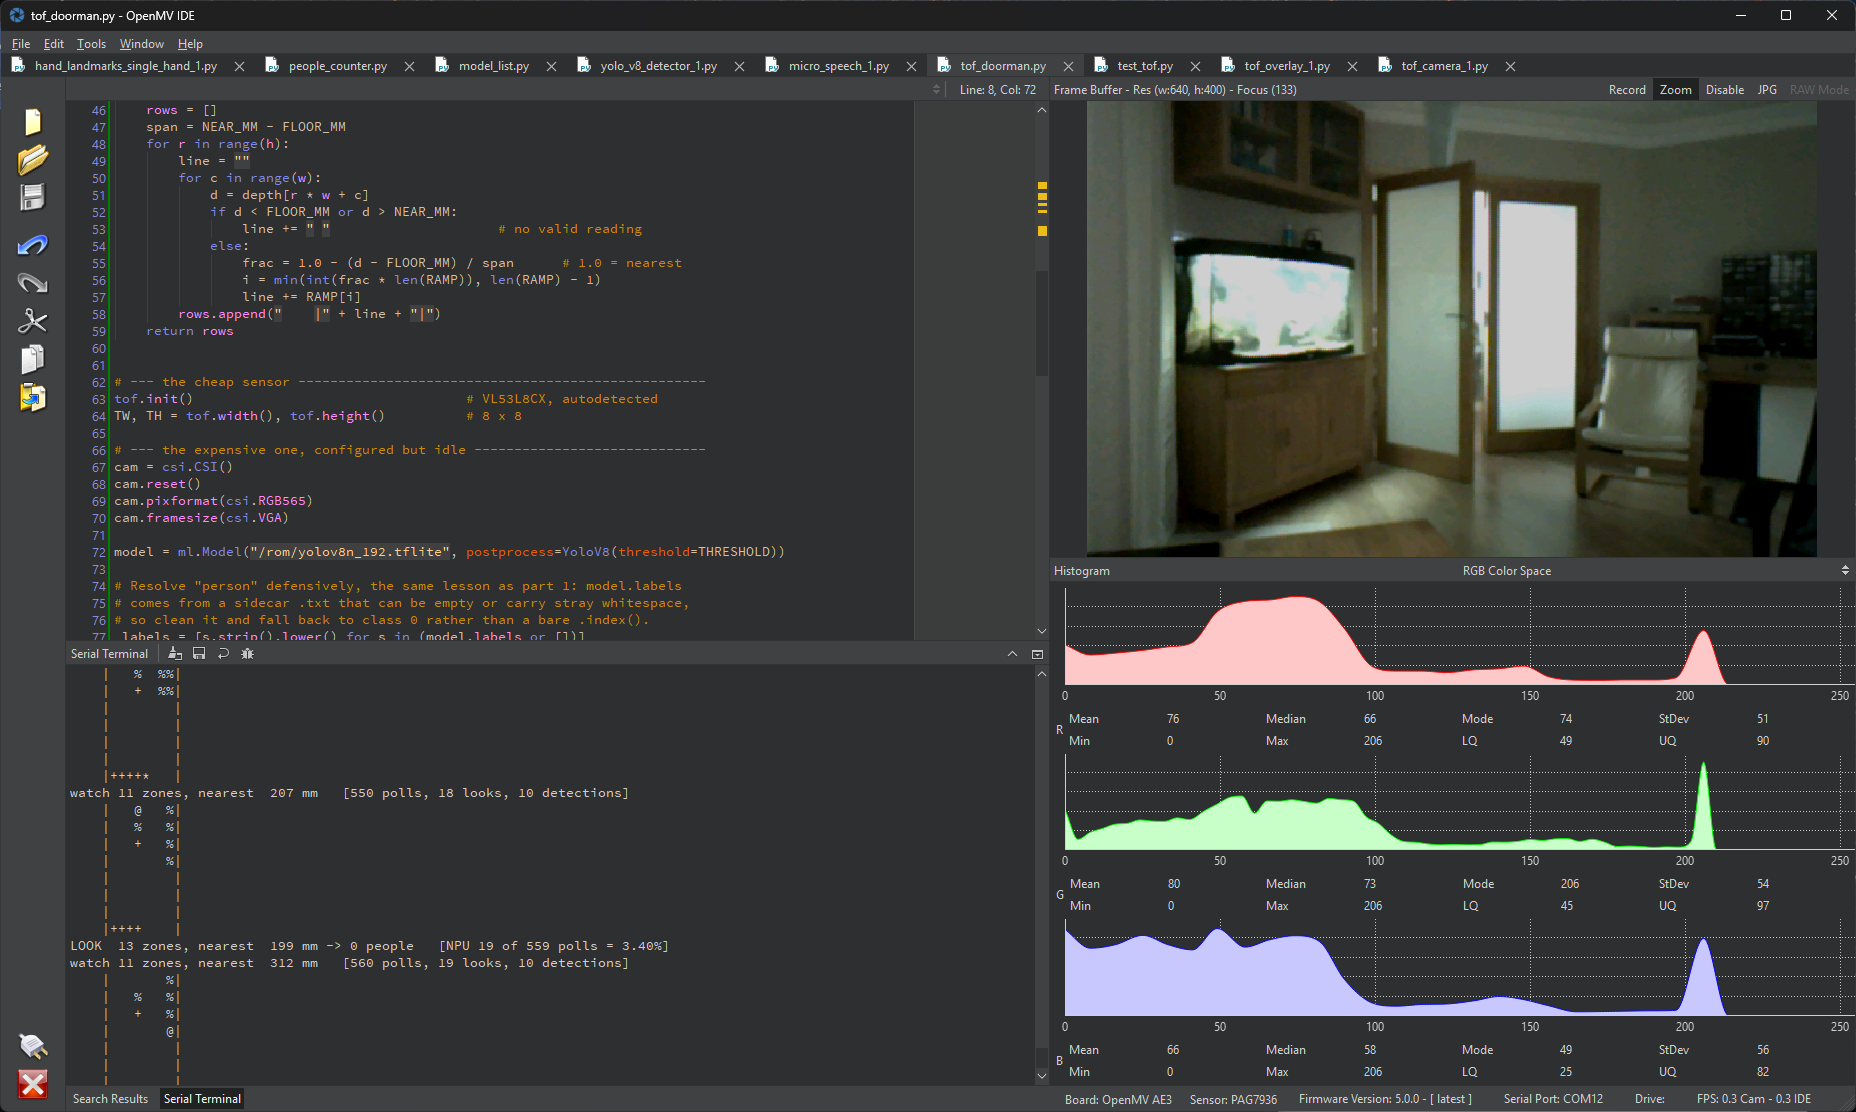
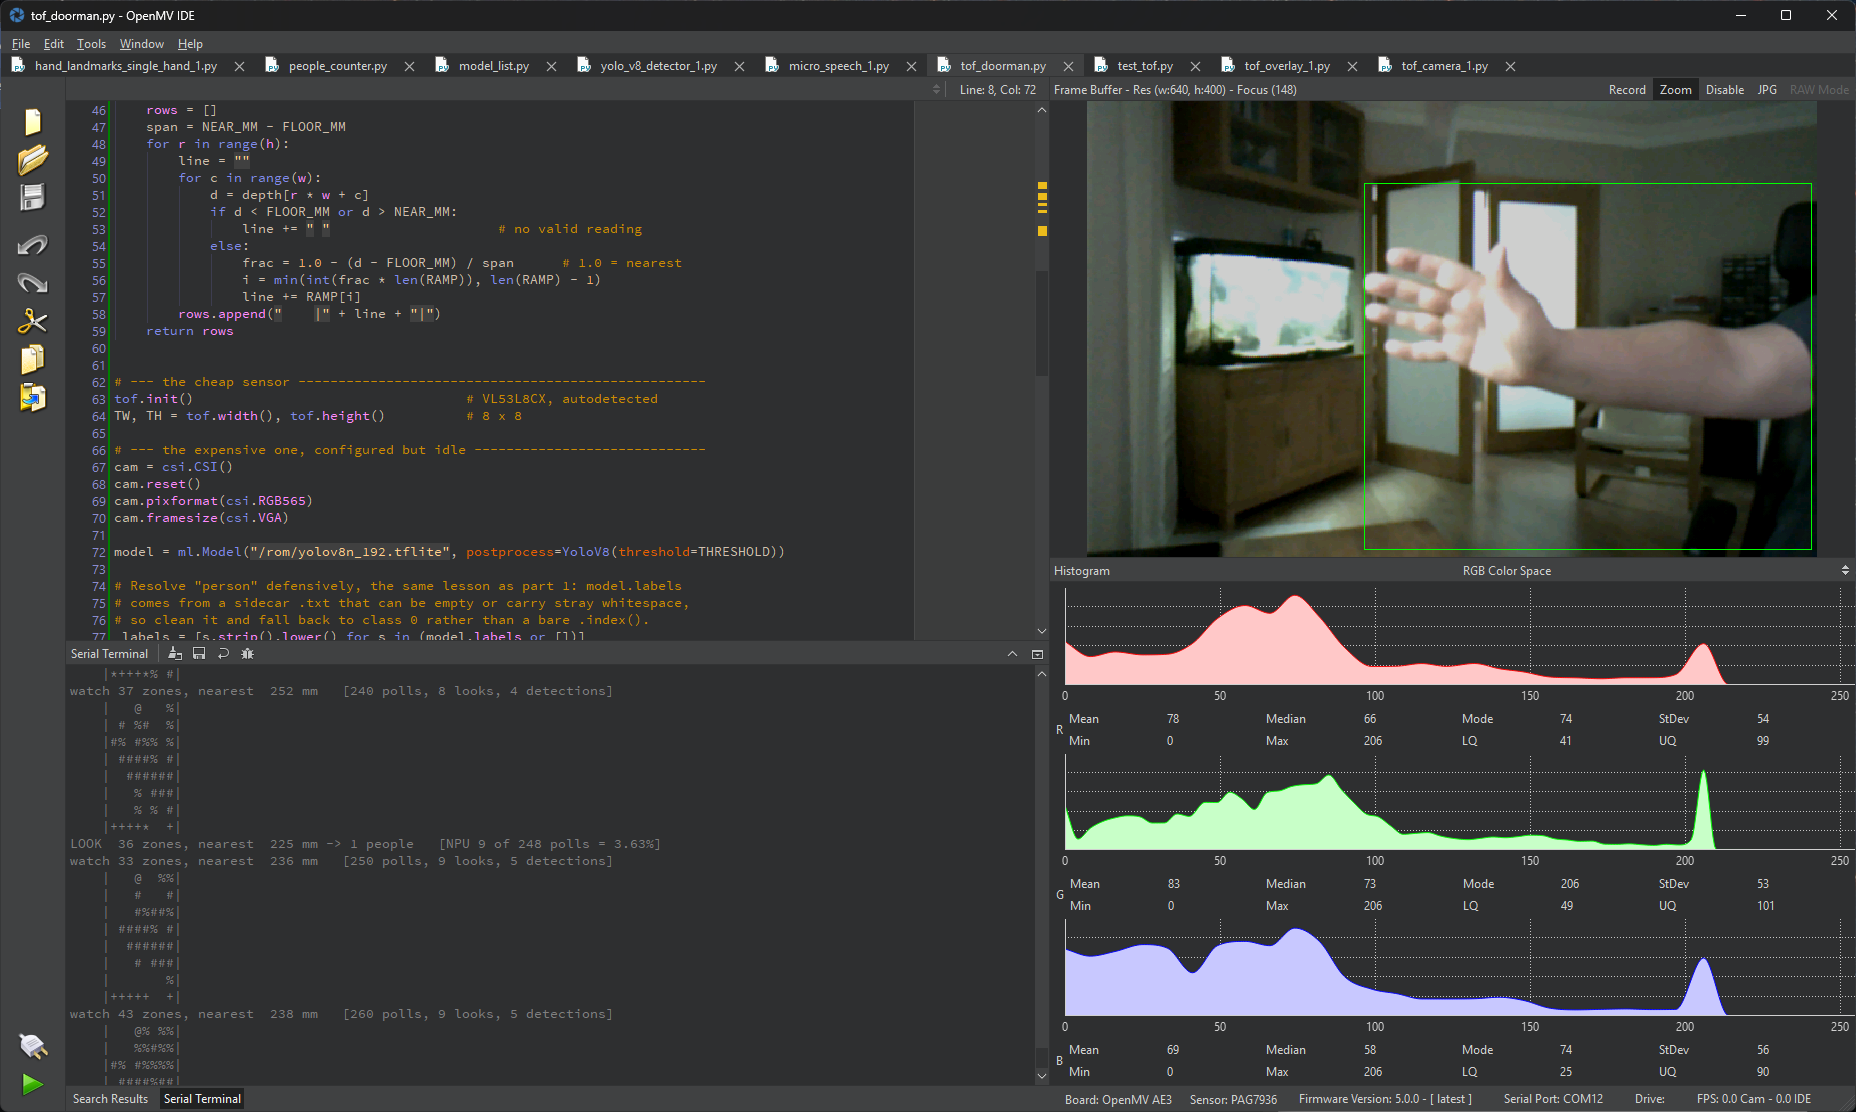
Here is an emphasis on the Figure 5 (no object) and Figure 6 (arm present) examples in ASCII plot:
...
watch 12 zones, nearest  346 mm   [710 polls, 23 looks, 10 detections]
    |       %|
    |   %  %%|
    |   %   %|
    |        |
    |        |
    |        |
    |        |
    |++++*  *|
...

watch 37 zones, nearest  252 mm   [240 polls, 8 looks, 4 detections]
    |   @   %|
    | # %#  %|
    |#% #%% %|
    | ####% #|
    |  ######|
    |   % ###|
    |   % % #|
    |++++*  +|
...Video 4. The phython script displaying the ToF ASCII map from Figure 5 (no object) and Figure 6 (arm present)
The other ratio is worth noting too. 71 detections from 76 looks, so when the depth sensor said something is there, the person detector agreed better than nine times in ten. The remainder is the wheelie-bin case in miniature, and it is exactly the division of labour the two sensors were chosen for: a cheap sensor with good recall and no discrimination, gating an expensive one that supplies the discrimination. A gate that was right only half the time would still be worth having, incidentally, since the cost of a wrong yes is one wasted inference rather than a missed visitor. Recall is what a doorman needs; precision is the detector's job.
The design notes
- The gate is six constants, and tuning them is the work.
NEAR_MMsets how close a visitor has to be,FLOOR_MMdiscards the invalid readings and anything touching the cover glass,MIN_ZONESis the noise floor,COOLDOWN_MSstops one lingering visitor from becoming a hundred inferences,POLL_MSsets how often you ask, andTHRESHOLDis the detector's own confidence. Walk towards the board with the terminal open and you will have all six set correctly inside ten minutes, which is a claim the sleeping version of this application cannot make. - Zones, not distance, is the robustness trick, and the frame minimum is a trap. It is tempting to gate on
dminfromread_depth()and be done. Do not, and the reason is stronger noise: invalid zones report negative distances, sodminon an empty room is around -500 mm and a naivedmin < NEAR_MMtest is satisfied on literally every frame. The gate would be permanently open and the whole design pointless. Filtering to a window bounded at both ends, then requiringMIN_ZONESzones to survive it, costs one list comprehension and fixes both problems at once: the invalid readings fall outside the window, and a single zone having a bad afternoon cannot open the gate on its own. - Rate-limit the poll, or the duty cycle is invalid. My first working version ran at 166 polls per second, which felt right until the arithmetic was tested: an 8×8 sensor does not produce frames at anything like that rate, so
read_depth()was handing back the same frame repeatedly and the impressive-looking duty-cycle percentage was measuring nothing but loop speed.POLL_MSfixes it, and the value is a real design decision rather than a tidy-up. Ten hertz gives a person walking at 1 m/s a reading every 10 cm, which is plenty for a doorway; raise it for a corridor people jog down, lower it to save power. - The cooldown is the duty cycle. Without
COOLDOWN_MS, a visitor who stops to read the sign in front of your camera holds the gate open and you are back to running YOLO continuously, which defeats the design. With it, the worst case is one inference every three seconds no matter what is happening in front of the sensor, which puts a hard ceiling on the energy an adversarial scene can cost you. Ceilings like that are what separate a demo from a product. - What this gate saves, and what it does not. In the code above the camera is initialised and streaming throughout, so the gate saves inference energy, not camera energy. That is the larger share, but it is not everything. A battery build adds
cam.sleep(True)after each look and wakes the sensor when the gate opens, at the cost of the settle frames a cold sensor needs before its auto-exposure is trustworthy. The sleeping variant at the end of this article takes the idea to its conclusion. - You can see the sensor thinking, in eight lines of text. The intended way to do this was the driver's false-colour rendering, which crashes the board on current firmware, so
depth_ascii()prints the grid instead. The substitution turned out to be an improvement. A heat-map tells you something is there; a character ramp tells you which zones, at what depth, in a form you can paste into a bug report. Being able to watch a gate make its decision is worth more than any amount of discussion here. - The one thing a
try/exceptcannot save you from. Worth restating in the context of working code: the guard aroundread_depth()is important because that call raises on a bad frame. When a function can hard-fault the board from C, wrapping it in Python doesn't make sense. Either the call is safe enough to make or it is not, and this one is not. - The empty-result guard is still needed, for a different reason than in Part 1.
predict()returns an empty tuple rather than a per-class list when nothing clears the threshold, soresult[PERSON]raisesIndexError. In Part 1's people counter that happened whenever the room was empty. Here it happens whenever the depth sensor was right that something arrived and the detector disagrees that it was a person, which is the wheelie-bin case, and it is common enough to matter.
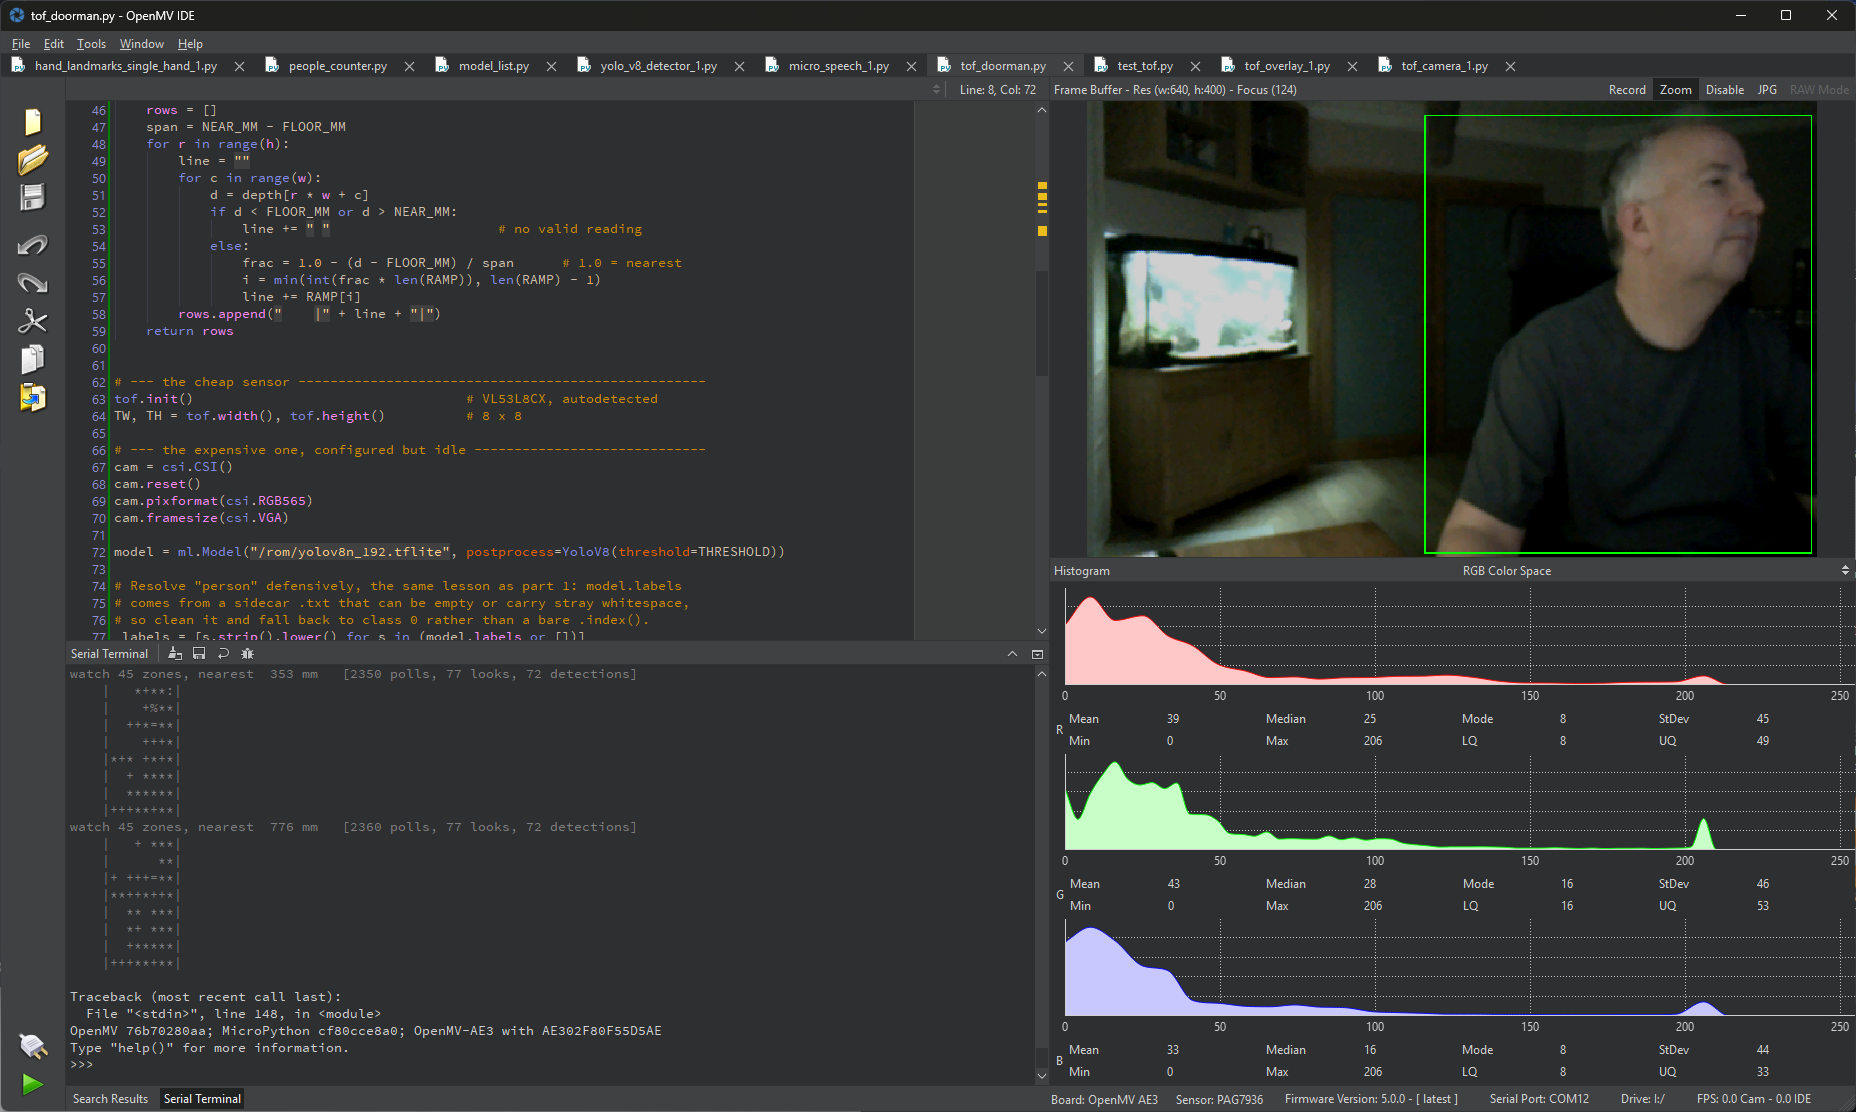
What the gate gives in a real AI doorway
The 3.33% above is the worst case, measured with someone deliberately standing in the sensor's face. A real doorway is nothing like that, and the interesting figure is what happens when the visitors are occasional rather than permanent. This is the one place in this article where I am reasoning rather than measuring, so treat the numbers as indicative to repeat with your own traffic rather than as results.
Take a corridor with a visitor every five minutes, the same three-second cooldown, and the same 10 Hz poll:
- Polls per hour: 36,000.
- Looks per hour: roughly 12, one per visitor, assuming each stays inside the cooldown window.
- Duty cycle of the NPU: 12 inferences where an ungated program would have run 36,000. That is 0.03%, a factor of 3000, and a hundred times better than the saturated worst case measured above.
Now put energy against it. The board runs at about 275 mW with the camera and NPU working, and an inference plus its frame costs on the order of 100 ms, so twelve looks is about 0.33 J per hour. The polling cost is the number I cannot give you approximately: ST market the VL53L8CX as a low-power part with an autonomous mode in the low milliwatts, but the figure that matters is the delta measured on this board with the camera idle, and it is not published value. Be wary of the numbers on breakout-board listings, which include their own regulators and are not the sensor.
What the arithmetic does establish, without any measurement at all, is where the remaining energy goes. Once the NPU is running 0.03% of the time, the NPU has stopped being the problem. What dominates is the board's idle draw of 24 mA, or 0.12 W, which is roughly 430 J per hour: more than a thousand times the inference cost. That is a useful conclusion and a slightly disappointing one. Gating the neural network is the right first move and it is not sufficient on its own, because a device that idles at 0.12 W flattens an 800 mAh LiPo in about a day whether or not it ever thinks. The rest of the win is in the sleep states, which is where this leads next.
And when you do want it to sleep just
The AI doorman above is the shape of the application; deep sleep is how you deploy it on a battery. The AE3 gives you two calls for this, and they are the same two the sleeping variant of any of these projects needs:
import machine

rtc = machine.RTC()
rtc.datetime((2026, 1, 1, 4, 12, 0, 0, 0))
machine.deepsleep(30000)      # 80 uA for 30 s, then wake via RTC
cam.sleep(True) # put the camera sensor into its sleep state
machine.deepsleep() takes the system down to that 80 µA floor and wakes on the RTC or a wake pin. csi.sleep() handles the camera sensor, which is a meaningful consumer in its own right. Combine them with the gate and the architecture becomes: sleep at microamps, wake periodically or on a pin, poll the depth sensor, and only spin up camera and NPU when the gate opens. Published figures put wake-to-inference at about 1.5 s stand-alone, or 0.5 s with the bootloader bypassed, and the awake burst dominates the energy budget so completely that the bootloader is worth roughly three times your battery life.
machine.deepsleep() runs, USB dies and the IDE reports a disconnect. Worse: pressing Run in the IDE can only ever give you one cycle, because IDE-launched scripts live in RAM, waking is a reset, and a reset wipes RAM, so the board comes back to find no script and stops. A repeating sleep-wake loop cannot be tested from the IDE at all. It requires the program saved as main.py, at which point the board is awake for about 1.5 s in every sleep interval and the USB device exists for a few per cent of the time: enough for the device to work, not much for you to catch it in.So build in stages. Get the gate right with the loop above and USB attached. Then save it as
main.py without the sleep call and confirm it runs standalone. Only then add deepsleep. And give yourself an escape hatch first: the AE3 has a user button on machine.Pin("SW"), so a check at the top of main.py that skips the sleep when the button is held costs three lines and saves you from a board that is awake five per cent of the time. Failing that, the IDE's firmware-update dialog offers to erase the internal filesystem, which takes the offending sleepy main.py with it.One more deployment note, learned the hard way. The AE3 has no µSD socket, so anything you save goes to / on the internal flash, sharing that 32 MB with the /rom models and the firmware. Measure what is actually free with os.statvfs("/") before planning to store images, wrap img.save() in a try/except so a full volume cannot throw an exception that skips your deepsleep() call and leaves the board awake until the battery dies, and know that files written by the board do not appear on the host USB drive until you force a remount with Tools → Reset or a replug, because the host never rescans a mass-storage volume it assumes cannot write to itself.
An aside: the unbricking route, and what is actually happening
Sooner or later a board that is asleep 95% of the time, or one whose main.py faults before it reaches the prompt, will stop answering. The IDE reports device not detected, the drive does not appear, and the ordinary Connect button has nothing to connect to. This is not a brick, and it is worth knowing the recovery path before you need it, because it lives behind a menu you have probably never opened: Tools → Run Bootloader (Load Firmware), at which point the IDE asks you to identify the board (select the AE3) and then offers two operations. Both are shown below, and both are ways of talking to the board when MicroPython itself is not running.
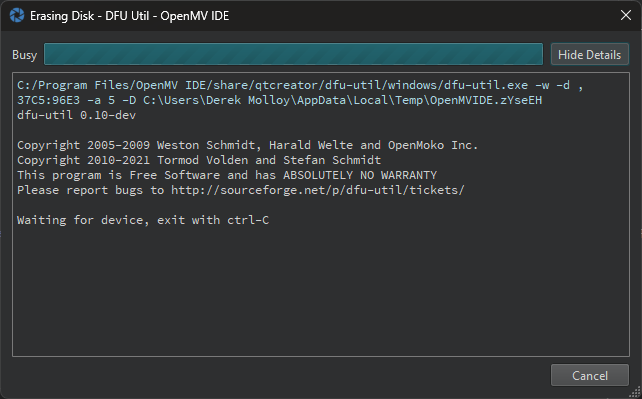
dfu-util, which sits waiting for the board to present itself in DFU mode.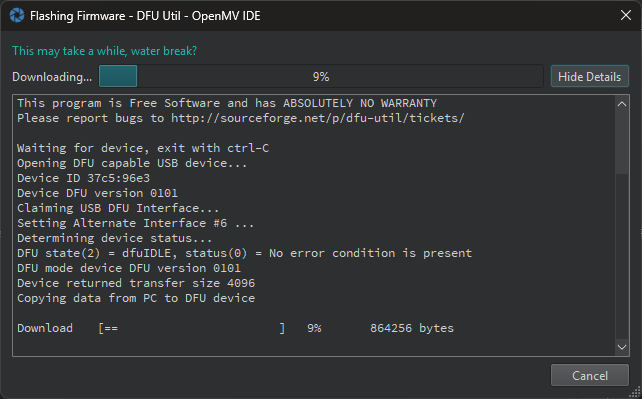
The window titles are self explanatory: IDE is a front end for dfu-util, the standard open-source utility for USB DFU (Device Firmware Upgrade). DFU is a class defined in the USB specification itself, which means it is implemented in the chip's ROM bootloader rather than in your firmware. That is the important property. A DFU-capable device can be reprogrammed even when the software on it is broken, because the code accepting the new image is not the code you replaced. It is the same mechanism behind an STM32's system bootloader or an Espressif chip's download mode, and it is why "bricked" is almost never the right word for a microcontroller with a USB peripheral.
The command line in Figure 8 decodes neatly, and it explains the behaviour you are looking at:
-d ,37C5:96E3targets a specific USB vendor and product ID.37C5is OpenMV's own vendor ID, so in DFU mode the board stops being a camera and becomes a generic OpenMV programming target.-wmeans wait for the device to appear. This is why the log ends atWaiting for device, exit with ctrl-C.The IDE will normally put the board into DFU itself, and when it cannot, power-cycling the board while the dialog sits waiting is the path.-a 5in Figure 8 againstSetting Alternate Interface #6in Figure 9. The IDE picks the region that matches the operation, which is how "erase the disk" and "replace the firmware" can be the same tool pointed at different targets.-D <tempfile>downloads a file to the device. Erasing is not a special command, it is writing a prepared blank filesystem image from a temporary file. There is no erase in DFU, only write.
Which one to reach for. They fail differently, so they fix different things:
- Erase Disk wipes the internal filesystem and nothing else. This is the targeted fix for a self-inflicted lockout: a
main.pythat sleeps, faults, or loops before the IDE can attach is on that filesystem, and erasing it hands the board back. Your scripts and saved captures are lost, which is the whole point, so this is an argument for keeping the authoritative copy of any script on your PC rather than only on the camera. - Flash Firmware replaces the MicroPython firmware wholesale. Reach for it when the board is genuinely not enumerating, or after a failed update. Look at Figure 5's byte counter: 864,256 bytes at 9% implies an image of the order of nine or ten megabytes, which is far more than an interpreter needs and is a reminder that the
/rommodel zoo travels with the firmware. YOLOv8n, MoveNet, the MediaPipe pipelines and the Haar cascades from the start of this article are all inside that download, which is both why it takes long enough to earn a "water break?" and why a firmware flash restores/romto a known state.
The practical lesson is the one the deep-sleep warning above made in the abstract, now with a screenshot attached. A device designed to be unreachable most of the time will occasionally be unreachable when you did not intend it, so the recovery path is part of the design rather than an afterthought. Know where this menu is, keep your scripts on your PC, and put the button check in main.py before you arm the sleep, not after.
The second brain, with a decorator
The AI doorman used a peripheral as its cheap sentry. The AE3 can also use a whole second processor for the job, and the firmware exposes that through MicroPython's openamp module worth quoting verbatim (this is the shipped hello_dual_core.py, trimmed of its licence header):
import time
import openamp


# This async function runs on the HE core.
@openamp.async_remote
async def task1(ept):
    import asyncio
    while True:
        print("Hello from the HE core!")
        await asyncio.sleep(1)


# Boot the HE core and start the registered tasks.
rproc = openamp.RemoteProc(0x80320000)
rproc.start()

# This loop runs on the HP core.
while True:
    print("Hello from the HP core!")
    time.sleep(1)
A decorator sends a Python coroutine to the other processor; its print() output is brought back to your console over an OpenAMP endpoint (the same remote-processor messaging framework Linux uses to talk to DSP cores, running here between two MicroPythons). The shipped examples escalate quickly: message passing between the cores, and a dual_core_vision_and_speech.py in which one core watches while the other listens.
Look at that against the AI doorman and the progression is clear. Gating the NPU behind a depth sensor is the same idea implemented with a peripheral; gating it behind the HE core and its 128-MAC NPU is the same idea implemented in silicon, and it scales to sentries a depth sensor cannot be, such as a keyword spotter or a motion detector watching a thumbnail stream. For readers of my UNO Q series the architecture is familiar: that board needed Debian, a container runtime and an RPC router to give an application two heterogeneous brains; the AE3 does it inside one 6 × 7 mm package, with a decorator, at milliwatts.
Choosing between the OpenMV siblings
The summary: the N6 is the better camera, the AE3 is the better device. Part 1's people counter belongs on an N6 screwed above a shop door with power nearby. This part's AI doorman belongs on an AE3, because the whole application is an argument between two sensors, and the flagship only has one of them.
Conclusion
- The Ensemble E3 is the most architecturally interesting microcontroller these posts have examined: big.LITTLE M55s each with their own NPU, 13.5 MB of SRAM, and MRAM in place of flash, from a interesting start-up company.
- The VL53L8CX is the AE3's surprise sensor. Read as a rangefinder it is a minor extra; read as a 64-zone depth camera it is a second modality, and one that answers "is anything there?" in the dark, at a fraction of the cost of asking the NPU "what is there?".
- The AI doorman pattern is reusable: a cheap always-on sensor holding a gate, an expensive detector behind it, a cooldown putting a hard ceiling on the worst case, and a duty-cycle figure printed by the program itself rather than estimated in a spreadsheet.
- The arithmetic that pattern produces is also a warning. Gate the NPU well enough and it stops being the dominant cost; the board's 0.12 W idle draw takes over, and the remaining wins are all in sleep states rather than in cleverer gating.
- The
openampdecorator putting coroutines on the second core is the same idea one level down, and the HE-core-as-sentry pattern it enables is where this board's ceiling actually is.
Across these posts, OpenMV's new generation has made a specific claim about the near future of embedded vision: that the interesting camera is not a peripheral, not a stream, and not a Linux box, but a sensor that reports conclusions, sized and powered like the sensors it will sit beside. The N6 makes that claim at industrial speed. The AE3 makes it on a battery, and adds a second sensor whose only job is to keep the first one asleep. Between them, and the UNO Q and XIAO series that preceded them, the through-line of this year's writing has been the same lesson at every scale: put the computation where the physics wants it, keep what crosses each boundary small, and the rest is clever engineering.
Appendix: Python Plot Code

