
A Low-Cost Thread Border Router: ESP32-C6-WROOM as an OpenThread RCP for Home Assistant in Docker

Thread is the low-power IPv6 mesh that underpins most Matter smart-home devices, and to use it you need a Thread Border Router (a bridge between your normal network and the mesh). Commercial border routers are built into many smart speakers and hubs, but they rarely give you the access a developer wants. The cheap alternative is to turn an ESP32-C6 into the radio half of a border router yourself.
This guide takes a low cost (€5) ESP32-C6-WROOM board, flashes it with OpenThread Radio Co-Processor (RCP) firmware, and connects it to a Home Assistant instance running in Docker. That last detail matters more than it sounds, and it is the main way this guide departs from the usual ones.
openthread/otbr Docker image, and a recent Home Assistant release. Command flags, image behaviour, and the Home Assistant UI all drift over time, so treat the exact strings below as a starting point and check the linked upstream docs if something does not match.Why "in Docker" changes everything
Most ESP32 border-router guides tell you to "install the OpenThread Border Router add-on" in Home Assistant. That instruction only works on Home Assistant OS (HAOS) or Supervised installs, because add-ons are managed by the Supervisor.
If you run Home Assistant as a plain Docker container (the homeassistant/home-assistant image), there is no Supervisor and there are no add-ons. So you cannot install the border router that way. Instead you run the border router as its own container alongside Home Assistant, and connect the two over the network. That is exactly what this guide does, using the official openthread/otbr image.
Step 1: Get the materials
| Item | Notes |
|---|---|
| ESP32-C6 board | An ESP32-C6-WROOM dev board (for example an ESP32-C6-DevKitC-1) is the target here. C6 is preferred over the H2: it is faster and usually cheaper. |
| USB-C data cable | Must carry data, not power only. Many cheap charging cables are power-only and will leave the board invisible to your host. |
| (Optional) external antenna | Most C6-WROOM boards use an onboard PCB antenna and need no setup. If your board has a U.FL/IPEX connector, a 4.5 to 5 dBi 2.4 GHz antenna helps the signal get through walls. |
The Seeed Studio XIAO ESP32-C6 is a popular pick for this job because of its external-antenna option and tidy form factor. The trade-off is that the XIAO needs a software setting to switch to its external antenna. A plain C6-WROOM with a U.FL connector is wired directly to the connector instead, so there is no antenna switch to set, but boards without a connector cannot use an external antenna without hardware modification.
A board with no external antenna still works across nearby rooms. An external antenna is what lets you reliably cross several walls or dense materials like brick. Higher gain is not automatically better: a 4.5 to 5 dBi antenna is a good choice. Standard 2.4 GHz RF-interference advice applies, since this is a USB-connected radio: keep it on a short USB extension cable away from the USB 3 ports and metal enclosures that surround a typical server.
Step 2: Flash the RCP firmware
An RCP turns the ESP32-C6 into a "dumb" 802.15.4 radio that a host (here, the OTBR container) drives over a serial link using the Spinel protocol. You need to put RCP firmware on the board. There are two routes: a browser flash, or compiling it yourself.
I focus on compiling directly as you are not always guaranteed that RCP firmware will be available for your ESP32 variant. Compiling it yourself (further down) takes longer to set up but lets you match the firmware to the OTBR container, so if you get a radio error, the compile route is a good fix.
The quick route: browser flash
Espressif's ESP Launchpad is a browser tool that flashes pre-built firmware over Web Serial, so it runs entirely in Chrome with no toolchain to install. Connect the board's native USB port, open ESP Launchpad, choose the OpenThread RCP image for the ESP32-C6, and flash.
Which USB port and device?
When you plug the board into a Windows machine, it appears as a numbered COM port rather than the /dev/serial/by-id path used on the Docker host. You only need this COM port for the flashing step; the persistent by-id path matters later, when the board is plugged into the Linux server that runs the OTBR container. If the board does not show up at all, the cable might be the culprit (see the data-cable note in Step 1).
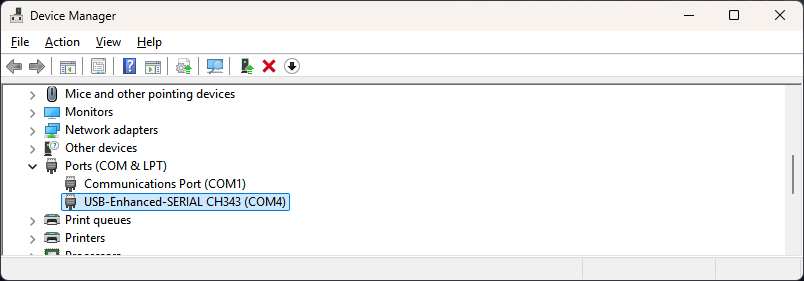
Windows identifies the COM port – COM4 in this case.
Under Linux Desktop (and the Server), you should see the ESP32-C6 has a built-in USB-Serial-JTAG peripheral. Use the board's native USB port (on a DevKitC-1 this is the port labelled USB, not the one labelled UART). When plugged in, it appears on your Docker host as:
/dev/serial/by-id/usb-Espressif_USB_JTAG_serial_debug_unit_XX-XX-XX-XX-XX-XX-if00
Confirm it is there before going further:
ls -l /dev/serial/by-id/
by-id path, never /dev/ttyACMx or /dev/ttyAMA…. The by-id symlink is stable across reboots and replugs, whereas ttyACM0 can change number if you have other serial devices. The /dev/ttyAMA… devices are the host's own UARTs and will not work here at all.openthread/otbr container negotiate a Spinel protocol version, and a large mismatch makes the border router fail to start with a radio error. If the container cannot talk to the radio (see the logs in Step 3), a version mismatch is the first thing to suspect: reflash with a firmware build close in age to the OTBR image you are running, or rebuild both from a matching point.Compile the firmware yourself (full control)
Compiling gives you a firmware built for exactly your board and ESP-IDF version, which sidesteps most version-mismatch pain. You need ESP-IDF installed.
git clone --recursive below pulls it along with its submodules, and the one-time install step downloads the C6 compiler toolchain. The export step is easy to forget: it puts idf.py and the toolchain on your PATH for the current shell only, so you must re-run it in every new terminal session before building. The block below shows the Linux/macOS commands; the Windows PowerShell equivalents follow.Under Linux:
# Get ESP-IDF and install the C6 toolchain (once).
git clone --recursive https://github.com/espressif/esp-idf.git
cd esp-idf
./install.sh esp32c6
. ./export.sh

# Build and flash the RCP example.
cd examples/openthread/ot_rcp
idf.py set-target esp32c6
idf.py build
idf.py -p /dev/ttyACM0 flash
Under Windows with PowerShell (Carefully note the use of the dedicated PowerShell export.ps1 batch file rather than the usual export.bat that is also present in the same directory):
PS C:\temp> git clone --recursive https://github.com/espressif/esp-idf.git
PS C:\temp> cd .\esp-idf\
PS C:\temp\esp-idf> .\install.bat esp32c6
PS C:\temp\esp-idf> .\export.ps1
...
Done! You can now compile ESP-IDF projects.
Go to the project directory and run:

  idf.py build

PS C:\temp\esp-idf> cd .\examples\openthread\ot_rcp\
There are a few non-default settings to apply. First set your target device, as this resets any settings that you apply using menuconfig: (adapt for Linux as required)
PS C:\temp\esp-idf\examples\openthread\ot_rcp> idf.py set-target esp32c6
...
-- Configuring done (28.0s)
-- Generating done (0.9s)
-- Build files have been written to: C:/temp/esp-idf/examples/openthread/ot_rcp/build

PS C:\temp\esp-idf\examples\openthread\ot_rcp> idf.py menuconfig
The idf.py menuconfig call opens a text-based configuration menu (navigate with the arrow keys, Enter to descend, Space to toggle, S to save, Q to quit). You are confirming that the RCP talks over the board's built-in USB-Serial-JTAG interface rather than a separate UART, which is what lets a single USB cable carry both flashing and the later Spinel link. On a stock C6-WROOM the example does not always default to this so please verify the settings. It is also worth opening the menu once so you understand which option drives the serial transport.
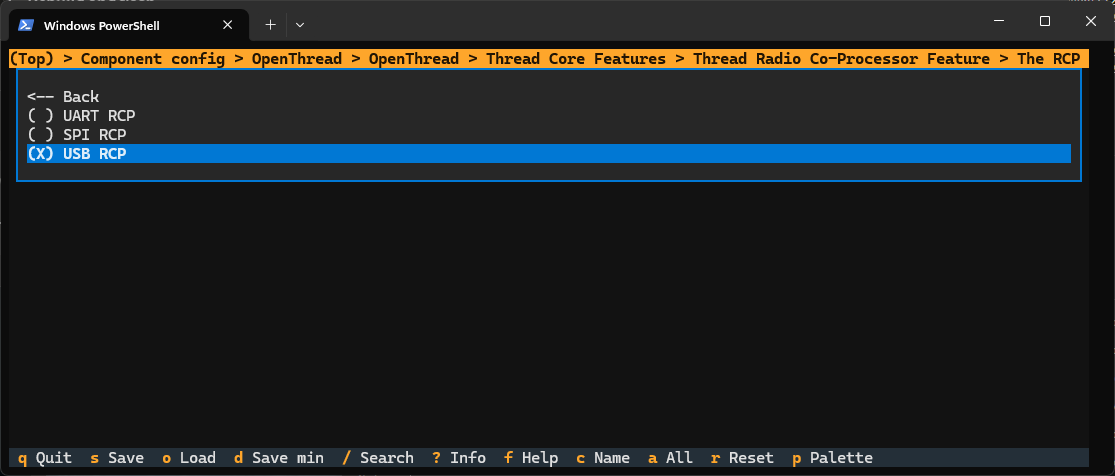
These options move around but in June 2026 use: Component config → OpenThread → Thread Core Features → Thread Radio Co-Processor Feature → The RCP, and USB RCP is selected (X) with UART RCP and SPI RCP deselected.
This choice simply sets the following property to yes in the sdkconfig file:
PS C:\temp\esp-idf\examples\openthread\ot_rcp> findstr /I "CONFIG_OPENTHREAD_RCP_USB_SERIAL_JTAG" sdkconfig
CONFIG_OPENTHREAD_RCP_USB_SERIAL_JTAG=y
Once this is complete you can start the build:
PS C:\temp\esp-idf\examples\openthread\ot_rcp> idf.py build
ot_rcp and not ot_br (border router) or any other option. Also, reset the board using the onboard reset button just before you flash it with the final step above. Mine would not flash unless I pressed the reset button.To flash the board, use the flash option (which usually identifies the COM port automatically):
PS C:\temp\esp-idf\examples\openthread\ot_rcp> idf.py -p COM4 flash
Serial port COM4:
Connecting....
Connected to ESP32-C6 on COM4:
Chip type:          ESP32-C6 (QFN40) (revision v0.0)
Features:           Wi-Fi 6, BT 5 (LE), IEEE802.15.4, Single Core + LP Core, 160MHz, Unknown Embedded Flash
Crystal frequency:  40MHz
...

Writing 'esp_ot_rcp.bin' at 0x00010000...
Writing at 0x0004c3b0 [==============================] 100.0% 165909/165909 bytes...
Wrote 246704 bytes (165909 compressed) at 0x00010000 in 3.9 seconds (502.3 kbit/s).
Verifying written data...
Hash of data verified.

Hard resetting via RTS pin...
Done
The ot_rcp example ships with sensible defaults for acting as an RCP over the USB-Serial-JTAG interface, so for a stock C6-WROOM you might not need to touch menuconfig. Once flashed, it behaves exactly like the precompiled option: a silent radio waiting for its host.
Step 3: Run the OpenThread Border Router container
With the radio flashed, the host side runs as the openthread/otbr container. Because Home Assistant is in Docker, the border router joins it as a sibling container.
Plug the border router into your destination server and identify the USB ID (note: I also have a ZigBee device attached -- names have been adjusted for security):
molloyd@ele:/dev/serial/by-id$ ls
usb-dresden_elektronik_ingenieurtechnik_GmbH_ConBee_II_XXXX
usb-Espressif_USB_JTAG_serial_debug_unit_40:4C:CA:4E:25:68-if00
The cleanest configuration uses host networking, which lets the border router advertise its Thread prefix onto your LAN and be discovered by Home Assistant over mDNS. Here is my docker-compose.yml, which is easier to keep alongside your Home Assistant compose file:
Two services are shown below. otbr is the border router itself and is the core of this guide. matter-server is the separate Matter controller that Home Assistant uses to commission Matter devices; it is only needed if you intend to use Matter-over-Thread (Step 5), and you can leave it out if you want raw Thread connectivity only. Both are listed here because they are commonly run side by side, and both want host networking for the same discovery reasons. The matter-server entry's --bluetooth-adapter 0 lets it commission new devices over Bluetooth during their initial setup, which is how most Matter devices are first paired before they move onto Thread.
host mode which makes it difficult to map ports. I have not needed the otbr web interface for the steps below.Here are my docker-compose.yaml entries. You will need to adapt these for your configuration, but use them as a starting point...
version: '3'
services:
  # Other services here...

  matter-server:
    container_name: matter-server
    image: ghcr.io/home-assistant-libs/python-matter-server:stable
    network_mode: host
    privileged: true
    restart: unless-stopped
    security_opt:
      - apparmor=unconfined
    volumes:
      - ${PWD}/volumes/matter-server:/data
      - /run/dbus:/run/dbus:ro
      - /etc/localtime:/etc/localtime:ro
    command: >
      --storage-path /data
      --paa-root-cert-dir /data/credentials
      --bluetooth-adapter 0

  otbr:
    container_name: otbr
    image: openthread/otbr:latest
    network_mode: host
    privileged: true
    restart: unless-stopped
    environment:
      - NAT64=1
      - DNS64=0
      - WEB_GUI=0
      - BACKBONE_INTERFACE=eno1
    devices:
      - /dev/serial/by-id/usb-Espressif_USB_JTAG_serial_debug_unit_40:4C:CA:4E:25:68-if00:/dev/ttyACM2
    volumes:
      - ${PWD}/OTBR:/data
      - /etc/localtime:/etc/localtime:ro
    command: >
      --radio-url spinel+hdlc+uart:///dev/ttyACM2?uart-baudrate=460800
      -B eno1
What the important pieces do:
devices: …:/dev/ttyACM2passes the RCP serial device into the container. The left side is the stableby-idpath of your specific board (copy it from thelsoutput above); the right side is the in-container name the radio URL then refers to. Nothing works without this mapping.--radio-url spinel+hdlc+uart:///dev/ttyACM2tells OTBR where the radio is and how to talk to it. Despite theuartin the URL, this is the correct scheme for the USB-Serial-JTAG link: the host treats it as a serial UART device.?uart-baudrate=460800sets the serial speed for the Spinel link. This must match what the RCP firmware expects;460800is the ESP-IDF default for theot_rcpexample. If you see garbled radio output or no negotiation at all, a baud-rate mismatch is worth ruling out alongside the firmware-version mismatch from Step 2.- No flow-control flag is set here. Older Home Assistant add-on guides told you to tick "disable Hardware Flow Control", which translated to a
?uart-flow-control=0parameter. Over the USB-Serial-JTAG interface there is no hardware flow control to disable, so the parameter is simply omitted. If you were adapting an older UART-based setup you would add it back, but for this USB board you do not need it. network_mode: hostlets the border router route IPv6 onto your LAN and be found by Home Assistant. This is the part that makes discovery "just work".privileged: trueis required so the container can manage network interfaces and routing.-B eno1/BACKBONE_INTERFACE=eno1name the host's LAN interface that the border router bridges Thread onto. Replaceeno1with your own interface name (Important, you must find it withip link); getting this wrong is a common reason devices on Thread cannot reach the rest of your network.
net.ipv6.conf.all.forwarding=1 and net.ipv4.conf.all.forwarding=1 on the host. If you cannot use host networking, the OpenThread Docker documentation covers a bridged setup with published ports and sysctls, but it is more work to make discovery and IPv6 routing function.Check it came up:
docker logs -f otbr
A healthy start logs the radio connecting and Spinel negotiating. A repeating radio or Spinel error almost always means the firmware-version mismatch from Step 2. You can also open the web UI at http://<your-docker-host-ip>:8080 to form or view a Thread network, and the REST API that Home Assistant uses lives at http://<your-docker-host-ip>:8081
WEB_GUI=0, which disables the built-in web interface. That is deliberate, because in host mode the web UI binds to port 80 and clashes with anything else using it (the catch above). The REST API on 8081 is all Home Assistant actually needs, so leaving the GUI off is the cleaner default. If you want the web UI to form or inspect the network by hand, set WEB_GUI=1 and make sure port 80 is free; otherwise drive everything from Home Assistant and ot-ctl (used in the merging section later).Now, if all goes well you should be able to check the REST API interface:
molloyd@ele:~/HomeAssistant$ curl http://127.0.0.1:8081/node
{
        "baId": "f9ceb6084af99113dc2f7b5d0e26c9a5",
        "baState":      "",
        "state":        "disabled",
        "routerCount":  0,
        "rlocAddress":  "fdde:ad00:beef::ff:fe00:0",
        "extAddress":   "428fbba8053e9368",
        "networkName":  "OpenThread",
        "rloc16":       "0xfffe",
        "leaderData":   {
                "partitionId":  0,
                "weighting":    0,
                "dataVersion":  0,
                "stableDataVersion":    0,
                "leaderRouterId":       0
        },
        "extPanId":     "dead00beef00cafe"
}
This curl against the REST API is a quick confirmation that the host side is alive and talking to the radio: a reply at all means the container started and the Spinel link is up. Here "state": "disabled" and routerCount: 0 are expected, because no Thread network has been formed yet. The networkName of OpenThread and extPanId of dead00beef00cafe are the example defaults; both change once you form or join a real network in the next steps.
Step 4: Connect it to Home Assistant
Home Assistant talks to an external border router through its OpenThread Border Router integration, pointed at the REST API.
- In Home Assistant, go to Settings → Devices & Services → Add Integration and choose OpenThread Border Router.
- When asked for the URL, enter the REST endpoint:
http://<your-docker-host-ip>:8081. In my case this is loopback to the same machinehttp://127.0.0.1:8081 - Home Assistant adds the border router and its Thread integration begins managing it. Open Settings → Devices & Services → Thread to see it listed.
- If you do not already have a Thread network, let Home Assistant create one here, or form one from the OTBR web UI and Home Assistant will adopt it. Set this border router as the preferred one if it is your only Thread radio.
The preferred border router is the one Home Assistant hands to your phone and to new devices as the network to join, so designating it keeps everything on a single mesh. If you also have a commercial router (a Nest Hub, in my case) and want them merged rather than separate, that is exactly what the "Merging my two networks" section below covers, and in that case you would make the shared network the preferred one.
If Home Assistant does not auto-discover the router: with host networking, the OTBR advertises itself over mDNS and Home Assistant usually finds it on its own. If your Home Assistant container is on a bridged network, mDNS may not cross between containers, in which case adding the integration manually by its REST URL (step 2 above) is the reliable path. Running Home Assistant itself with host networking removes most of this friction.
Merging my two networks (optional)
Many homes already have a Thread network running, created by a commercial border router such as a Google Nest Hub or an Apple HomePod. By default your new ESP32-C6 router forms its own separate Thread network, so you end up with two meshes that cannot see each other's devices. The goal here is to merge them: rather than run two isolated networks, you make your OTBR join the existing one so every Thread device, whoever commissioned it, lives on a single mesh. Skip this section entirely if your ESP32-C6 is your only Thread border router.
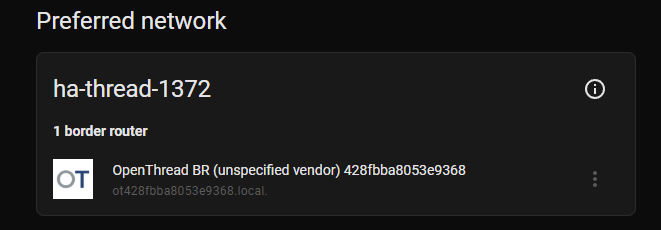
To achieve this, both Border Routers (the Google Nest Hub and your ESP32-C6) must share the identical Active Operational Dataset (Network Name, PAN ID, Network Key, etc.). Because the Google ecosystem operates as a closed system and won't easily adopt a custom third-party dataset, the standard procedure is to force your OpenThread Border Router (OTBR) to abandon ha-thread-1372 and join the NEST-PAN-F095 network.
Re-provision the OTBR
You now need to push this preferred dataset to your Docker container. There are two primary methods to accomplish this.
Method A: the Home Assistant UI (try this first). In Settings → Devices & Services → Thread, the Nest network usually appears automatically once your phone or another device has shared it with Home Assistant. Mark it as the preferred network, and Home Assistant will attempt to push that dataset to your OTBR over the REST API for you, with no command line needed. This works most of the time; only fall through to Method B if the push fails or your Docker networking blocks the REST call. The command-line route below has the advantage of being explicit and visible, which is why it is shown in full.
Method B: The Command Line (ot-ctl) If the UI method fails, or if Docker networking prevents the REST API push, you can manually inject the dataset.
- Obtain the Active Dataset TLVs (a long hexadecimal string) for the Nest network. You can often find this by clicking the
ⓘ(info) icon next to the newly preferred Nest network in the UI. It was not visible for me, so please see the additional step below. - Access your OTBR Docker container's terminal:
docker exec -it <your_otbr_container_name> bash
- Use the
ot-ctlutility to halt the current process, apply the Nest dataset, and restart the interface:
ot-ctl thread stop
ot-ctl dataset set active <insert_hex_dataset_string_here>
ot-ctl ifconfig up
ot-ctl thread start
- Verify the ESP32-C6 has successfully attached to the Nest mesh by running
ot-ctl state. It should transition torouterwithin a few moments.
The ot-ctl utility is the OpenThread command-line tool that ships inside the OTBR container; it speaks directly to the radio, which is why you docker exec into the container first. The four commands take the network interface down, write the new dataset, bring it back up, and start Thread, in that order. ot-ctl state then reports the node's role: it starts as detached, briefly becomes child, and settles on router (or leader) once it has joined. If it stays detached, the dataset is wrong or the radio cannot hear the other border router, so check the hex string and the antenna placement.
Step 1 (in Method B) above said to read the TLV string from the info icon in the UI. If that is missing, the same value is stored on disk by Home Assistant, which is the route shown below. See your HomeAssistant configuration files /config. In my case /config is mapped to ~/HomeAssistant, so the file is as below:
molloyd@ele:~/HomeAssistant/.storage$ more thread.datasets
{
  "version": 1,
  "minor_version": 4,
  "key": "thread.datasets",
  "data": {
    "datasets": [
      {
        "created": "2026-01-09T21:37:04.639230+00:00",
        "id": "01KEJB22KZ8Q0ZKXT1K15DRJRC",
        "preferred_border_agent_id": "a38ceceee28031a959a634871625e030",
        "preferred_extended_address": "32070c64dd7eed7a",
        "source": "Google",
        "tlv": "000300000C0102F095020879662DE063397CCA0E080000630DF03BA0D50510670D7590B4FB620C934464C639E1669B030D4E4553542D50414E2D463039350708FDA5600F64860000041015D9AE97A0C61983E80B805E9A7458080C0402B0F77835060004001FFFE0"
      },
      {
       ...
      }
    ],
    "preferred_dataset": "01KEJB22KZ8Q0ZKXT1K15DRJRC"
  }
}
The value you want is the tlv field for the dataset whose "source": "Google" (or whichever commercial router you are joining). The preferred_dataset ID near the bottom tells you which entry Home Assistant currently treats as preferred. Copy only the hex string itself, not the surrounding quotes or the field name. You must extract this with no return characters:
ot-ctl will reject the truncated dataset. Paste it as one unbroken line, exactly as shown below. Data has been altered slightly for privacy.molloyd@ele:~/HomeAssistant$ docker exec -it otbr bash
root@ele:/app# ot-ctl thread stop
Done
root@ele:/app# ot-ctl dataset set active 000300000C0102F095020879662DE063397CCA0E080000630DF03BA0D50510670D7590B4FB620C934464C639E1669B030D4E4553542D50414E2D463039350708FDA5600F64860000041015D9AE97A0C61983E80B805E9A7458080C0402B0F77835060004001FFFE0
Done
root@ele:/app# ot-ctl ifconfig up
Done
root@ele:/app# ot-ctl thread start
Done
And by magic, I have two border routers on the same network:
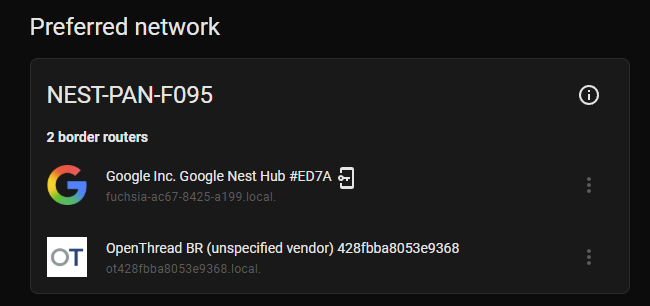
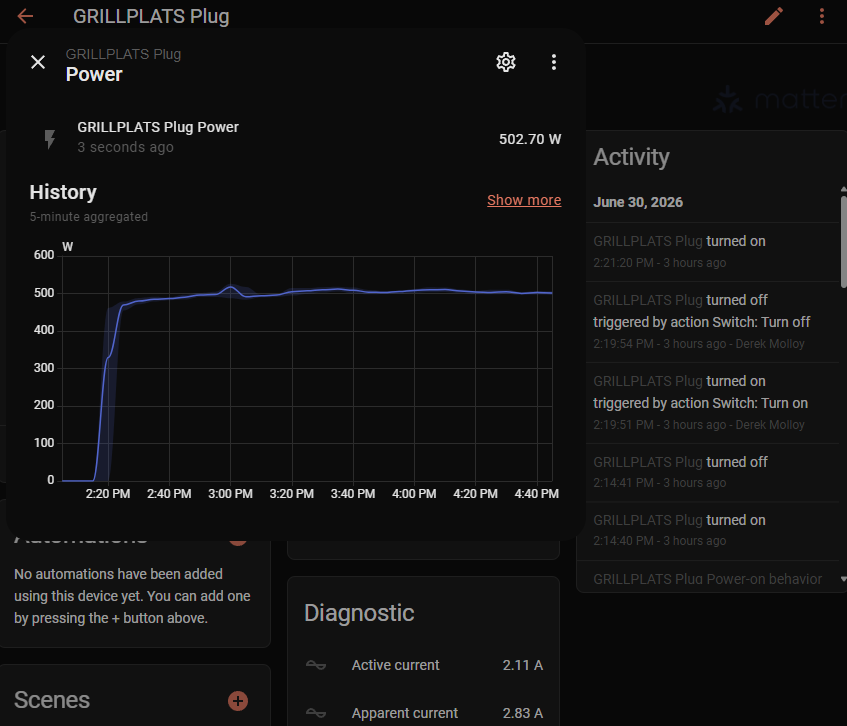
What you are seeing here is both border routers now reporting the same Thread network in Home Assistant, which is the proof the merge worked: devices commissioned by either router now share one mesh. If instead the two networks still show separately, the dataset did not take, so re-check that ot-ctl state reached router and that you copied the correct tlv string.
Step 5 (optional): Share credentials with your phone for Matter
If you plan to add Matter-over-Thread devices, your phone needs to know your Thread network's credentials, otherwise commissioning a device through a phone app can create a second, separate Thread network that your Home Assistant border router cannot see.
The fix is to sync credentials between Home Assistant and your phone using the Home Assistant Companion app:
- Install the Companion app (iOS or Android) and sign in to your Home Assistant.
- Open the app's Thread settings. It will offer to import your Home Assistant border router's credentials into the phone's system Thread store (Apple or Google), and to send the phone's preferred credentials back to Home Assistant.
- Accept the sync. From then on, Matter devices you commission with your phone join the same Thread network as your border router.
The exact wording shifts between app versions, so follow the current Home Assistant Thread documentation if the menus differ. This step is purely about Matter: if you only need raw Thread connectivity, you can skip it.

Step 6 (optional): Visualise the mesh with Thread Tools
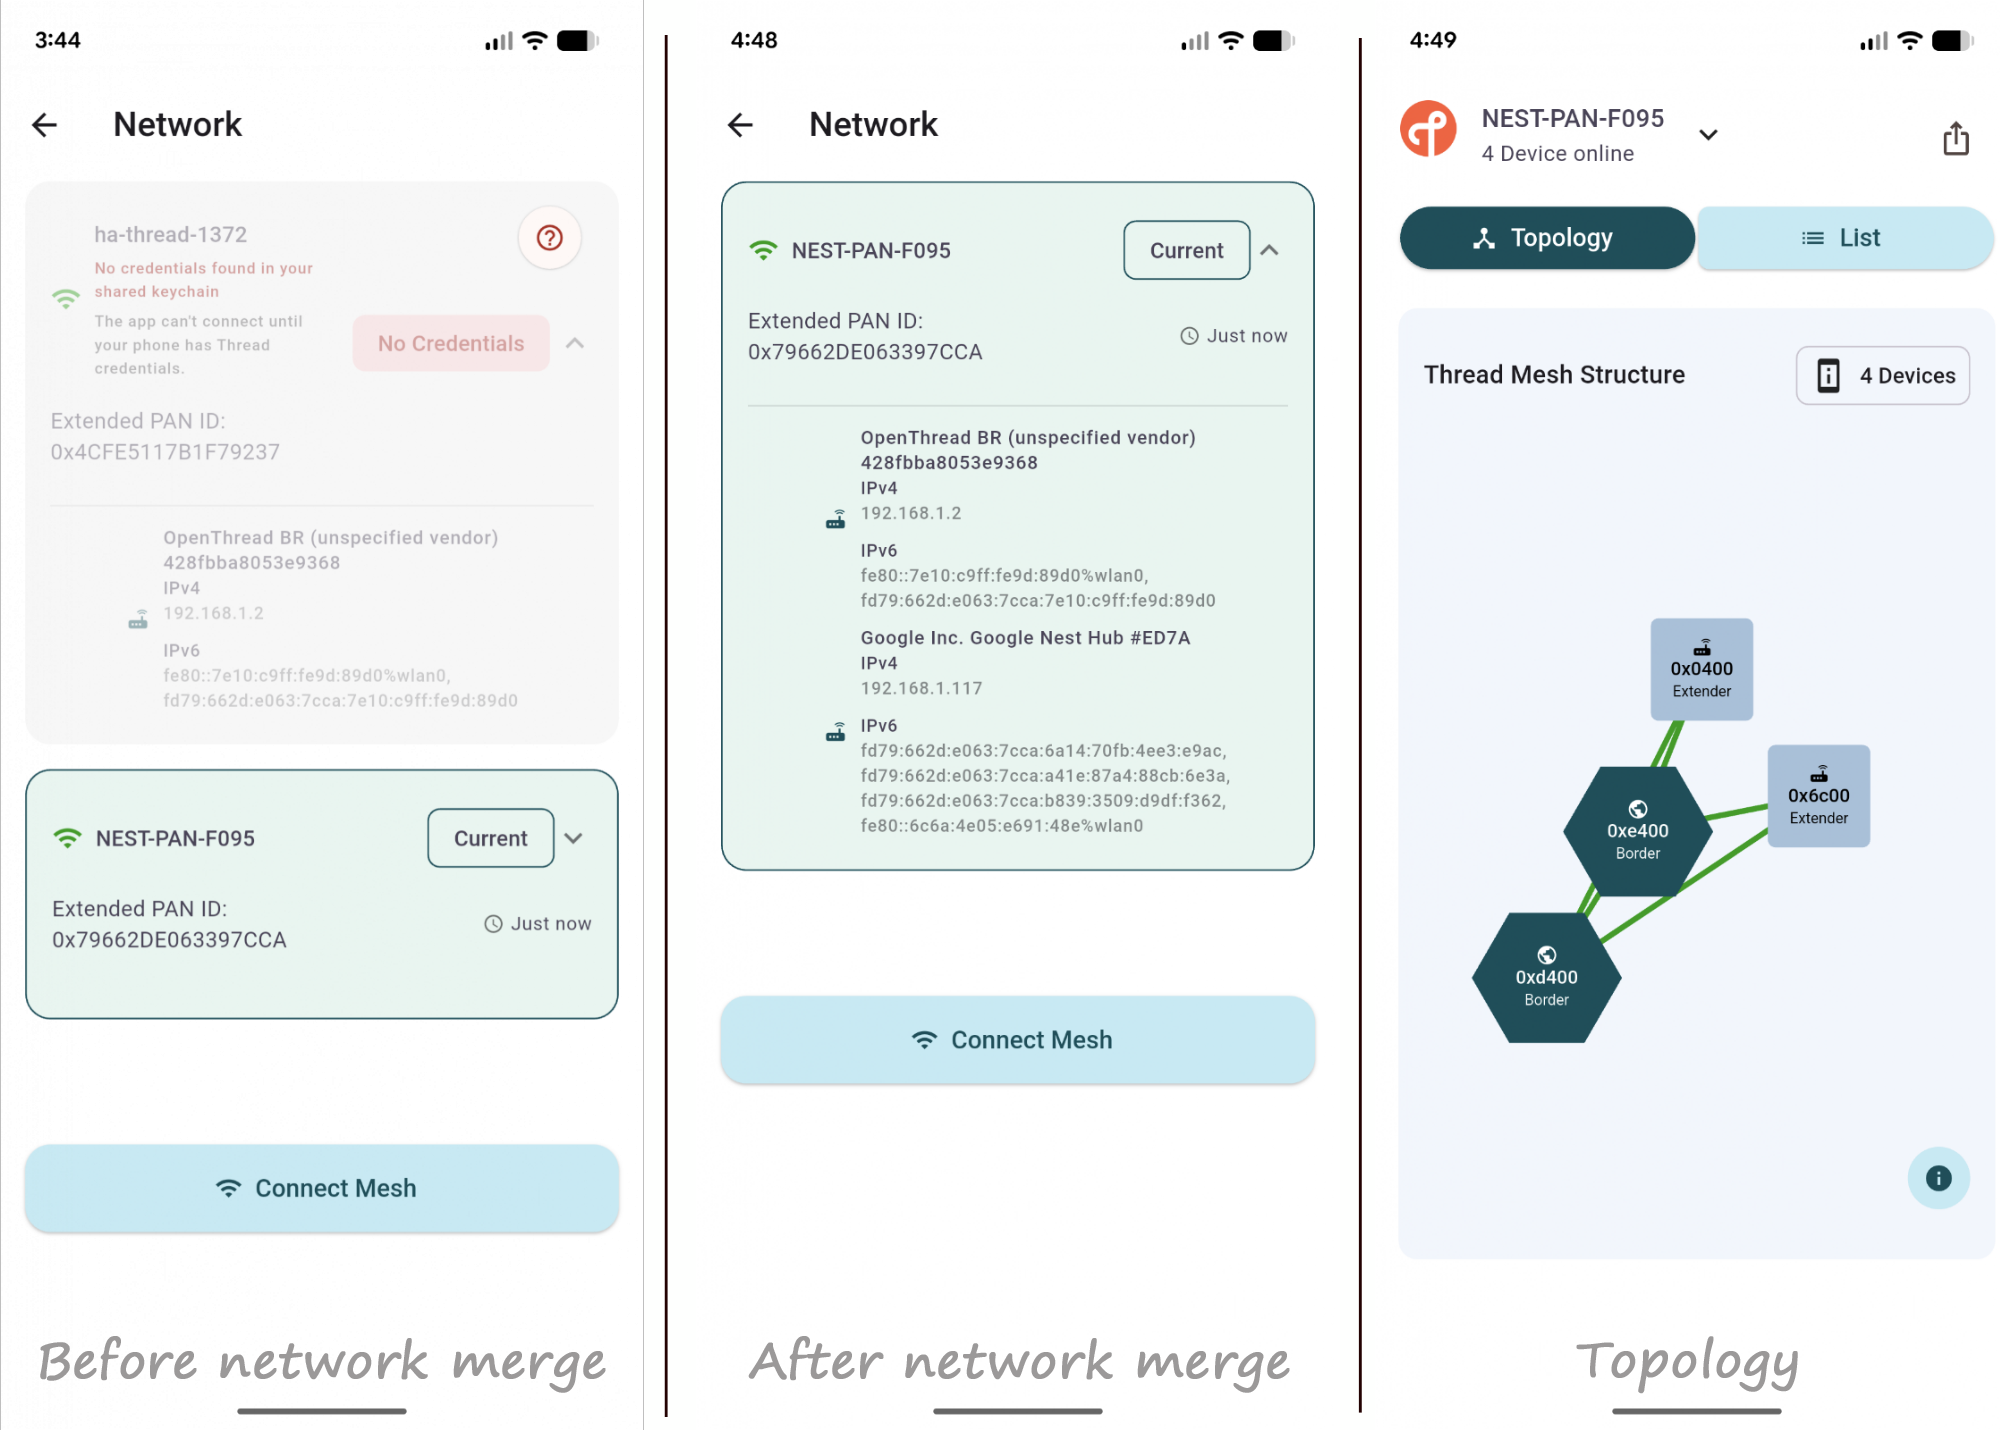
Once devices start joining, it helps to see the mesh rather than infer it from logs. Thread Tools is the Thread Group's official Android diagnostic app, and it is the easiest way to confirm that your ESP32-C6 border router and any commercial routers really are forming one network. You can install it from its Google Play listing.
The app needs compatible Thread hardware and a local Thread network to analyse, so it complements the border router you have just built rather than replacing any of the steps above. Point it at the same Thread network and it gives you three things that are useful when something goes wrong:
- Network topology: a real-time map of the nodes and border routers and how they connect, which is the quickest way to spot whether your two routers merged into one mesh or are still running separately (the failure mode from the merging section).
- Diagnostics: connectivity insights that help pinpoint weak links, lag, or nodes that keep dropping, which is where the antenna and placement advice from Step 1 pays off.
- Device roles: it categorises each node by its role (leader, router, child, border router), so you can tell what your ESP32-C6 has settled into, matching the
ot-ctl stateoutput from earlier.
Here you can see my current network:
This step is purely for visibility and troubleshooting; nothing in the rest of the guide depends on it. If your devices are joining cleanly and Home Assistant shows a single network, you may never need it, but it is the first thing I check when a node will not attach.
Wrapping up
You hopefully now have a working Thread Border Router for the price of an ESP32-C6, integrated with a Dockerised Home Assistant without any add-on system. The two adaptations that matter most, and that the standard guides skip, are running the border router as its own openthread/otbr container instead of an add-on, and keeping the RCP firmware version aligned with that container so the radio link negotiates cleanly.
From here you can commission Matter-over-Thread devices, or use the mesh directly. If you later want to build a Thread device rather than the router, that pairs naturally with the next guide, where the border router you just built is a requirement that lets a browser reach the device.
Thread on Dockerised Home Assistant is one of the most complex configurations I have performed for Home Assistant. I hope that it becomes more straightforward as time goes on.
Good luck with your installations!

