Introduction
In a previous post, I described how you could set up the Beaglebone Black to capture video and process video using OpenCV with the Logitech C920 camera. In this post I am going to look at how you can begin streaming data using the camera and code that I had adapted previously. The previous post is here and the final instructional page is here. I hope to follow this post up with a video shortly as soon as I address all of the issues I would like. I have also just released a post on how to stream video using UDP unicast and multicasting. I am going to view the video using VLC on a Windows 7 PC.
Acknowledgement
This post is based heavily on work by William C Boner and OZ9AEC and I would recommend that you read the work on their blogs as there is plenty of information there on getting video streaming to work. I have adapted their work with slightly different code and hopefully I have helped make it more accessible for everyone. I will also extend their work in the next few posts.
Getting Started
Download the source code for my boneCV repository. This has the source code for everything that is discussed from here on down. Use:
|
1 |
git clone git://github.com/derekmolloy/boneCV |
To clone the repository to your local file system. All of the code is in this repository and the scripts necessary to stream the video are listed there too.
Next, I will look at a few different ways of streaming the video using avconv (ffmpeg) and the code that I had previously distributed through this repository.
Starting the RTP Stream
Step 1: Running the streamVideoRTP Script
Once you have downloaded the repository you can build the code by executing ./build which will result in an executable capture program in the boneCV folder. These steps are discussed in the previous posts that are linked in the Introduction above.
Edit the script streamVideoRTP to specify the IP address of the machine that will be playing the video. In my case it is a Windows 7 PC and I am going to use VLC. Here is my script:
|
1 2 3 4 5 6 7 8 9 10 11 12 13 14 15 16 17 |
#!/bin/bash echo "Video Streaming for the Beaglebone - derekmolloy.ie" echo "Piping the output of capture to avconv" # Next line not necessary if you are using my -F option on capture v4l2-ctl --set-fmt-video=width=1920,height=1080,pixelformat=1 # Pipe the output of capture into avconv/ffmpeg # capture "-F" My H264 passthrough mode # "-o" Output the video (to be passed to avconv via pipe) # "-c0" Capture 0 frames, which means infinite frames in my program # avconv "-re" read input at the native frame rate # "-i -" Take the input from the pipe # "-vcodec copy" Do not transcode the video # "-f rtp rtp://192.168.1.2:1234/" Force rtp to output to address of my PC on port 1234 ./capture -F -o -c0|avconv -re -i - -vcodec copy -f rtp rtp://192.168.1.4:1234/ |
You can see that the IP address of my Window 7 PC is 192.168.1.4 and I have randomly chosen port 1234.
Then execute the script streamVideoRTP by typing ./streamVideoRTP which will result in an output like in Figure 1.
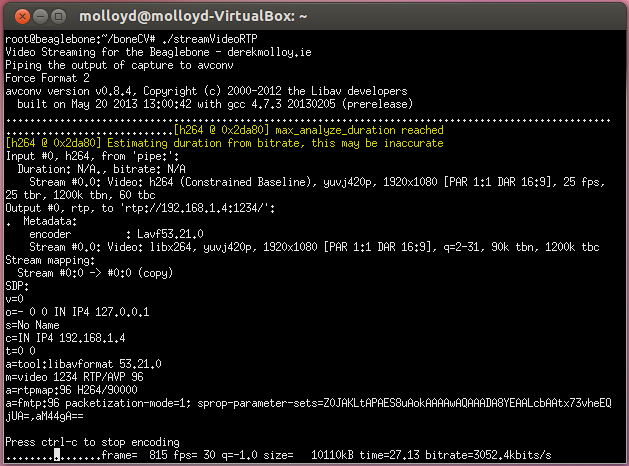 Figure 1. Executing the streamVideoRTP
Step 2: Kill It!
Using ctrl-c kill the stream. We need the values that are listed under “SDP:” in the output to create the SDP file for VLC on our Windows Machine.
Step 3: Copy the Data into a file called BeagleboneRTPStream.sdp
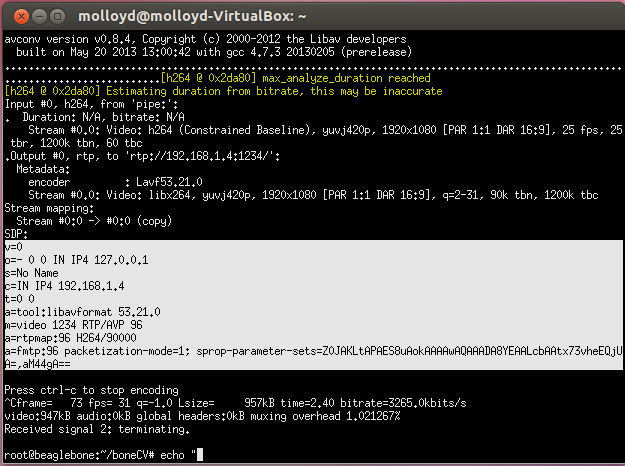
- Type echo “ at the command prompt and then select the text at the Linux prompt as described in Figure 2.
Figure 2. Typo echo “ and then select the text (as highlighted)
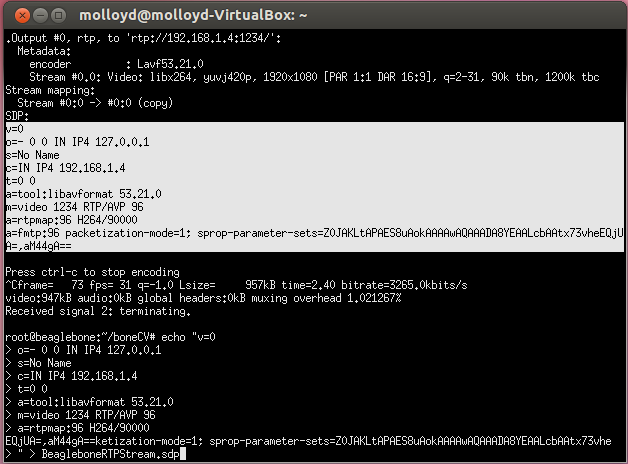
- Then click your middle mouse button to paste the text at the command prompt. Finish the string using a ” > BeagleboneRTPStream.sdp and hit enter. This is captured in Figure 3.
Figure 3. Creating the sdp using the ./streamVideoRTP output
I have left my sdp file in the git repository so that you can see it and even edit it.
Step 4. FTP this file to/from your windows machine
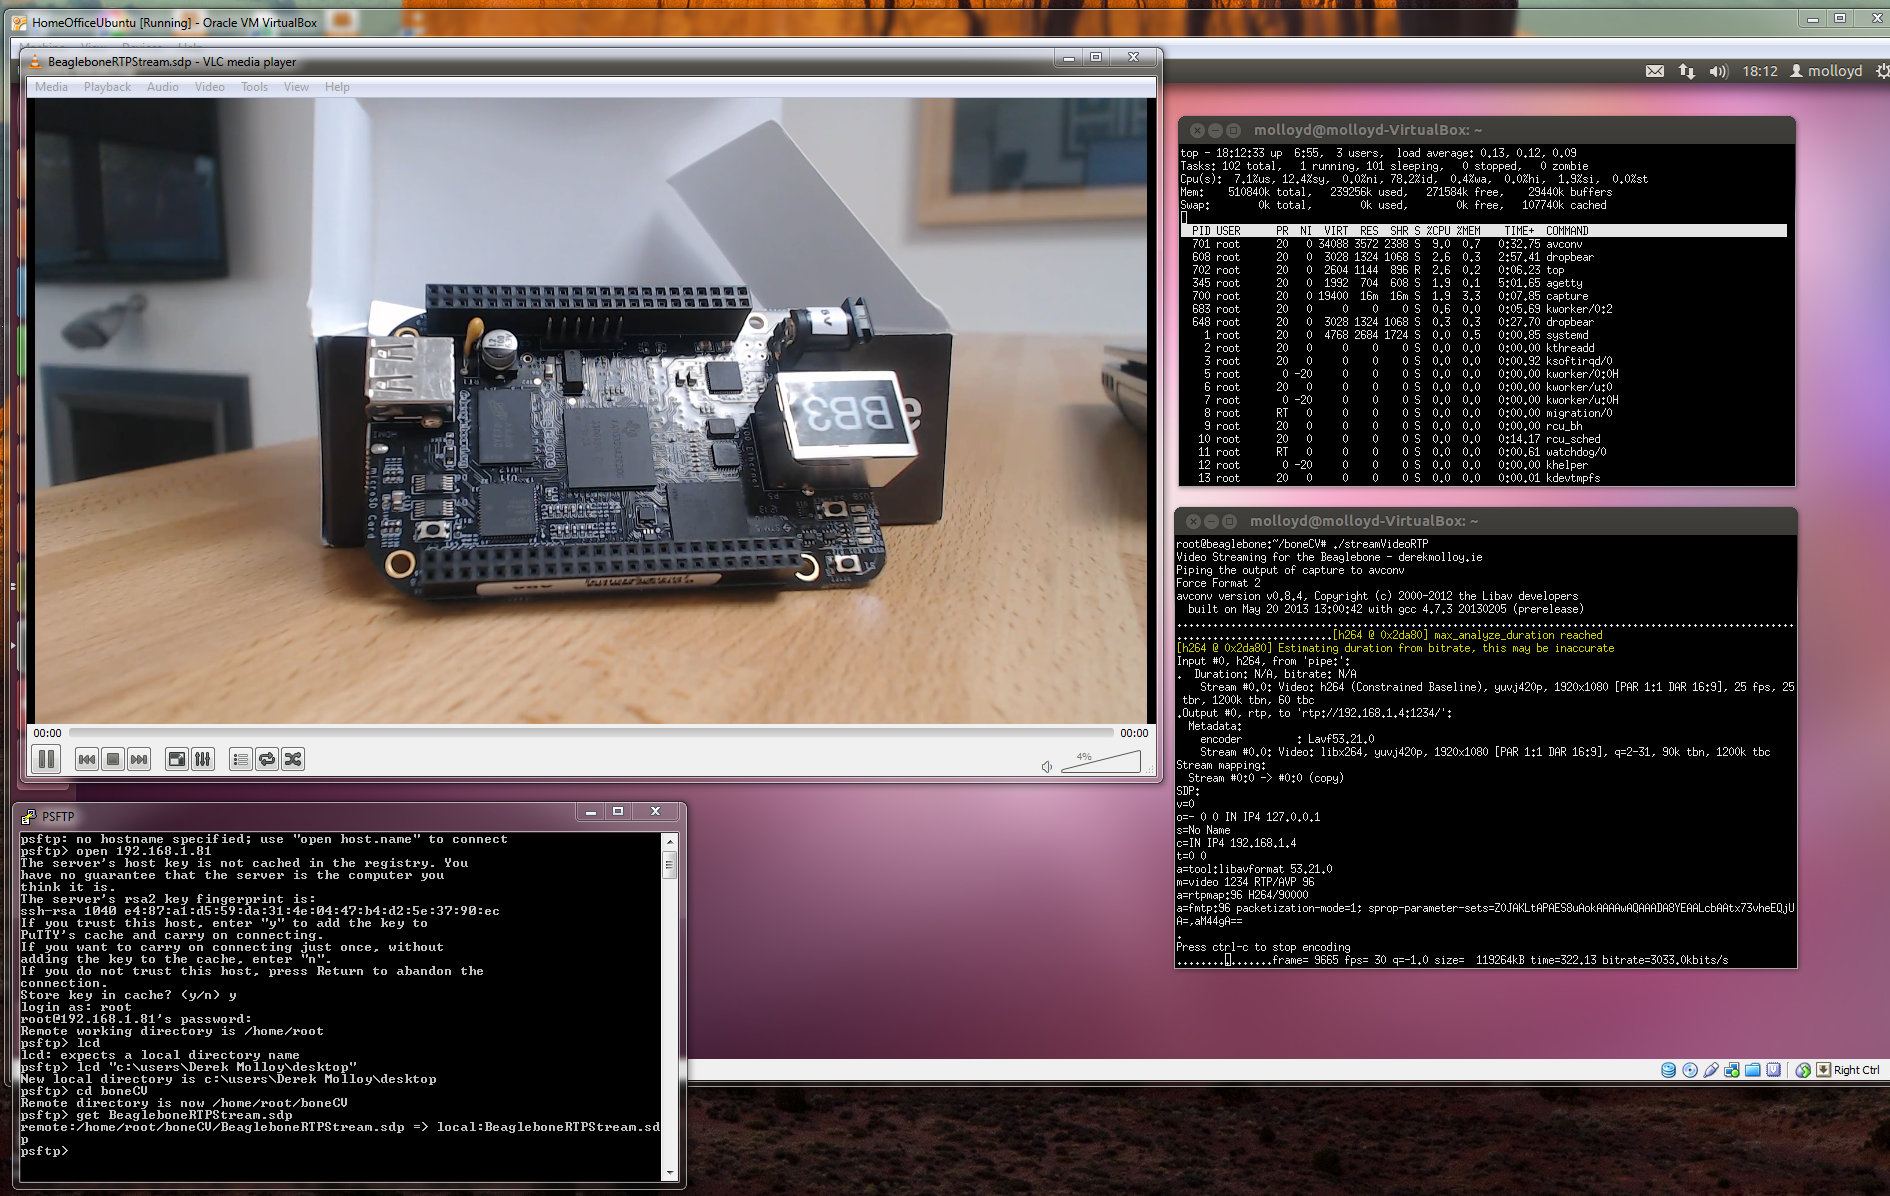
I just use psftp from the Windows command prompt in my case as I have PuTTY installed on the Windows 7 machine. Place the file anywhere – I’ll just use the desktop (you can see my usage in the bottom-left of figure 4 below).
Step 5. Start the Server
Just execute ./streamVideoRTP again! You should see it running at about 3Mbit/sec as before and it should be stable, giving you a consistent frame rate (visible on the bottom-right of figure 4 below).
Step 6. Start VLC on the Windows/Linux ‘client’ Machine
The easiest way to do this is probably to double-click the SDP file on your desktop as it is likely associated with VLC if that is on your machine. If everything goes well you should see exactly what I have in Figure 4.
Figure 4. The final output – Press for high-resolution version
You should be able to see various points in this image:
- VLC is running in the window on the top left and you can see a live video of one of my Beaglebones. I would like to make a video so that you can see the quality of this video and the excellent frame rate. There is a latency of about 1 second.
- On the bottom left you can see how I used psftp (running on my Windows PC) to upload the SDP file from the Beaglebone to my PC.
- On the bottom right you can see the RTP server running using the streamVideoRTP script
- On the top right you can see top running, which gives the overhead of the capture and avconv applications.
Conclusions
I hope to make a video on this shortly as there are other elements that I would like to discuss. One important feature of this type of streaming is that the C920 is taking care of all video coding, a computationally very expensive operation. This means that the load on the Beaglebone is very light, as displayed in Figure 4. The total cost is about 12% CPU and 4% of memory.
I will follow this post up very shortly with a post on using UDP unicasting and multicasting to stream the video data.


Hi Derek
Nice tutorial, are you streaming a video from VLC player from windows and then playing the video on the beaglebone LCD? if so what dose that look like?
-Terrence
Hi Terrence, I am streaming to the PC and haven’t tried streaming to the Beaglebone. It may have difficulty in decoding the H264 at 30 fps in full HD. Interestingly, the Raspberry PI should be able to do it if you can direct the stream to the hardware decoder. Would be interested in seeing how people get on with doing it on the BB. Derek.
Hi Derek,
Great work here!
I have a question,
Is it normal for the playback to have 1 to 1.5 second delay on the screen?
I am streaming it directly from the board to a Ubuntu system. Not into windows. So I am just wondering if that is a problem with the board processing the stream before it gets sent out.
Thanks,
Russ
Thanks Russ – Yes, processing and encoding the video on the camera, serialising it, streaming it over the network and then decoding it all have a time cost, which I would estimate results in a latency of about 1 second. I will have a video of my setup available shortly so you should be able to compare. Derek.
Hello Dr Derek!
greetings!
I wanted to know, using the beaglebone-black can i capture a 640×480@30fps video and stream it over wifi?
Well i don’t need any additional thing done, just capture from cam and stream. if the operation is possible without any major lag.
Thanks in advance Good Sir!
Streaming at any resolution using H.264 from the Logitech C920 tops out at 30fps and seems to use about 3Mbps bandwidth. It should work comfortably with WiFi, but I’ve been having problems making it work. I’ve recently come to the conclusion that the problem is simply that I need to use a powered USB hub, The C920 reports that it will use up to 500mA of power, my WiFi adapter reports up to 450mA, and my hub reports 100mA. The BBB declares that it only puts out 500mA, even plugged into a DC power supply. I’ve not picked up a power supply for my hub or a powered hub to confirm that this is behind my current problems but it makes sense.
An interesting thing I learned tonight with the latest version of my code is that the C920 will reduce its frame rate in low light situations. I was playing with my camera pointed out the window taking a set number of frames and moving onto the next video file. 30fps at 1 hour should be 108,000 frames, and in daylight each file was consistent, but after sunset and darkness, the files started growing in size. I also noticed FFMPEG reporting to the screen that the FPS was down to 15.
Hi William.C. Booner
I had the same problem, we were using edimax wifi dongle and logitech c920 camera, after seeing your post I was able to come to a conclusion,so I would like to know are you using any new USB hub, if yes which one is it?
Hi Derek,
i am using a Logitech C170,
i can capture the image and view it, but when i goto stream it, I get this error saying
[mp3@02da80] Format detected only with low score of 1, misdetection possible!
[mp3@0x2f900 ] Header missing
and dosn’t progress from there, i am guessing this is happening because i am not capturing any audio from the webcam yes?
i use the mjpg format to capture 640×480@30fps.
Any workaround for this? the Logitech has a mic on it, but well can I go about just grabbing the video and not using the video over the stream?
thanks
-Kevin
Solved well it needed a -f mjpeg on input stage but well now
avconv -f video4linux2 -i /dev/video0 -vcodec h263p -f rtp rtp://
works but resolution is limited to 320×240 trying to get a better resolution to work. lag is around 0.5secs
Hi Derek …….
Ref:
http://derekmolloy.ie/streaming-video-using-rtp-on-the-beaglebone-black/
I found the solution for MS LifeCam in native MJPEG and it works beautifully!
I started with:
# cpufreq-set -f 1000MHz
Rather than piping from capture, here I used avconv exclusively. I think it might be more efficient.
I replaced line 6 by:
# v4l2-ctl –set-fmt-video=width=320,height=240,pixelformat=1 (i.e. mjpeg)
Added this:
# v4l2-ctl –set-parm=7.5 (frame rate)
And replaced line 17 by:
# avconv -f video4linux2 -input_format mjpeg -r 7.5 -i /dev/video0 -vcodec h263p -r 7.5 -f rtp rtp://192.168.1.4:1234/
Everything else on your page remains the same. With these settings on the BBB at 320×240 8 fps, I get ~20% CPU (attached). At 640×480 8 fps, it goes to 71%. Camera image saturation, and barrel and vignetting corrections, are excellent. WD in the snapshot is 2.5 cm, and autofocus is *very* stable. I like this cam.
Caveats: I was unable to get any of this to show up in Ubuntu VLC. It would just time out and give an error. Hmmm. Win VLC works perfectly. Latency is 1.5 seconds.
Thus I have answered my own question and I encourage you to share it with others.
All the best,
Chris.
Hi. I read your blog and test my beaglebone black.
I seen streaming video on my beaglebone black but I want a listen to music the board.
of cource i want a streaming music.
If you know the streaming and play on beaglebone black, teach to me.
thank you.
Hi,
I did step by step like you but i got Error in Step 1, Could you help me?
I run ” ./streamVideoRTP ”
This is Error on my screen:
” ……..pipe: Invalid data found when processing input”
Thank you!
Hi,
Its a nice tutorial, I like it. Do you know how to connect a CCD or CMOS camera in Beaglebone Black?
I need just connect and to see the image, any idea?
Thanks a lot!
Juan C.
Hi Derek, Is it possible process the video and stream the video at the same time?
Hi, derek,
The tutorial is so great. your information is very useful and helpful. I’m green in beaglebone black.
you help me to caught up very quicky.
I want to try setup the video streaming follow by your video.
unfortunately, I have some problem. I hope you can help me to solve or some hints to me.
you are a expert.
my problem is beaglebone black cannot continuous streaming the video data to PC.
after enter command #./streamVideoRTP
normally, it will continuous to streaming the video data from camera to PC. ( I follow your video step by step to do it).
but my beaglebone black just run one time only. then it will stop.
I have tried to get your source again and follow your step one by step to do it
Is it a setting problem? Is it a buffer size for video streaming?
Thank you
Jacky
hi derk i am scientist at DARPA i want to make the wabecam an ip cam using beaglebone black
Hi Derek
I am using my beaglebone black with linux kernel image 3.2 withTI sitara rootfs. When I connect the a Edimax Wifi dongle to the usb port on beaglebone black it works fine, after that I attched a custom tusb2036 hub to the board and tried to access Wifi. But I was only able to scan and connect very often ,mostly it said “no scan results”. The point I noted that tusb2036 is full-speed compared to a standard hub (high speed) which worked perfectly fine even with beaglebone black.
When I connect the hub alone with my PC running with Linux PC with ubuntu 12.04 with kernel 3.8 scaniing works perfectly.
So does that mean that full speed to hgh speed emulation/simulaton is supported in 3.8 kernel which is not in 3.2 kernel ?? otherwise what could be the reason
Pls note the tusb schematics was verified by TI employees and said to be no issues
Thanks
Hari
Hi Derek –
I love your posts. Thank you. I was wondering if you have ever experimented with using the BBB board, an HDMI Cable and Display – to display a live video stream? I’m looking for code or a way to read in an RTSP or RTMP live stream and display it on an HDMI display hooked into the HDMI port on the BBB. Quick research shows that VLCJ might be an option. Wondering if you might have any suggestions. Please let me know if you need a live RTMP stream example to look at!
Thank you in advance,
Tim
hey
thanks a lot for this tutorial it helped me a lot, i am just having little issues with rtp..i am getting this error..
built on Jul 3 2013 19:28:08 with gcc 4.7.3 20130205 (prerelease)
…………………………………………………………………………………………………………………[h264 @ 0x2da80] max_analyze_duration reached
[h264 @ 0x2da80] Estimating duration from bitrate, this may be inaccurate
Input #0, h264, from ‘pipe:’:
Duration: N/A, bitrate: .N/A
Stream #0.0: Video: h264 (Constrained Baseline), yuvj420p, 1920×1080 [PAR 1:1 DAR 16:9], 25 fps, 25 tbr, 1200k tbn, 60 tbc
At least one output file must be specified
./streamVideoRTP: line 20: rtp://192.168.7.1:1234/: No such file or directory
anyhelp would be great
HI Derek it’s a pleasure watching your work !
i have a few questions if you don’t mind :
* if our beaglebone black is equipped with an LCD cape could we stream the output of our PC webcam into the BBB and then display it into the LCD cape using a Qt GUI is there a VLC package to be installed into the BBB ??
* could we send some serial command to the BBB that we want them to be directly transmitted by the BBB into a prolific USB to serial adapter ??
* is it possible to make the beaglebone black launch this qt interface directly when he start up ( nothing appears on the screen except the qt GUI wich is equipped with a quit bottons that turn off the computer ) ??
— yes no shame on that i want to build my own ipad double like robot i have build all the needed electronic card to actuate the robot and a servo card to make the altitude adjustment motor be like a servo and all mechanical parts are already printed but i am still baffled with those batch script adjustement i am new on this . i have only some experience with Python programming language .
best regards
– HI Derek it’s a pleasure watching your work !
Thanks.
– if our beaglebone black is equipped with an LCD cape could we stream the output of our PC webcam into the BBB and then display it into the LCD cape using a Qt GUI is there a VLC package to be installed into the BBB ??
Not really. Video decoding is a very heavy process that is not hardware supported on the BBB (It is on the PI).
* could we send some serial command to the BBB that we want them to be directly transmitted by the BBB into a prolific USB to serial adapter ??
Yes, the USB to TTL3.3V connector (UARTO0) is perfect for that.
* is it possible to make the beaglebone black launch this qt interface directly when he start up ( nothing appears on the screen except the qt GUI wich is equipped with a quit bottons that turn off the computer ) ??
Yes, have a look at systemd, but it will take some work.
Kind regards,
Derek.
Hello,
Thanks again for another great, detailed tutorial.
I think I’ve followed the directions correctly here, but when I run the script I receive the error:
“pipe:: Invalid data found when processing input”
and I am returned to the command prompt. The error appears to happen as the capture command is executed. Any thoughts?
Hi Derek,
Thank you for posting all the great tutorials!
I am having a problem though. As in the tutorial i am attempting to stream to a Windows 7 machine. The script streamVideoRTP fails out with an error message saying “At least one output file must be specified…No such file or directory”
I can ping the the PC successfully, but the RTP script can’t seem to find it. I did change the ip address in the script for my computer and I opened up port 1234 for TCP in Windows firewall. Over wifi and plugged in same response.
Any ideas?
Thank you
Alfred
when i m runing ./streamVideoRTP then i m getting this error “select timeout
pipe:: Invalid data found when processing input ”
can any one help me
Hello Derek,
I am using RTP streaming and I am able to stream without a problem when my BeagleBone Black is connected to the internet using an ethernet cable. But as soon as I connect to the the BBB to the same network using Wi-fi the streaming does not work. Is there something I have to do to get the wi-fi set-up to work?
Thanks,
Any help would be appreciated!
Hello Mr. Derek,
I am having a serious problem while streaming video. I am using BeagleBone Black REV C Debian Distribution. I am trying to stream video using Logitech C270h camera. I have seen your videos regarding this and tried it but is not working. I am getting error message “SELECT TIMEOUT and PIPE:: INVALID DATA FOUND WHEN PROCESSING INPUT”. I just want to inform you that my camera does not have H.264 format. It is a 720p camera. Please help regarding this problem.
Hi everyone…my project involves developing a standalone system for image and video processing…. initially i heard Raspberry pi can do multimedia tasks better than BBB… but after exhaustive search through discussion forums i found that pi is not an attractive choice for my needs……
components involved are
camera===>BBB===>Zigbee module……
Power supply <==== portable USB baterry /powercape
working:
-capturing a live video stream using a cam attached to BBB
-processing the captured data(some kind of compressions)
-send the compressed data wirelessly using a zigbee module attached to BBB
my doubts are
– can BBB capture video streams from a camera?
-If yes, what are the cams which are economical to buy??
-can BBB process videos with openCV installed on it??
-can a Zigbee module be attached to BBB??
-can i be able to operate BBB with batteries(two no.s) or a portable usb battery ??
since am a beginner in embedded linux platform please kindly suggest me tutorials and books which i can go through to master the use of BBB with openCV and interfacing BBB with Zigbee module.
I am looking forward your views and suggestions which will be greatly helpful for me… thanks in advance.
Hi,
Derek I have been following your link for streaming udp/rtp. I have found this very helpful but i am facing two issues.
1- latency is about 2-3 sec
2- every time it gives the fps=30 whether i had configured the video0 device with 10fps using v4l2-ctl –set-parm.
Can you please help me to figure out these problems.
Thanks,
Hammad.
Hi i m making a ROV and i require to stream the video. i understand that you are running logitech camera according to the codes and all. but i cant run the code with an average camera. can anyone tell me what i am doing wrong. Please help!
Derek,
Great videos and clearly explained. Just bought your book and I expect nothing but good things. Thanks for all you do.
Jeff
Derek,
Your new Beaglebone book is absolutely super! Or as we like to say: It is “off the chain” good. The book is in depth and a wealth of knowledge. Really, really nice job by you and your team.
I can’t wait for your next book which hopefully you are writing now 😉
Jeff Williams
Thanks for your support Jeff! I’m adding more content to the book website over the next while. No plans for another book just yet! Derek.
Hi Derek,
I came across your posting as I was searching on how to encapsulate a raw UDP MPEG-4 stream into a more reliable transport like RTP. Given that my front end already a UDP stream, is there a way to modify your work to accept that rather than the USB camera you’re using?
Best Regards
-Ted
Hi Derek,
I have a questions about robotic with BegaleBone Black. I have build one with wifi and bluetooth using usb hub to control by smartphones.The usbhub for getting more ports of usb to connect webcam, Bluetooth adapter and wifi adapter. The Bluetooth to controlled the robotic and the wifi for webcam. So, when I’m running the robotic will run really slow and then stop working. Also, I’m using Debian image with Python Language.USB I used “Insignia- 4-Port USB 2.0 Hub”. If you know how to fix my problem? because I’m using the robotic for my senior project. Sorry for my English. Thank You in advance.
It might be the issue is the usb hub! if so I had found product will works with BeagleBone Black
here is the link:
http://www.titan.tw/product/USB_2COM_BB.html
How much power can I provide over USB to an external device?
It limits the USB Host port power to 500mA. and the usbhub needs for each ports 500mA for each, so we are using three ports each one need 500mA and that not enough for feed the webcam, wifi and Bluetooth adapter.
Hi Ayman, when I read your question I immediately thought it was a power problem, which you have also suspected in your follow-up. The upper current limit on USB is about 500mA and can be much lower depending on the host device. I don’t think it is possible to drive a webcam and network adapter on the same board. In fact, I have difficulties with my laptop in driving a BeagleBone with a single webcam (no hub). You need a powered USB hub or you need to puchase a 2A+ 5V fixed power supply. Kind regards, Derek.
Hello Derek. Can you help me with this problem?
Video Streaming for the Beaglebone – derekmolloy.ie
Piping the output of capture to avconv
VIDIOC_ENUM_FMT: failed: Invalid argument
VIDIOC_S_FMT: failed: Device or resource busy
Force Format 2
VIDIOC_S_FMT error 16, Device or resource busy
avconv version 0.8.17-6:0.8.17-1, Copyright (c) 2000-2014 the Libav developers
built on Mar 15 2015 18:02:14 with gcc 4.6.3
pipe:: Invalid data found when processing input
Hi Nur, I’m afraid that is not an error that I have seen before. I’m assuming you are using the Logitech C920 as it does not work with other non-h264 cameras. Kind regards, Derek.
Hi Derek… i dont know if you can help but im looking to stream a video from the bbb with the c920 over rtp but with the less delay possible… using of course the enconder h.264 1080p of this cam…. i tried with your code but i get a delay of 1 to 1,5s and i need something like 100ms …. can you help me ?
Hi Filipe, I’m afraid that I tried and I couldn’t get the latency down any lower than that level, Kind regards, Derek.
Thank you so much for you time! i’ve managed to do that with the libraries of gstreamer in c++ code…
thank you one more time.
By the way, this is one of the best tutorials i’ve seen about the subject! 😉
Hi Filipe,
Im looking to get a stream with a low latency to drive my robot.
Can you explain how you managed to do this with gstreamer?
Thanks!!
Can you share details how you resolved this issue, please? Thanks!
Hello Derek and Filipe,
I must appreciate the extent to which the details are explained for video streaming. It is indeed a very good article.
Coming to the latency involved for the system, I want to ask you both , if there is a way to bring down the latency to less than 200ms. I am trying to adopt this solution for a Drone application as part of my university project and hence trying for a low latency video streaming.
I look forward for your reply.
Hi Derek and thanks for the howto. I managed to get RTP streaming to work with C920 and beaglebone black (rev B). BUT, the image on the playing computer flickers like crazy. And with flicker I mean the light flickers in the image. It’s streaming at 30 fps, about 3000 k/s so it seems ok. Any idea why the flicker and can it be tweaked in the settings maybe?
Also, have you tested the 720p mode on the C920? Or the RTSP mode? I tried to stream RTSP but the bitrate stays at 0 k/s although it says streaming.
Hello, When in the first step you say Run RTP, the text starts running all over the putty window. How can I execute ./streamVideoRTP?
Thanks,
How to stream webcam video from Beaglebone Black over the internet?
I’m using your built binaries, And got this:
./streamVideoRTP: line 6: v4l2-ctl: command not found
./streamVideoRTP: line 18: ./capture: cannot execute binary file: Exec format error
./streamVideoRTP: line 18: avconv: command not found
Hi Derek, I am using your streamVideoRTP script for streaming video to remote machine through i.p. address. So, I want to record that streamed video to an playable .mp4/.avi format on remote machine directly without using record button on VLC and without storing it on Beagleboard.
Is there any way to record it directly on remote machine?
Your tutorials are awesome!!
Thanks.
we can no longer install avconv on debian linux., it not support more,
So i can not run streamVideoRTP file.
Could you change streamVideoRTP script to use ffmpeg instead of avaconv?
./capture -F -o -c0|avconv -re -i–vcodec copy -f rtp rtp://192.168.1.4:1234/
=> ./capture -F -o -c0|ffmpeg -re -i–vcodec copy -f rtp rtp://192.168.1.4:1234/
I run ./streamVideo, But I get the follwong error? what is solution?
VIDIOC_S_PARM: failed: Inappropriate ioctl for device
Force Format 1
ffmpeg version 4.1.6-1~deb10u1 Copyright (c) 2000-2020 the FFmpeg developers
built with gcc 8 (Debian 8.3.0-6)
configuration: –prefix=/usr –extra-version=’1~deb10u1′ –toolchain=hardened –libdir=/usr/lib/arm-linux-gnueabihf –incdir=/usr/include/arm-linux-gnueabihf –arch=arm –enable-gpl –disable-stripping –enable-avresample –disable-filter=resample –enable-avisynth –enable-gnutls –enable-ladspa –enable-libaom –enable-libass –enable-libbluray –enable-libbs2b –enable-libcaca –enable-libcdio –enable-libcodec2 –enable-libflite –enable-libfontconfig –enable-libfreetype –enable-libfribidi –enable-libgme –enable-libgsm –enable-libjack –enable-libmp3lame –enable-libmysofa –enable-libopenjpeg –enable-libopenmpt –enable-libopus –enable-libpulse –enable-librsvg –enable-librubberband –enable-libshine –enable-libsnappy –enable-libsoxr –enable-libspeex –enable-libssh –enable-libtheora –enable-libtwolame –enable-libvidstab –enable-libvorbis –enable-libvpx –enable-libwavpack –enable-libwebp –enable-libx265 –enable-libxml2 –enable-libxvid –enable-libzmq –enable-libzvbi –enable-lv2 –enable-omx –enable-openal –enable-opengl –enable-sdl2 –enable-libdc1394 –enable-libdrm –enable-libiec61883 –enable-chromaprint –enable-frei0r –enable-libx264 –enable-shared
libavutil 56. 22.100 / 56. 22.100
libavcodec 58. 35.100 / 58. 35.100
libavformat 58. 20.100 / 58. 20.100
libavdevice 58. 5.100 / 58. 5.100
libavfilter 7. 40.101 / 7. 40.101
libavresample 4. 0. 0 / 4. 0. 0
libswscale 5. 3.100 / 5. 3.100
libswresample 3. 3.100 / 3. 3.100
libpostproc 55. 3.100 / 55. 3.100
.pipe:: Invalid data found when processing input ==> this is error
cat ./streamVideo
v4l2-ctl –set-fmt-video=width=1920,height=1080,pixelformat=1
v4l2-ctl –set-parm=15
#./capture -F -o -c300000|ffmpeg -i – -vcodec copy -f rtp rtp://192.168.1.4:8090/
./capture -d /dev/video1 -f -o -c300000|ffmpeg -i – -vcodec copy -f rtp rtp://172.30.1.58:8090/