[updated April 2015] Although the BBB is supplied with a Linux distribution already on its eMMC, one of the first steps you may carry out is updating your BBB to have the latest Linux distribution.
The beagleboard.org website has very clear instructions on writing a new system image to the BBB, so this section only details observations and additional steps that may be useful in achieving a successful upgrade.
Downloading a Flasher Image
The latest BeagleBone Black Debian distribution images are available from BeagleBoard.org/latest-images. There are two versions to choose from: a version that runs directly from the micro-SD Card; or a version that writes to the BBB’s on-board eMMC, called a “flasher” image. The advantage of the eMMC version is that once it is written to the eMMC (which takes about 5–25 minutes) the BBB will boot in about 10 seconds from then on, and the micro-SD card slot will remain available for additional removable storage. For the remaining steps, the eMMC flasher image is chosen and Windows is used as the desktop operating system.
[tagline_box backgroundcolor=”” shadow=”yes” shadowopacity=”0.7″ border=”0px” bordercolor=”” highlightposition=”top” content_alignment=”left” link=”” linktarget=”_self” modal=”” button_size=”” button_shape=”” button_type=”” buttoncolor=”” button=”” title=”” description=”” animation_type=”0″ animation_direction=”down” animation_speed=”0.1″ class=”” id=””]If you are planning to flash the eMMC with a new image, please ensure that you download a “flasher” image. The latest flasher images are available at: http://elinux.org/Beagleboard:BeagleBoneBlack_Debian and the latest image that is currently supported in this book is: BBB-eMMC-flasher-debian-7.8-lxde-4gb-armhf-2015-03-01-4gb.img.xz[/tagline_box]
Creating an SD Card Image
- Using a web browser, download the image file to the desktop computer. You should end up with a file of the form BBB-eMMC-flasher-distro-YYYY.MM.DD.img.xz.
- Check whether your desktop computer can open the .xz format file. If it cannot, then please see www.7-zip.org for an open-source file archiving tool, which is capable of extracting the .xz format—a lossless data compression format that uses the Lempel-Ziv-Markov Algorithm (LZMA).
- If the archive extraction is successful, the result will be a single file with the .img extension (SD image file) of the form BBB-eMMC-flasher-distro-YYYY.MM.DD.img.
- Under Windows, install “Win32 Disk Imager” from the Sourceforge.net website: sourceforge.net/projects/win32diskimager/files/latest/download. Extract the download to a folder that you can find again in the future, and execute Win32DiskImager.exe directly from within that folder. You will have to “elevate it” by right-clicking and choosing “Run as administrator”. The tool is displayed in Figure 1. Please note that there is a similar tool for Mac OS X called “Pi Filler”.
- Place a micro-SD card that has sufficient capacity (ideally 4GB+) into your computer’s SD card reader/writer and then start the Disk Imager tool. Once the disk imager software has started, it will not detect the SD card when it is inserted into the computer, so please insert the SD card first. A Class 10 Micro-SD card or greater is preferable.
- Using Win32 Disk Imager, write the .img file to your SD card (using its drive letter for the SD reader on your desktop). This will take some time (about 5–15 minutes), which varies according to card speed, writer speed, and the distribution used. See Figure 2.A1 below for a screen capture of Win32 Disk Imager in action. When you are done, you will have a micro-SD card that you can use to flash your BBB’s eMMC.
Figure 1: The Win32 Disk Imager writing to the micro-SD card.
Desktop Linux Alternative
If you are not familiar with Linux then please ignore this section—it is here for reference. Here are the steps required to create the SD card image under Linux:
- Find the micro-SD Card device (for example, mine is sdd). Type the following:
|
1 |
$ mount |
- Download the flasher image file (get the URL from BeagleBoard.org/latest-images). For example:
|
1 |
$ wget http://debian.beagleboard.org/images/BBB-eMMC-flasher-debian-7.5-2014-05-14-2gb.img.xz |
- Decompress the .xz file:
|
1 |
$ xz -d BBB*.xz |
This gives you the image file: BBB*.img. Write the image to the memory card (please check that you have the correct SD card device—in my case it is /dev/sdd)
|
1 |
$ sudo dd if=./BBB*.img of=/dev/sdX |
where BBB*.img is the full name of the image file—use the Tab key to autocomplete. /dev/sdX is your specific SD card reader device. It should take 5 to 10 minutes for this write to complete.
Flashing the BBB with the SD Card Image
At this point you should have a micro-SD card containing a “flasher” Linux image. Here are the steps to flash the eMMC:
- You should perform this process with only a single 5V 2A power supply plugged into the DC jack. Alternatively, you can use a USB adapter for power. Disconnect the Ethernet cable and remove any shields and USB peripherals.
- Power off your BBB by physically disconnecting the USB/power cable.
- Plug the micro-SD card into the BBB’s micro-SD card slot.
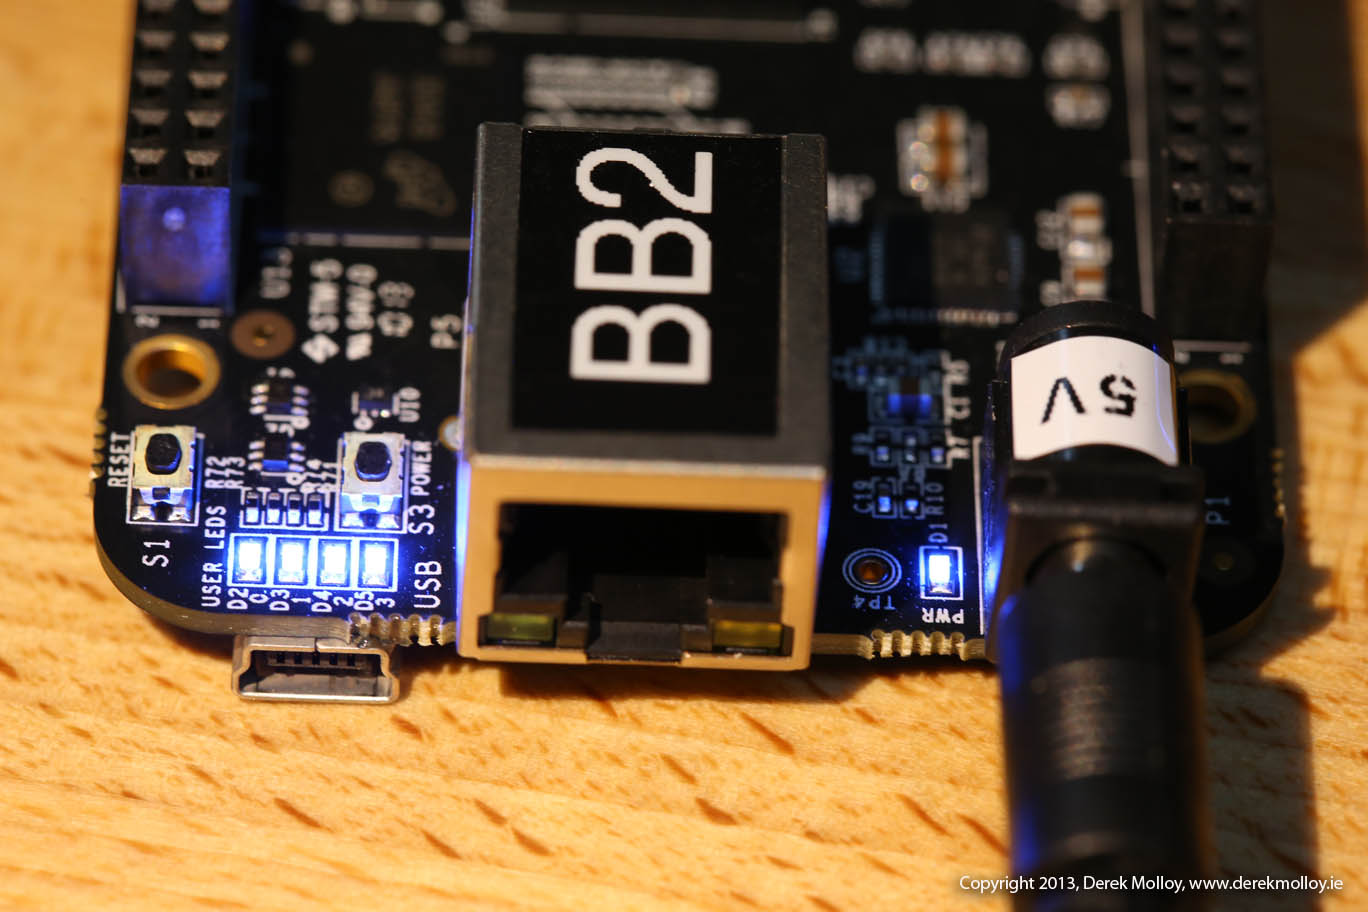
- Hold the Boot Button (S2) on the top right (near the SD card slot) and, while holding this button, insert the USB/power lead to connect the power. Keep holding the button until the LEDs start to flash. The blue on-board LEDs should light in sequence and then continue to flash for the next 5–25 minutes (depending on the distribution used and the speed of the SD card). The latest distribution flashes in a Cylon/Knightrider pattern.
- Wait until the LEDs stop blinking and all 4 LEDs are fully lit as in Figure 2 (the latest image then powers the board down). This process can take 5-25 minutes depending on the image used. If the flashing procedure fails—for example, no LEDs flash, or it keeps running for more than 45 minutes —then disconnect the power and try restarting the BBB with the S2 button pressed.
- Remove the micro-SD card. This is important, as you could end up flashing the eMMC again by accident.
- Finally, press the Power button (S3) to power up the board and you should have the latest image installed.
Figure 2. Success! And the all of the LEDs turn off and the board shuts down.
Some notes:
- On point 9. above, on one board that I have I must press the Reset button (S1) after I apply the power or nothing seems to happen. In this case (while the board is powered) I press the Reset button (S1) and the Boot button (S2) at the same time and this seems to work.
I will modify this post with any other advice that you may have.

Hi Derek,
Awesome videos and very informational and helpful. I was on the raspberry pi, but i just got my beaglebone black yesterday. I was curious about a few things.
1.) have you tried to load ubuntu on it? if so, did you create a blog or video about it already? what image/build did you use?
2.) out of the box, is I2C enabled? i have some project i want to port over to the BBB that is currently running on my pi (support for a 128×64 LCD display)
Thanks,
Mike
Hi Mike, I haven’t tried Ubuntu on the BBB yet. I did not he BBW, but I have been using Angstrom a lot more and find it great, so I have stuck with it on the BBB. For Ubuntu, previously I built my own image for the BBW (see my video on compiling the kernel/USB adapters – it’s not a bad place to start). I2C is enabled out of the box on the BBB under Angstrom, Derek.
We have been using Ubuntu on BBB for about a month.
If you prefer Ubuntu, you can download Ubuntu from various sites, or get a pre-installed and configured micro SD Flash with Ubuntu 13.04 for the BeagleBone Black from:
https://www.akirisolutions.com/products/beagle-bone/ubuntu
The BeagleBone Black is an awesome board.
Derek, quick question – is there a way to save a full backup of my BBB eMMC (so I could restore the installation with all my apps and settings if needed later)??
BTW, thanks SO much for your excellent video tutorials… just got my BBB, so I am starting to work through them now.
Derek, Recently i got my beagle-bone Black and working on it.
I Have downloaded angstrom images and used SD card to boot an it works.
I was looking for customization of kernel and rebuild the image and use.
I tried some from different website documents but its failing.
Do you have any video tutorials or documents for building kernel, u-boot and rootfs from scratch.
Hi, Derek ,i followed the steps as u described . my problem is after completing step 8 pressing the s2 switch and powering up the board the 4 usr LEDs lit up and the remain unblinking . and the board is not flashing with os . i tried about 8 times . now i am frustrated . is there anything i can do . plz help me.
Hi , Derek , can you tell me what will happen if i delete the MLO file of a running os and then try to flash a new os using sd card.
Dear Derek,
Can we learn linux device drivers using Beagle Bone Board.
If you dont mind, Could you pls tell what and all can be done using Beagle Bone Board.
Regards,
khamar
Hi Derek !!
I Just want to Erase the Image Shipped along with my New BBB. I want it to always boot from SD-CARD. I am speciffially Planning to explore the BBB with Startware. So i will always Place the MLO and the app.bin which i am testing ? Please suggest
Hi Derek,
I just flashed my BBB to the latest 9/04/13 image and now the GateOne ssh is missing, How do I access this another way? Thanks
Under windows you can download and install PuTTY for free and use it to SSH to the Beaglebone. You just need to know the Beaglebone’s IP address.
Hello Derek,
When flashing the BBB it starts out okay, or so it appears (flashing lights), but then it goes to 2 solid blue lights after a few minutes into it. Have you experienced this before or know what the cause may be? Thanks,
John
Never mind…got it working. The reason it went to two solid blue was because I had an insufficient power supply. My fix was using USB Power and 5vdc p.s. plugged in at the same time.
Thanks very much Derek, the info you provide is invaluable! Your time and effort are very much appreciated 🙂
Hi Derek,
Do you have any idea how much space Angstrom takes up on the eMMc?
Currently just running your boneCV program on the Beaglebone Black and we only have 80MB of space remaining? This seems odd to me.
Thanks for posting great tutorials!
Jason
Derek,
Thank you so much for all this valuable information. Recommended modification to your excellent explanations:
Step #9: Add this sentence: “After powering up the board, the four leds will flash initially, but then they will all light up together for a few moments. After this you can release the Boot Button.”.
Patrick
Thanks Patrick,
That’s very useful. Have modified the description as you suggest.
Derek.
Hi Derek,
I followed the steps as you described above. When holding the button only 3 LEDs lit up. Please help me.
Hi, would be nice to “know” what indicates that fashing was not succsessfull- I assume when the CPU led is the only led that is turned on, no heartbeat, no sd, flash activity…
Hi Can anybody help me ?
I’ve beaglebone black, I’m trying to reboot it with a new angstrom image from SD card.
But the problem now is BBB is booting for just about 5 minutes and all the LED’s will go off with SD card.
And if I boot without SD card only 3 LED’s are glowing i.e. D2,D3,D4.
What may be the problem ?
I experienced the same thing when you bootup while the Ethernet cable is connected to the BBB. Try booting up with Ethernet disconnected and when is up, then you can reconnect the Ethernet cable.
Hi Derek,
Thanks for doing the invaluable videos. I have a problem though. I used BBB-eMMC-flasher-2013.09.04.img distribution on my BBB. However when I try to opkg install qt4-embedded I get libgles-omap3 unsatisfied recommendation messages and finally cannot install qt4-embedded with kernel-image-3.2.30.
TIA,
Vic
Hi Derek
Robert C Nelson at https://github.com/RobertCNelson/tools/tree/master/scripts
Have made some nice scripts for flashing eMMC from running SD and vice versa.
Regards
Jacob
Dear Derek,
pls provide me help in regard to change the logo-(Header/Dog/while booting….i hope u will give attention on my request..
Hi Derek,
eee, is “Win32 Disk Imager” safe?
i used that tool yesterday, then my microsd card become read only. i cant rewrite BBB image to my card again. meh. bad luck. or maybe, iam am too lazy to find out.
i will try to use “usb image tool” (http://www.alexpage.de/usb-image-tool/) soon.
Dear Derek,
I have wec7 image files such as nk.bin, mlo, ebootsd. I want to boot bbb using this through sd card.
please give me the procedure.
We have a BBB and in the sd card we have debian image. When we try to flash the eMMC through the sd card we hold down the boot button and user 0 and user 1 go solid. there is no flashing of leds before or after. We are using both 5V jack and USB power. Can you help us?
Derek thanks for all ur tuts. When I try to flash emmc with Ubuntu the 3 LEDs glow n nothing happens. I tried many times with various power sources with no luck.
Hi Derek,
Why not using the dd linux utility to put the image on the SD card and so something like
sudo dd bs=1M if=BBB-eMMC-flasher-debian-7.5-2014-05-14-2gb.img of=/dev/sdg
Hi Manu, Yes, that is the preferred way, but unfortunately not everyone has desktop Linux! Derek.
Hi Sir,
Iam following your site for flashing image on beagle bone.
iam flashing debian image on board.
i did all the steps but my board is not booting.
i did many times but it is not showing anything in my hdmi display.
please suggest me how to find my board is booting or not.
reg,
arun
i would like to know if you have an image available that has spidev enabled by default? i have tried everything to enable this feature for some nrf24l01 radios i have with no success…… PLEASE HELP ME… and thank you
i think you mean led D2 keeps on flashing instead of d%
Thank you very much.Iam able to boot from the SD card now
I want to Flash my Beaglebone with Android Operating System.
Can anyone suggest me how to proceed.
thank you.
Hi Derek,
When i use just usb cable, putty works fine but when i plugged in dc power to bbb.I can not use putty ,gives me error “Network error:Connection refused”.I do not understand why,it is all about dc power.
Hi Derek,
After i flashed latest Debian , i can no longer access my BBB throw putty or shh. It says Connection refused, any ideas why ?
Hi, if you are sure that the IP address is correct (e.g., 192.168.7.2) and the BeagleBone is not appearing as a USB device on your PC, then you should flash it again with a freshly downloaded image — it’s likely that the image on the eMMC is corrupt. Derek.
Hi Derek,
I want to load my own compiled Image. But how to identify its working properly or not ??
Hi Derek,
First of all a Happy new year if you read this post just before the 31st !
Question: I’ve just received the revision “C” of the BBB with Debian image after bricking my revision B beaglebone black ( electrical mistake….)
Is there a lot of difference between the angstrom and debian image? As i tried to install the Libetech project software on the first BBB but had always issues to make it work. (http://www.jeremyblum.com/2012/09/16/open-sourcing-the-libetech-qr-code-lock-system/)
Could this project work on the revision C with Debian without many different configurations ?
Thanks
Many Happy Returns. No, there appears to be better driver support and I find the Debian distribution to be a lot easier to work with. I haven’t used that project, but if you could get the code project working under Angstrom then it should work just as well under Debian. Derek.
Hi Derek,
My commment has been deleted. Did i write something wrong ?
Regards
Pietro
Hi Pietro, no, the inclusion of the URL just put it up for review. Kind regards, Derek.
Hi Derek,
I have an application built with IAR that I am running from SD Card on the BeagleBone “White” board. I boot my application using an MLO file from the TI Starterware and create an “app” file to load which both live on the SD Card. As you know this setup will copy the application into RAM on the BB White and begin execution at 0x80000000. I use the tiimage utility to convert the IAR binary into an MLO loadable app file.
I am trying to get this image to run on the BB Black. I am wondering if it is possible to do the same, boot from the SD card and execute out of RAM as the BB White does or do I need to program the eMMC with the image from the SD card. Is this possible? If so do I need to specify a different load address and/or use a different MLO file when booting with S2 depressed?
Any insight appreciated.
Hi there,
As of a couple months ago I started working with BeagleBone Black for a work project. Recently, I’ve written a bash script that is supposed to install the software I’ve written. Sometimes (not every time) after running echo -en ‘\n\niface eth0 inet dhcp\n’ >> /etc/network/interfaces; /etc/init.d/networking restart the board will stop responding…which doesn’t make sense. Other times it goes through the entire script without issue, and after a reboot it will no longer respond….but sometimes it appears to work just fine.
None the less, I need to reload a debian image so I can continue working.
I’ve followed instructions from many different websites, but I can’t seem to get the BealgeBone Black (Rev B6) to load an image off the SD card. I’ve tried FAT16/FAT32 formatting on the 16GB SD card, used the latest Debian image from beaglebone website, and other combinations of stuff, trying to figure out how to get it to work. Sometimes when I hold the s2 / boot button, D4 will stay lit for most of the time, instead of D3…other times it’s reversed. Sometimes when trying, after waiting 30 mins, it appears to be finished by lighting up D3 and D4 solid, and no flash from the other 2.
One of the reasons I am confused is because the LED’s on the 5 boards I’ve tried never light up as described on other websites, such as this page. All 4 LED’s only ever light up when you first power the board on, but never after that moment.
Any recommendations? different things to try?
Thank you!
Hi Derek,
I’ve heard that the new FileSystem F2FS from Samsung is the best filesystem for SD cards and eMMC memories . It incorporates wear leveling and other performance improvements for NAND based memories.
How would we be able to move from EXT4 to F2FS filesystem on the Beaglebone Black?
Hi, doing this eMMC image copy works very nicely but I keep ending up with a BBB with too little file system space left.
What would be really great was an instruction how to copy an image of one’s choice from SD to eMMC and then clear the SD card and use its free space as a file system expansion. It should in some way or another allow lots of software to be installed (/usr).
Hi
I am trying to install ubuntu in beaglebone but ubuntu desktop environment wont’s came.Now i am trying to restore angstrom to eMMC on Beaglebone Black. I searched all things related to this but nothing found .please hlp me .
I accidently modified uEnv.txt file located in eMMC of my Beaglebone black. Now the board is not booting. I can not even see BBB for serial connection from terra term. How can I get access to the board? If I can just access to uboot I could reflash or run it using nfs. Any ideas?
Frank, if you don’t need anything on the beaglebone then you should be able to reflash it using the usual steps. The alternative is to boot the BBB from a SD card (not flashing image) and then mount the FAT partition of the eMMC as a device. You can then edit the uEnv.txt file using an editor like nano. Hope that helps, Derek.
Derek, thanks a lot. I will try it. My objective is to stop booting at uboot. So that I can setup nfs and tftpboot. Since I messed up uEnv.txt Do you think I have to reflash it first? I was thinking it should at least try to boot and stop on uboot but not load kernel. That is why I modified uEnv.txt in first place. I am new to Beaglebone it is different than OMAP 3530.
Hi
Please help me because i want to restore angstrom os in eMMC in Beaglebone black. I was formatted my beaglebone because i want to restore anstrong os . When i am connecting beaglebone with my system then nothing is shown .I am not getting any solution how my beaglebone is working.plz Derek help me . ..plz
Hi Dr,
I would like to thank you about the information. I did all the steps and it has been successfully. But I have question about how to setup a Bluetooth? because I built a robotic car and I need to control it using smart phones that has Bluetooth technology. Please help !
Hi Derek,
I wrote the Debian image to my SD card in the Beagle Bone Black, but I’m not sure why the serial port UART 4 does not work with the Adafruit libraries. I had Armstrong before and it worked perfectly fine. I don’t know if different permissions need to be specified when using Debian.
I would really appreciate your help
Hi Derek.
After I programming python on my board, It had started to blocked, sometimes I needed reboot or power off constantly. NOW When I connect my BBB, anything happen, it is not recognize in Win or Linux, even not as a usb device or mass storage., only blink the led USR0. the screen shows messages about recognize ports, GPIOs, and so on, I can not get to boot.
If I do a reflash or boot from a uSD, I will lose the information and files on my home directory?.
I did a procedure with beagleboneblack-save-emmc, but after a long time (with press the boot switch S2), nothing happen, the leds are OFF. no blink or anything.
I appreciate your help or advice.
thank you
Please help ! when connecting bbb to pc , power led is blinking once and all usr leds are not blinking even once . I followed the steps mentioned above and still the problem is same ! I dont know what happened to it . Please someone help .
do found any solution please !!!
Hello Derrek,
Right now I am strying to install latest image( from beaglebord webpage to BBB(debian)). D5 led did’t stay on, opposite to it is almost stays down. What may be triggering this problem? After reintalling this latest image, I unplugged microSD card, and booted BBB but any of the 4 leds stopped litting. But after insterting micro sdcard and booting from it, I can connect to the board with usb cable.
I repeatedly went back to step9 reapplied steps, but no use.
Could you please help me?
Regards,
Upol
Hello Derrek,
I solved that problem. I downloaded emmc flasher from here http://elinux.org/Beagleboard:BeagleBoneBlack_Debian#BBB_Rev_C_.284GB_eMMC.29. After that everything went as you stated. Thanks.
Derek,
It appears that the latest images of debian come with the uEnv.txt set to just boot instead of flashing the eMMC. I think the write-up should be modified to include the following from:
http://elinux.org/Beagleboard:BeagleBoneBlack_Debian#Flashing_eMMC
———————————————————————————————
quoted text
———————————————————————————————
To setup the standalone microSD image to automatically flash the eMMC on powerup.
In /boot/uEnv.txt:
##enable BBB: eMMC Flasher:
#cmdline=init=/opt/scripts/tools/eMMC/init-eMMC-flasher-v3.sh
Change to:
##enable BBB: eMMC Flasher:
cmdline=init=/opt/scripts/tools/eMMC/init-eMMC-flasher-v3.sh
and reboot the system, it’ll flash the eMMC on the next bootup. (make sure to remove the microSD after flashing is complete)
———————————————————————————————
quoted text
———————————————————————————————
Actually, it appears that I downloaded the regular bootable SD card image. In any case, if the user finds that the image doesn’t flash the eMMC then he can try changing the /boot/uEnv.txt to uncomment the line to enable the flasher.
In fact, I think it is preferable to use the bootable SD card and just change the /boot/uEnv.txt to make it a flasher. It seems to change to a regular bootable image after rebooting and flashing the one time.
Sorry for all the comments.
For the 2015-03-01 releases, there are 5 different images for the BBB & only two are designed to flash the eMMC.
I lost several weeks of frustrating work before discovering that this and that the older ways of flashing no longer work, despite the implication that they would at: http://beagleboard.org/latest-images.
Study the 2015-03-01 Release Notes in the lower portion of page: http://elinux.org/Beagleboard:BeagleBoneBlack_Debian
Derek,
PS. For the 2015-03-01 release, I had tried adding the:
/boot/uEnv.txt file with:
##enable BBB: eMMC Flasher:
cmdline=init=/opt/scripts/tools/eMMC/init-eMMC-flasher-v3.sh
to the image on the SD card, however, for me, despite many, many tries, this never worked.
When I switched to one of the flasher 2015-03-01 releases, the eMMC flashed & retained the 2015-03-01 release first try, even powering down the board after the eMMC fashing completed.
Hi.
I try to install a Debian image on my BBB.
After booting from mSD card, first I have seen a light “wave” generated by LEDs. Now all of them are blinking simultaneously. Two short blinks and pause. It goes over 45 minutes already. Does it mean anything. Is there any LED encoded progress bar?
Hi Petro, It sounds like it is booting — are you definitely using a flasher image? (I have made that mistake before!) It should be in the name of the file. Kind regards, Derek.
Now I am not sure any more what image I was using.
But my problem looks similar to one described here:
http://blog.asiantuntijakaveri.fi/2014/05/flashing-beaglebone-black-rev-b-2gb.html
I still have to try if the solution will work.
Hi Derek,
I have checked what image I have been using. It was the latest Debian from here:
http://beagleboard.org/latest-images
According to manual I have to modify in
##enable BBB: eMMC Flasher:
#cmdline=init=/opt/scripts/tools/eMMC/init-eMMC-flasher-v3.sh
Change to:
##enable BBB: eMMC Flasher:
cmdline=init=/opt/scripts/tools/eMMC/init-eMMC-flasher-v3.sh
So I have done it, and got this result.
I have found similar problem description
http://blog.asiantuntijakaveri.fi/2014/05/flashing-beaglebone-black-rev-b-2gb.html
But I have not tried it yet.
Hi Derek, you were right about wrong image.
I have downloaded a flasher image, and everything went smoothly.
Best.
Petro.
P.S. the latest debian flasher even powers off at the end.
I hope this was not already posted, but I thought it was worth mentioning. The LED flashing sequence I saw when updating my eMMC was a back-and-forth (cylon eyes, KITT) pattern, and D5 did not stay on at all. My little HDMI display showed activity during the process before going all white, not sure why. When the process was done, all 4 of the LEDs when on, but they did not stay on longer than maybe a minute or two before all going dark. ?? The flashing worked though.
I searched everywhere to find out what the back-and-forth pattern meant before finding it on google groups at https://groups.google.com/forum/#!topic/beagleboard/fD5jfj1E4N4
Was this a change of some kind or has the pattern always been this way? Thank you!
Thanks Gary, Yes, it is a new indicator and it looks great… I’ll have to update this guide! Thanks, Derek.
It looks great but offers no progress without a screen. A flashing back and forth with maybe making the LED’s solid as percentage of the eMMC burn. I know this is not under your control Derek, but maybe pass that info on to them? The flash back and forth is cool, but how about flashing just the first LED then as the progress goes to 25% done, then make the first LED solid and flash the next one? And so on… honestly, how hard could that be? Then the user SEE’s flashing activity with at least one LED and sees a bar or two to show how far the flashing is going. The back-and-forth is nice to see that something is working, but the WAIT and SEE for a successful finish is rude. Honestly, how hard could that be? In ANYTHING? Routers, wireless access points, TV’s, etc. Firmware updates should definitely show a progress, even if the visual is limited to 4 LED’s. Just my opinion.
Hello Derek,
We are facing below issue while building the program from eclipse in beaglebone.
./helloworldtest: error while loading shared libraries: libstdc++.so.6: cannot open shared object file: No such file or directory
We are using 64 bit ubuntu on desktop and in BBB we have installed debain image.
Request you to reply to this error urgently.
Thanks in advance.
Hi there, it is not clear from your message if you have installed a cross-compilation environment. Please watch my video
at https://www.youtube.com/watch?v=hzZHcH5quow and follow the updated steps linked to in the video description message to ensure that you have a properly configured cross-compilation environment for hard floats. Kind regards, Derek.
P.S. I will delete these two messages in the next few days as they are not related to “Writing a new Image to the BBB”.
I downloaded the latest Debian image, 2013-03-01, listed above in your write up. I unzipped it with 7-zip and used Win32 Disk Imager to write to my 4 GB SD card. One problem I think I see is that the Win32 DIsk Imager MD5 checksum is not the same as listed on the Debian download website. I downloaded it again and still got the same MD5 result so I am pretty confused. My problem is that I never get the 4 steady LED response no matter how long I let it operate. The LED’s blink until I reset the system. Can you shed some light on this problem?
Hi Larry, that strange about the checksums, but it may be human error on the website. It sounds like your image is booting rather than writing to the eMMC. Please check the following points in order:
Kind regards, Derek.
Larry, Derek, the checksum is for the zipped archive, not the decompressed image. I had the same issue initially.
Thanks Thomas, that makes sense, Derek.
Derek,
I’ve been using your “FLASHER” images for the BBB for a couple of years now, I want to say thank you for sharing your hard work with the world, it has helped me go from not knowing anything about Linux to learning quite a lot.
Do you have a donation site or google wallet?
Thanks again,
Troy
Thanks Troy, Robert Nelson does all of the hard work on the images — I’m just the educator. The advertisement and Amazon links cover the cost of hosting the website — that is all I need 🙂 Kind regards, Derek.
Hı DEREK,
I format my PC beaglebone tie , trying to make the installation of the MMC, but my beaglebone only USB power light does not burn lights.
what should I do?
Hi there — try again, but make sure that if you have a REV-B BeagleBone that you use the 2GB flasher image, not the more common 4GB flasher image. Kind regards, Derek.
Hi Derek,
I have a BeagleBone and I did write an Angstrom image on provided sd card. Later when I connect it to my PC it’s not getting detected. The led’s are not glowing. Please help me. What should I do??
Hey, I did all the steps that you’ve mentioned but when i open the console on Putty nothing shows!
can u help me with listing the files and directories that should exist on the SD card just to make sure that i didn’t make any mistake in the following procedure.
thank you
Hi Derek,
I am able to boot my BBB successfully with live image (Debian 2015-07-17) – I can see my BBB through my router and SSH into it successfully.
If I use the flasher image, the BBB LEDs go into Cylon/Knightrider pattern for 5 minutes and then keep blinking ON/OFF in about half second interval simultaneously. I hold power down for 8 sec, remove the SD card, reconnect the Ethernet cable, but the BBB never acquires an IP address. Would this indicate a failed eMMC flash?
Also during boot of live SD card, the home page says I have “rev 0A5C” – would this indicate Rev. C with 4GB or one of earlier revisions with 2GB eMMC?
Thank you
Just one note regarding the “dd method” … you’ll find that this works much faster if you use a sensible block-size, e.g.
dd if=BBB*.img of=/dev/ bs=2048
Cheers
I just downloaded the BBB eMMC flasher for Rev C (my board) of the debian Jessie 8.1 image.
The same issue also happened with the previous 7.8 flasher.
I flash the .img with Ubuntu’s Image Writer program, I insert the SD card, check nothing else is plugged in. Power the board while holding the boot button aaaaaannnndddd….
Nothing, 4 Solid LEDs instantly and nothing changes no matter how many times I try, redownload, reflash, check sums, etc. etc. etc.
What am I missing, and where can I find relevant info on the BeagleBone project, it seems like there’s a half-assed wiki page, an out-of-date website, and a whole hell a lot of webserver issues.
I believe I’m being a little rude in the above, but I’ve been scouring hundreds of articles for weeks now, all I want to do is update to the latest jessie images. Despite following vaguely written articles that point every which way to more vague articles, nothing works the way it’s should. If the BeagleBone was upfront and said “Hey, this is a really small project and is intended for people very familiar with a Linux Operating System” then I wouldn’t be as upset.
However that’s not the case. The BeagleBone was supposed to be “as easy as Pi” referencing the more widely supported Raspberry Pi project of which I am more familiar (but still nowhere near expert).
It’s just ridiculously maddening to have to make make a leap from hobby-grade arduinos, straight into embedded linux programming with ZERO middle ground.
Hi there, you are correct it should work the way your have listed. Make sure that you uncompress the xz file into an img file before you write it to the SD Card — I’m only mentioning that because it is not in your list of steps. All four LEDs lighting means that the SD card cannot boot. If you are uncompressing the image then please try a different SD card. It is always possible that there is a problem with the SD Card slot reader — maybe try putting some ** very gentle ** pressure on the pins to see if that is the problem. Hope that helps, Derek.
Actually, I got a little further in my problem.
I used one of my Bus Pirates to create a bridge to look at the serial console while booting from the flasher.
I may have missed a verbosity setting, but the machine halts (with no indication as to why) at Running uenvcmd (Pastebin Log Here: http://pastebin.com/wfbWYc1F)
and the uEnv.txt it seems to use: http://pastebin.com/7tm3DD6W
However changes to the uEnv.txt doesn’t seem to work even booting to the normal Debian image
Is there a way to change whatever is echoing “Running uenvcmd … to output a little more info?
Has this problem ever been recorded otherwise?
Hi there, it all looks good until the uenvcmd — have you edited the command in uenv.txt? You have to be especially careful if you open this file under Windows. For example if you opened this file and just saved it in notepad then the Unix end-of-line characters will have been replaced by DOS end-of-line characters and the file will not have been read properly. Still that should not have happened with a fresh image. However, it does clarify that you have a valid file and your board is attempting to boot from the SD card. You can add verbose to the kernel line to get more detailed debugging, but it looks like your board is stuck within u-boot and not the kernel itself. Kind regards, Derek.
Hi Mr. Derek, first of all great website for the BBB, ok I’ll try to be as specific with my problem as I can, I flashed my BBB with ubuntu 14.04 using a 16 GB micro sd and your great tutorial, now I want to install a desktop for my board and some applications using my sd card as the storage, I read about expanding the filesystem in order to do it but I haven’t been able to expand it in the card, I think that the only way to expand the fs to the card is by using a boot image and booting from the sd everytime, I hope you can post a link or give me some info about this topic I really appreciated it
Hi Derek
Thanks for this useful information. I have a problem. When I flashing Angrostrom new version. After the flashing all leds are flashing and down. Do you have any idea ? like this video https://www.youtube.com/watch?v=B3mSsfo-PAQ
Hi Derek,
I have successfully flash the beaglebone with the latest debian image. I want to upgrade with the linux 3.12.9 kernel. Please suggest how to do that.
hi every body. i wanna have a backup as img file from emmc, how can i do that?
http://derekmolloy.ie/write-a-new-image-to-the-beaglebone-black/ web page:
“Some notes:
On point 9. above, on one board that I have I must press the Reset button (S1) after I apply the power or nothing seems to happen. In this case (while the board is powered) I press the Reset button (S1) and the Boot button (S2) at the same time and this seems to work. ”
—— However, there is no point 9 that I can see. It stops at 7 on my screen.
Question: Have a 32 GB microSD card that I used to flash my beagle with the latest code. Now that I done flashing, how can I use the microSDcard for additional storage? BBB always wants to re-load what is on the microSDcard into the eMMC.
Exploring BeagleBone came yesterday and I found the info on page 90. Somehow I missed that on the on-line copy. I do better looking a a book than a monitor.
There’s many comments already, and I’m not sure whether this has been said, but I thought I’d add this tidbit of info about my experience getting “back to Angstrom.” When following Derek’s procedure to flash your eMMC with a SD Card, don’t be impatient. I tried over and over, thinking at the ’45 minute mark’ that something had failed, when in actuality, I hadn’t waited long enough! Be patient.
I let my process go unattended for about an-hour-and-half and got to the 4 LEDs lit (as in Step 5.) I removed power and removed the SD card, then applied power again and my board booted/mounted like new! So, I guess everybody’s experience may differ.
Just be patient and it should work as expected. Now that I’m back to “factory”, I’ll try a Debian image using the same process.
Hope this helps,
Scott
I commented earlier today regarding my experience with flashing my BBB via microSD card “back to Angstrom” and wanted to follow up. Interestingly enough, after getting my board back to Angstrom, I really desired to attempt to flash it with the 4Gb Debian flasher image (https://rcn-ee.com/rootfs/bb.org/release/2015-03-01/lxde-4gb/BBB-eMMC-flasher-debian-7.8-lxde-4gb-armhf-2015-03-01-4gb.img.xz). After about 25 minutes, the 4 blue LEDs lit in a “blink-blink…blink-blink” pattern, which told me the write had failed. And I think I read it somewhere to confirm my suspicions.
Out of curiosity, I then tried flashing it with the *2Gb* Debian flasher image (https://rcn-ee.com/rootfs/bb.org/release/2015-03-01/lxde/BBB-eMMC-flasher-debian-7.8-lxde-armhf-2015-03-01-2gb.img.xz) and after approx. 10 minutes of a similar Cylon/Knightrider pattern in the LEDs, the board powered itself down. I removed the microSD card, reapplied power and the board booted/mounted as expected! After reinstalling the drivers for Mac OS X, the board was fully recognized and I now have Debian on my BBB!
So, be patient and if the 4Gb (Rev C) image does not work, try the ‘lighter’ 2Gb image for all Revs.
Hope that helps,
Scott
Hi Derek,
Do you have information posted on how to the Debian Vbox to recognize a SD card? My laptop doesn’t have a dedicated SD card reader so I’m trying to use a USB/SD card. I can successfully set it up as a shared folder but not as a /dev. In lieu of this can I put an image on the BB using a shared file then create the SD boot card on the BB?
Thank you for all the great work you have done, very helpful.
Brian
Derek,
I have the older BBB 2GB eMMC version. I successfully flashed Debian using the correct 2GB flasher version. My question is, what have they done to downsize Debian to fit on my 2GB BBB? What features will I be missing? Will I run into memory problems? If so can these be overcome by mounting an micro SD?
Thanks for all of your great work!
Hi Mark, Much of what is missing is packages related to windowing. Yes, you are correct — if you mount an SD card as additional storage then you can create a new mount-point location for any software that you would like. Kind regards, Derek.
please help me to resolve beaglebone black
I ask you please make me program the traffic light with 3 LED . red 10 seconds , 3 seconds bright yellow , green menyal 10 seconds and repeat continuously
thank you
Your comment is awaiting moderation.
please help me to resolve bash script in beaglebone black
I ask you please make me program the traffic light with 3 LED . red 10 seconds , 3 seconds bright yellow , green 10 seconds and repeat continuously
thank you!!
hi Derek
please help me to resolve bash script in beaglebone black
I ask you please make me program the traffic light with 3 LED . red 10 seconds , 3 seconds bright yellow , green 10 seconds and repeat continuously
thank you!!
Hey Derek,
How do you use the .img files of Angstrom available on beagleboard.org on VirtualBox? I get an error that they are not accessible when i use them.
thank you
sir i need to install ubuntu in my bbb rev c board with sd
so kindly give me the correct procedure for that sir
Hi Derek,
I’m trying to flash the eMMC on my BeagleBone Black. I’ve downloaded the latest image from http://beagleboard.org/latest-images , but I couldn’t find a “flasher-image” so I downloaded “bone-debian-8.3-lxqt-4gb-armhf-2016-01-24-4gb.img”. I followed the rest of the tutorial, unzip, make disk with Win32DiskImager, inserted into BBB with DC power source only. When I boot the BBB (while pressing S2) I don’t get the knightridet LED pattern, it just boots up on the new image. I can log in thought the UART-port on the new image with the default temp username. Afterwards if I boot the BBB without the SD-card, I return to the old version..
From the latest-images download site, it is noted that I have to make a change to the uEnv.txt on the linux partition on the SD-card to turn the image into a falsher image, but I can’t open the SD-card from windows after I have created the image.
How do I make a falsher image from these new bone-images?
Thank you very much!
Derek,
A FYI: I couldn’t find a flasher img for Debian 3.8 so started up the non-flasher img and then found this note on flashing the eMMC that worked great to flash the eMMC::
http://stackoverflow.com/questions/33930747/how-to-flash-beaglebone-black-emmc-with-debian-8-2-image/33931009#33931009
Regards,
John
Derek:
I have flashed the 3.8.13 bone79 on my BBB but now my 4D Systems 4DCAPE won’t show the IDE but does show a cursor arrow. Do you how I might get the display showing the IDE again? It did show the IDE before i upgraded to 79. I wanted to do the upgrade in hopes that I could get the BBIO ADC to work.
Thanks,
John
Hello,
I’ve bought recently BBB. Initially i started using the image on the uSD without flashing the eMMC, and everything was as a heaven where I could work on both version of the OS.
Now, however, i can’t get the BBB to boot from the uSD, and whenever i press the “S2” button the LEDs never light & BBB never boots until i press for a while on the POWER button to shut it off & then restart it.
I tried once to reformat the uSD & install the image again (thought some file might be corrupted), guess what .. it worked for ONCE only!!! and couldn’t do it again.
I’m not sure if this has a relation to it, but i even tried to see the uSD using “fdisk -l” but it didn’t appear at all while using the original OS coming with the BBB.
If anyone has any ideas, his/her help will be really highly appreciated.
Thanks a lot,
i am facing similar issue did you fixed that plzz help me
hye. im newbie BBB.
i had a problem where when i try boot the sd card, then suddenly the BBB turn off? is the os fully installed at internal emmc?
We have seen some bizarre behaviours with different variants of BBB. The first version had 2GB of eMMC – you won’t be able to flash big distros with that. Later versions had 4, but on the first revisions, this was formatted as 2+2 partitions to have some compatibility with the previous version, perhaps. This will also not flash with a full distro, and aborts the process very quickly. @iza this is probably what you’re seeing. To check, you can connect a serial debug cable to the header on the BBB and connect a terminal to it. Observe the output, it will say “Insufficient disk space” or something like that in the event that it is 2+2. To fix the problem, you need to change the partitioning so that there is a single 4GB one.
Over and above that, we have seen behaviour where some BBB need the button held down, and some only flash when it is NOT held down. Adding that to Derek’s observation about the reset button, it makes developing a commercial product with BBB – as we are attempting for reasons that were a little beyond our control – pretty much impossible, as when you unbox a BBB you simply do not know what you are getting. Currently we are seeing a behaviour such that sometimes – not every time – we flash an image, copy additional files across using WinSCP, check everything is OK, shut down correctly, reboot and discover that the new files are gone and the previous ones are in their place. This is all immensely frustrating.
Hi,
I want t use the BBB Jessie 8.4 for a project. I want to install the 4gb flasher version on emmc. But how to configure Linux to install all other tools via apt-get on the SD card. The problem is if I use the flasher 4gb version I have not enough space for eclipse, … ,… and I don’t know how to configure automatically to install via apt-get on SD card.
Hi Derek,
Thanks for your great Book and website on BB. I have an 8-GB uSD. I installed Debian Linux on half of it. I want to install big software like libreoffice. How can I use free space of my uSD for installing program?
Thanks you in advanced.
Alex
I have a slightly different problem.. lots of led activity, but lasts longer than 45 minutes and new version doesn’t get flashed. I’m using a Rev. C 7.4 Wheezy (4GB).
1) Used Win32DiskImager to write bone-debian-8.4-lxqt-4gb-armhf-2016-05-13-4gb.img to 32gb sd card (tried 4gb sd card as well)
2) Insert card (contact side up), press hold s2 button (near sd card) while plugging in 5v/2a ac/dc adapter.
3) 4 led blink, different patterns, but no change . This is what the leds look like : https://gfycat.com/EquatorialThreadbareIndigobunting
Does the /boot/uEnv.txt need to be modified first? Also, if everything boots from the eMMC, where does the /boot/uEnv.txt reside that it can be modified?
Hey coco, this is just FYI (not sure if anyone else had this issue). When I received my Rev C, it would not boot. So I wanted to re-flash the eMMC from an SD card. Instead of flashing per these instructions, I had to do the following:
1) Download his eMMC-flashed file at the beginning of this tutorial and flash the eMMC with that first (this one happens on bootup).
2) Then I booted up that version of Debian and logged on as root (w/o SD card in BBB). From here you can change the /boot/uENV.txt file as stated by: http://elinux.org/Beagleboard:BeagleBoneBlack_Debian#BBB_Rev_C_.284GB_eMMC.29.
**You will notice now that when you try to boot up the BBB, it will not w/o an SD card installed; it is looking for something to flash now
3) I then had to re-load my SD card with the latest Debian image. I inserted this into the BBB and booted it up (w/o holding the S2 button) and it booted from the SD card (without flashing). I noticed that even when I did hole the S2 button on apply power, no flash would occur.
4) Now you are running the Debian image from the SD card and must login as root on that side and change the /boot/uEnv.txt file there as well.
5) If you click the menu and just hit reboot, the eMMC will be flashed from the SD card. THERE IS NO NEED TO HOLD THE S2 BUTTON. You can plug in an HDMI cable to view how far along it is.Once its done it will power down and you can remove the SD card and reboot.
What I think is going on is there has to be a handshake to reflash eMMC -> eMMC must shake hands with SD image. This is where the agreement to flash eMMC takes place. So, the eMMC must be looking for an image on the SD card to flash, and the SD card image must be in flash mode enabled for and flash to take place. I wonder if this was done to avoid bricking BBB. Of course, you could just skip the second reflashing part and update the Debian image and kernel from the BBB directly while connected to the internet.
NOTE: I am not an expert, this was just the sequence I took and it worked for me. There is probably a much easier way to do this.
Hi Derek
Firstly, thanks for writing ‘Exploring Beaglebone’, it’s an exceptional read. Bought it last week and haven’t been able to put it down.
Secondly, do you know of a definitive tutorial for QNX on Beaglebone? I’m thinking of using it for my final year project and really need a good introductory tutorial.
Sincere Thanks
Do not worry if you want to remove the blocked files or too long path files from your system, here I suggest a smooth way. Use “Long path tool” software and keep yourself cool.
The path you entered, is too long. Enter a shorter path
File Name could not be found. Check the spelling of the filename,
and verify that the file location is correct.
The path you entered, is too long. Enter a shorter path
File Name could not be found. Check the spelling of the filename,
and verify that the file location is correct.
Hi Sir
After flashing my beaglebone how can i recover my 16 gb back (my pendrive was 16 gb in capacity)?
i dont have 5 volt adepter can i apply 9V ??? . is it possible to use usb port as power supply using mobile charger ? and flash it ?
How do I get the debian image to show startup lines on hdmi console while booting?
Thanks,
Gordon
Hi Derek,
We created an application using white beagle bone with angstrom version (application uses – php scripts, snmp communication and lighttpd web server )
The Application is cable of reading GPIO data ethernet cable and displays the values on web server.
My query is,
If I want to run same application in a beagle bone black what are the steps that I need to take care and
what configurations are required to run the same application on beagle bone black.
(like which version of OS image do I need to load in SD card, Is porting is possible or not )
very nice and Informative, preparing for linux Certification, wanted to learn linux operating system,recently joined in http://www.kerneltraining.com/linux-admin-training/, can anyone suggest me some books and videos.
Hello sir.
I am working on beaglebone where i have to log real time data which requires me to log the terminal output onto the SD Card of Beaglebone. When i plug in the Beaglebone, it doesn’t display the external storage. I have tried mounting it but in vain. I have created a log file in Cloud9 IDE. How do i export it to the external storage ?
hello, i write image on 8gb sd card after that follow the commands pressed the s2 switch while led blink after that waiting for lit all 4 leds but led 3 lit continuously..what should i do..???
Hi Derek,
I have purchased beaglebone black where i want port u-boot and linux kernel from scratch without using any ti sdks
i want to rewrite linux drivers for buses spi uart i2c usb using beaglebone black can you guide how to proceed.
thanks & regards,
krishna
Mr. Molloy.
I couldn’t flash into beaglebone black.
I repeated the steps for installing debian into beaglebone black.
But the blue leds are always blinking.
Why?
Derek,
It seems I may have ‘locked’ the GPIO Device Tree. I need a way to reset. The BBB is running the latest Debian, root and gpiouser are member of a gpio group, but neither can export or unexport on any pin.
echo 49 > /sys/class/gpio/export
bash: echo: write error: Device or resource busy
echo 49 > unexport
bash: echo: write error: Invalid argument
How do reset the system or get back to sanity?
Thanks in Advance!
very nice.tnx.
Hi Derek,
Am using ubuntu 12.04 sd card image..Is there any possibilities to flash SD Card image to eMMC of Beaglebone black.
Please help me by reply to this query.
Thank You.
HI Derek,
Am Using ubuntu 16.04 emmc flasher image in one of my BBB.
To enable UART devices i used so many methods to enable UART devices..But no one is working for me that are
1. Editing uEnv.txt file
2. By directly echo BB-UART! > /sys/devices/platform/bone_capemgr/slots
3. By adding UART devices to /lib/firmware directory
4. When i try to echo BB-UART1 to /sys/devices/platform/bone_capemgr/slots file, the system was not responding to that command and going to hang.
Please tell me the solution to enable UART devices in BBB with UBUNTU 16.04
Thank You.
Hi, I have the same question as you with Ubuntu 16.04. All the ways just don’t work.
Do you solve this problem? Can you help me? Thanks very much.
Hi derek,
I am following your instructions (Linux) to install Angstrom Distribution on BBB Rev C from Ubuntu 16.04 computer.
My sd card is sdb.
After this command “sudo dd if=./BBB-eMMC-flasher-2013.09.12.img of=/dev/sdb” nothing happens in terminal.
Can you suggest me what might be going wrong? It will be great help for me.
hey i was flashing my board with latest debian image from usd card . its size after decompression is 3.5 gb. after booting it from usd card , initially led’s turn on one by one, then they start flickering but after 2-3 mins only user led 0 is blinking (like a heartbeat) and all other led’s are off . this happened for more than an hour . so i unplugged the power supply , but again was unable to boot from eeprom and usd is behaving in a similar manner . how much should i wait . also i cannot access the eeprom part already installed as i deleted the mlo file so beagle bone is unable to boot .
Hi I am able to see the following message and after that the board just sits on the last line and does nothing.
Please let me know what did I mess up and how can I clean it.
Tearing Down script environment
==> Unmounting /tmp
blockdev: cannot open /dev/mmcblk0: No such file or directory
==> Stopping Cylon LEDs …
==> Setting LEDs to
[ 22.984517] Kernel panic – not syncing: Attempted to kill init! exitcode=0x00000100
[ 22.984517]
[ 22.993718] CPU: 0 PID: 1 Comm: init-eMMC-flash Not tainted 4.4.91-ti-r133 #1
[ 23.000882] Hardware name: Generic AM33XX (Flattened Device Tree)
[ 23.007045] [] (unwind_backtrace) from [] (show_stack+0x20/0x24)
[ 23.014835] [] (show_stack) from [] (dump_stack+0x8c/0xa0)
[ 23.022102] [] (dump_stack) from [] (panic+0xfc/0x27c)
[ 23.029018] [] (panic) from [] (complete_and_exit+0x0/0x2c)
[ 23.036363] [] (complete_and_exit) from [] (do_group_exit+0x50/0xe0)
[ 23.044493] [] (do_group_exit) from [] (__wake_up_parent+0x0/0x30)
[ 23.052452] [] (__wake_up_parent) from [] (ret_fast_syscall+0x0/0x44)
[ 23.060678] —[ end Kernel panic – not syncing: Attempted to kill init! exitcode=0x00000100
[ 23.060678]
[ 31.992032] random: nonblocking pool is initialized
Hi Derek,
I am trying to flash my beaglebone black board with a kernel that I build by following : “https://eewiki.net/display/linuxonarm/BeagleBone+Black#BeagleBoneBlack-SetupmicroSDcard”. As I try to flash the board it seems to be writing the eMMC and says to restart the board after the process is finished. I remove the card and restart it, them after a while it shows the following message and does nothing.
Tearing Down script environment
==> Unmounting /tmp
blockdev: cannot open /dev/mmcblk0: No such file or directory
==> Stopping Cylon LEDs …
==> Setting LEDs to
[ 23.016501] Kernel panic – not syncing: Attempted to kill init! exitcode=0x00000100
[ 23.016501]
[ 23.025702] CPU: 0 PID: 1 Comm: init-eMMC-flash Not tainted 4.4.91-ti-r133 #1
[ 23.032867] Hardware name: Generic AM33XX (Flattened Device Tree)
[ 23.039030] [] (unwind_backtrace) from [] (show_stack+0x20/0x24)
[ 23.046820] [] (show_stack) from [] (dump_stack+0x8c/0xa0)
[ 23.054087] [] (dump_stack) from [] (panic+0xfc/0x27c)
[ 23.061003] [] (panic) from [] (complete_and_exit+0x0/0x2c)
[ 23.068348] [] (complete_and_exit) from [] (do_group_exit+0x50/0xe0)
[ 23.076478] [] (do_group_exit) from [] (__wake_up_parent+0x0/0x30)
[ 23.084437] [] (__wake_up_parent) from [] (ret_fast_syscall+0x0/0x44)
[ 23.092663] —[ end Kernel panic – not syncing: Attempted to kill init! exitcode=0x00000100
[ 23.092663]
[ 31.764034] random: nonblocking pool is initialized
The board just sits on the last message and does nothing. Please help me in understanding what am I doing wrong.
Thanks,
Rohit
Hi Derek,
i copied the BBB-eMMC-flasher-debian-7.4-2014-03-27-2gb.img image into the microSD card as mentioned press the s2 button, but non of the LEDs are blinking only PWR LED along active (ON). Even after restart with out microSD card all LEDs blink some times and stops and the BBB is not communicating to PC through usb. Is any way i can revert it back, and make it like old.
Thanks and Regards,
Shynesh Sukumaran
Hi Derek,
I use BeagleBone black REVC with 4Gb eMMC memory. I followed above steps, and I wait over 1 hour, just USR0 LED and USR2 led still blink. USR0 led blink in beathearth pattern. I use USB as power supply. I can’t figure out what’s problem?
BR,
Nikola
Is there any memory limit for micro SD Card? I am thinking to use 64 GB Memory Card.
sir , out of the 4 USR led’s , two led’s are blinking for a long time (more than 2 hours) .
can you advice what to do ?
Hi Derek,
Im getting following issue while flashing above image.
U-Boot SPL 2014.04-00014-g47880f5 (Apr 22 2014 – 13:23:54)
** Partition 1 not valid on device 0 **
spl_register_fat_device: fat register err – -1
### ERROR ### Please RESET the board ###
After following these steps , the LEDs start blinking . But i have waited for more than one hour the BBB is still not ready to work . I need help to solve this problem .
I started the process as outlined at 10am, it is now 3:30pm and lights are still flashing. Do you know what might be the issue?
-Beaglebone Black
-bone-debian-10.3-iot-armhf-2020-04-06-4gb.img
Thank you for the help
kb