I have already posted on how we can build a vanilla Angstrom distribution from source at this post: Building Angstrom for Beaglebone from Source. This post looks at how we can add SPI to the kernel and rebuild the Linux kernel and Angstrom distribution. The post isn’t specific to SPI, so it may be that you are looking to make a different change to the distribution.
Initial Setup
If you have not done these steps already as explained in the previous post you should:
|
1 2 3 4 |
git clone git://github.com/angstrom-distribution/setup-scripts.git cd setup-scripts MACHINE=beaglebone ./oebb.sh config beaglebone MACHINE=beaglebone ./oebb.sh update |
This should have you at the same point as the previous post and ready to go. If you receive any errors at this point then please go back to that post.
Really useful guide on using bitbake for open embedded and how everything works:
http://docs.openembedded.org/usermanual/usermanual.html#chapter_using_bitbake_and_oe
This is a substantial document; however, if you ever want to understand what is going on and how to create your own recipes you need to read this.
Back up the Default Kernel Configuration
Because we are about to replace the default configuration for the Beaglebone it is useful to back it up:
|
1 2 3 |
cd ~/beaglebone/setup-scripts/sources/meta-ti/recipes-kernel/linux/linux-ti33x-psp-3.2/ cp defconfig defconfig_backup |
This means that we can always replace it if something goes wrong.
Modify the Kernel Configuration on the Beaglebone using Menuconfig
We can make modifications to the kernel configuration as follows:
|
1 2 3 |
cd ~/beaglebone/setup-scripts/build/tmp-anstrom_v2012_12-eglibc/work/beaglebone-angstrom-linux-gnueabi/linux-mainline-3.8.11-r23a/package/usr/src/kernel make menuconfig |
The directory after build will depend on what your current build directory is. This directory appeared because I have already built the kernel in the last post: Building Angstrom for Beaglebone from Source
However, if you haven’t built a distribution already you could type:
|
1 2 3 4 |
. ~/.oe/environment-angstromv2012.12 bitbake virtual/kernel -c configure ***or*** bitbake cloud9-image -c configure |
depending on your target distribution.
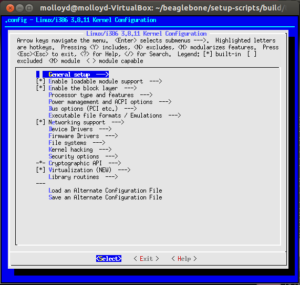
When you execute make menuconfig you should see an interface like in Figure 1. In this case I am going to enable Debug support for SPI drivers. You could be doing this for another reason; for example in Figure 3 I am enabling CAN bus support.
Figure 1: menuconfig user interface
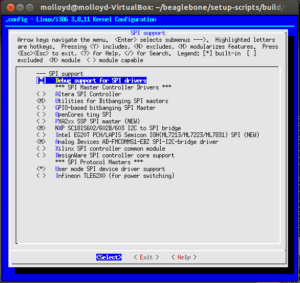
Go to -> Device Driver -> SPI support and then enable “Debug support for SPI drivers” by pressing Y
Figure 2: Enable “Debug support for SPI drivers” by pressing ‘Y’
Figure 3: Enabling ‘CAN bus subsystem support’ (Networking Support -> CAN bus subsystem support)
If you were doing what I was doing your screen should appear as in Figure 2. Exit by pressing Exit back to the main menu and then exit completely. You can then copy the config file to your linux-ti33x-psp-3.2 directory so that it won’t be lost on a bitbake clean:
|
1 2 3 |
cp .config ~/beaglebone/setup-scripts/sources/meta-ti/recipes-kernel/linux/linux-ti33x-psp-3.2/defconfig cat defconfig|grep CONFIG_SPI_SPIDEV |
This should come back with CONFIG_SPI_SPIDEV=y
You can then build your distribution with the custom kernel settings you have made by doing something like:
|
1 2 |
cd ~/beaglebone/setup-scripts/ bitbake cloud9-image |
to build the standard recipes – however if you want to change the recipe have a look at the next section.
Changing the Angstrom Beaglebone build Recipes
I was having problems with the latest release with nodejs and it is not something I needed for the project I had planned. So the question arose – how do I change the Angstrom build recipe?
Here is one way – it is probably not very elegant:
|
1 2 |
cd ~/beaglebone/setup-scripts/sources/meta-ti/recipes-misc/images/ cp cloud9-image.bb derek-image.bb |
I have build my version from the cloud9-image.bb file, except I have removed nodejs and anything else that had nodejs as a dependency. Here is the content of my derek-image.bb file:
|
1 2 3 4 5 6 7 8 9 10 11 12 13 14 15 16 17 18 19 20 21 22 23 24 25 26 27 28 29 30 31 32 33 34 35 36 37 38 |
# Image without cloud9 ide but with hw tools installed require ti-hw-bringup-image.bb FATPAYLOAD = "${datadir}/beaglebone-getting-started/*" ROOTFSTYPE_beaglebone = "ext4" IMAGE_INSTALL += " \ systemd-analyze \ mpd \ packagegroup-sdk-target \ vim vim-vimrc \ procps \ beaglebone-tester \ screen minicom \ git \ led-config \ opencv-dev \ cronie-systemd ntpdate \ nano \ minicom \ hicolor-icon-theme \ gateone \ tar \ gdb gdbserver \ mplayer2 \ tslib-tests tslib-calibrate \ iproute2 canutils \ connman-tests \ rsync \ e2fsprogs-mke2fs \ cpufreq-tweaks \ dosfstools \ parted \ " export IMAGE_BASENAME = "Derek-IDE" |
Now, to build this recipe:
|
1 2 3 |
cd ~/beaglebone/setup-scripts/ . ~/.oe/environment-angstromv2012.12 bitbake derek-image |
Note: do not add .bb to the end of the derek-image, even though that is the name of the file.
This should be enough for you to build your own custom distribution. You should then find the build in the directory like “~/beaglebone/setup-scripts/build/tmp-angstrom_v2012_12-eglibc/deploy/images/beaglebone”, which will change according to your build etc. Here is the directory listing:
|
1 2 3 4 5 6 7 8 9 10 11 12 13 14 15 16 17 18 19 20 |
molloyd@molloyd-VirtualBox:~/beaglebone/setup-scripts/build/tmp-angstrom_v2012_12-eglibc/deploy/images/beaglebone$ ls -al total 524876 drwxrwxr-x 2 molloyd molloyd 4096 May 5 13:15 . drwxrwxr-x 3 molloyd molloyd 4096 Apr 21 16:05 .. -rw-r--r-- 1 molloyd molloyd 130297073 May 5 13:14 Angstrom-Derek-IDE-eglibc-ipk-v2012.12-beaglebone.rootfs.tar.gz -rw-r--r-- 1 molloyd molloyd 78804972 May 5 13:15 Angstrom-Derek-IDE-eglibc-ipk-v2012.12-beaglebone.rootfs.tar.xz lrwxrwxrwx 1 molloyd molloyd 63 May 5 13:15 Derek-IDE-beaglebone.tar.gz -> Angstrom-Derek-IDE-eglibc-ipk-v2012.12-beaglebone.rootfs.tar.gz lrwxrwxrwx 1 molloyd molloyd 63 May 5 13:15 Derek-IDE-beaglebone.tar.xz -> Angstrom-Derek-IDE-eglibc-ipk-v2012.12-beaglebone.rootfs.tar.xz -rwxrwxr-x 1 molloyd molloyd 1535 Mar 25 2011 mkcard.sh lrwxrwxrwx 1 molloyd molloyd 22 May 3 22:37 MLO -> MLO-beaglebone-2013.04 lrwxrwxrwx 1 molloyd molloyd 22 May 3 22:37 MLO-beaglebone -> MLO-beaglebone-2013.04 -rwxr-xr-x 1 molloyd molloyd 99904 May 3 22:37 MLO-beaglebone-2013.04 -rw-rw-r-- 1 molloyd molloyd 37466149 May 3 22:49 modules-3.8.11-r23a-beaglebone.tgz -rw-rw-r-- 1 molloyd molloyd 294 May 5 13:08 README_-_DO_NOT_DELETE_FILES_IN_THIS_DIRECTORY.txt -rwxr-xr-x 1 molloyd molloyd 378948 May 3 22:37 u-boot-beaglebone-2013.04-r0.img lrwxrwxrwx 1 molloyd molloyd 32 May 3 22:37 u-boot-beaglebone.img -> u-boot-beaglebone-2013.04-r0.img lrwxrwxrwx 1 molloyd molloyd 32 May 3 22:37 u-boot.img -> u-boot-beaglebone-2013.04-r0.img lrwxrwxrwx 1 molloyd molloyd 48 May 3 22:49 uImage -> uImage-3.8.11-r23a-beaglebone-20130503213041.bin -rw-r--r-- 1 molloyd molloyd 4218960 May 3 22:49 uImage-3.8.11-r23a-beaglebone-20130503213041.bin lrwxrwxrwx 1 molloyd molloyd 48 May 3 22:49 uImage-beaglebone.bin -> uImage-3.8.11-r23a-beaglebone-20130503213041.bin |
You can then deploy this to your SD card using the instructions in my post: Building Angstrom for Beaglebone from Source
Custom patches for the Beaglebone kernel build and distribution:
All of the beaglebone specific patches are in the directory: ~/beaglebone/setup-scripts/sources/meta-ti/recipes-kernel/linux/linux-ti33x-psp-3.2/beaglebone
For example, the patches related to the LCD4 Cape are:
|
1 2 3 4 5 6 7 8 |
-rw-rw-r-- 1 molloyd molloyd 1494 Apr 20 17:59 0092-beaglebone-add-support-for-LCD4-rev-A1-button-suppor.patch -rw-rw-r-- 1 molloyd molloyd 9470 Apr 20 17:59 0093-beaglebone-update-cssp_camera-driver-to-support-revi.patch -rw-rw-r-- 1 molloyd molloyd 3231 Apr 20 17:59 0094-beaglebone-make-LCD4-Rev-A1-display-work-no-button-s.patch -rw-rw-r-- 1 molloyd molloyd 4271 Apr 20 17:59 0095-beaglebone-convert-LCD4-to-16-bit-add-button-support.patch -rw-rw-r-- 1 molloyd molloyd 4357 Apr 20 17:59 0096-beaglebone-camera-cape-sensor-orientation-support-fo.patch -rw-rw-r-- 1 molloyd molloyd 26765 Apr 20 17:59 0097-beaglebone-improve-performance-of-mt9t112-driver-for.patch -rw-rw-r-- 1 molloyd molloyd 14360 Apr 20 17:59 0098-beaglebone-Remove-optimization-from-square-resolutio.patch -rw-rw-r-- 1 molloyd molloyd 928 Apr 20 17:59 0099-beaglebone-fix-DOWN-button-on-LCD4.patch |
You can step back one directory and view the bitbake file at: ~/beaglebone/setup-scripts/sources/meta-ti/recipes-kernel/linux/linux-ti33x-psp_3.2.bb
nano is useful for this as there are a lot of pages:
|
1 2 |
~/beaglebone/setup-scripts/sources/meta-ti/recipes-kernel/linux/linux-ti33x-psp_3.2.bb nano linux-ti33x-psp_3.2.bb |
At the bottom of a long list can see the 102 beaglebone patches (use CTRL-V to quickly page down) on this date. You would be able to modify the linux-ti33x-psp_3.2.bb and add in a custom patch or remove a patch if you felt it was causing difficulty. The process to build is then the same as before.


here is the same mistake 😉
Thanks Joerg, Fixed.
Hi Derek
I read and followed your article on setting up NTP on the BBB and it worked perfectly. So I read this one as a potential solution to my next problem. It probably would be but there might be a simpler solution.
I have flashed my BBB with the latest release from BeagleBoard and had no problem doing it. But when I needed a custom Angstrom distribution, I went to http://narcissus.angstrom-distribution.org/ to build one online and the resulting image did not boot. I suspect that when I selected BeagleBoard as the computer for which I needed the image, it may have been wrong. Or maybe I needed to select some platform specific pkg or maybe the 2011.03 release as a start was wrong.
If desperate, I will follow your tutorial and build my own distribution this way but it seems that it would be easier to use the online builder if I knew the right answers. Can you help?
Yves
Hi Matt!
The newer versions of Angstrom generate zImages instead of uImages. I suggest editing the uEnv.txt in your boot partition on the SD card to remedy the problem. A quick Google Search should find one quickly (I don’t want to paste mine here, since I got it from another website).
Hi Derek,
Thanks for this great content. Quick question, how would you change the kernel from the 3.8.11 to the 3.2.x?
Regards,
Víctor.
HI Derek,
thanks for this blog was helpful n i have the same question as Victor i want to get back to kernel 3.2.X? and have u tried BBB kernel 3.8 16×2 character lcd? please help me..
Regards,
vinay
Hi Derek
I have ubuntu 12.10 , is this the process I would have to do ti enable the SPI bus on the beagleBone.
Im trying to read the output of an adc IC which connects to the SPI.
Hi Derek.
Thanks for your beaglebone black blog & youtube.
I am develeping a program with qt for bbb.
As you mentioned about qt4-embedded installation youtube, i wish to re-create kernel 3.8 for bbb.
But I can’t generate it.
First of all I wish to create cloud9-image.
But it can’t with
ERROR: …. /sources/meta-openembedded/meta-oe/recipes-devtools/nodejs/nodejs4_0.4.12.bb, ) do_install) fail with exit code ‘1’
But I can generate qt4-demo-imgae.
And some image ok , some image not.
Please help me and advice about minimum kernel environment for qt program in bbb.
Best Regards.
byung-wook choi in korea.
i have the question . can you help me ?
Hello Derek,
In the backup kernel config step, I am finding defconfig in a slightly different path from your case.
You:
cd ~/beaglebone/setup-scripts/sources/meta-ti/recipes-kernel/linux/linux-ti33x-psp-3.2/
Me:
cd ~/beaglebone/setup-scripts/sources/meta-ti/recipes-kernel/linux/linux-ti33x-psp-3.2/beaglebone
I was not sure if this was a mistake, or if the environment has changed a bit since you did your build.
Thanks for all your good work!
Don
Again, this was a great help and following this tutorial I was able to build the systemd-image which is better suited to my needs. However, I want to enable hard floating point support. Could you give any details how to do this?
Many thanks.
Hi Derek,
your tutorial is great and in the meantime some folder, etc seemed to have changed (at least on my installation):
The “…/setup-scripts/deploy/eglibc/images/beaglebone/” folder holds everything needed: the kernel image, u-boot.img, MLO, Angstrom sysroot (the operating files) and the (updated) modules.
Another difference is the use of zImage instead of uImage as the kernel image.
I found a slightly more up to date tutorial in this beaglebone google mailing list (please remove the link if you dont like links here): https://groups.google.com/forum/#!searchin/beagleboard/Angstrom$20bitbake/beagleboard/ALCmNV_aEsY/tmzc_7k8jD4J
The main point to take away from that tutorial is that it doesn’t seem sufficient to run ‘bitbake -c clean cloud9-image’ and ‘bitbake cloud9-image’ to rebuild and reconfigure the kernel. But that we need to explicitly rebuild the kernel and then integrate it with the existing Angstrom systemroot.
This can be done by ‘bitbake -c clean virtual/kernel’ to clean it, ‘bitbake -c configure’ to preconfigure it if you haven’t ever build it. Then ‘bitbake -c menuconfig virtual/kernel’ to call up the kernel configuration window and finally ‘bitbake menuconfig’. It may be necessary or at least gives me peace of mind to first delete the content of the “…/setup-scripts/deploy/eglibc/images/beaglebone/”. More on the exact steps in the link I posted.
Once that is done you have to integrate your new kernel with the existing Angstrom build. I am not 100% sure this is all correct, but it seems to work for me:
1st: Copy the new zImage file from the “…/deploy/…/beaglebone” (as above) directory to both the boot partition on your SD card/eMMC as well as into the /boot/ folder in your Angstrom build on your SD card/eMMC. You might have to rename it or link it so that there is a ‘zImage’ file available.
2nd: extract your ‘modules-beaglebone.gz’ archive in the “…/deploy/…/beaglebone” (as above) folder.
3rd: (manually?!) copy the content of the archive “…/beaglebone/lib/” onto your Angstrom build on the SD card/eMMC. I believe it is important not to delete files?! but do make sure you overwrite existing files to ensure that your new kernel modules are in some list, etc… (((!!! This are my empirical results, could someone more knowledgeable please correct me !!!)))
4th: eject your SD card and reboot.
(5th:) Check if your modules load.
Hi Derek
I am an R&D manager in a company with a long history of embedded SW and own HW. We are moving to linux and have decided to use BBB as a prototype. I have bought a number of copies of your excellent book (the companion site is also great) for the team. With this background, I have some team-related questions that I would like to hear your opinion on:
1) Can you recommend a generic directory structure?
(in other words – should we isolate as much of our stuff from the distro, in a pseudo-user’s home, or fill stuff into /usr/local/bin – or what?)
2) Is there a recommended layout for source-code on hosts (and in git)?
3) How do we ensure that we all have exactly the same target when developing?
It’s easy to imagine that some update stuff, that others don’t – producing strange errors.
3) What is the recommended way to multiply images in production?
I have seen how you build Angstrom from the bottom (now were on debian “wheezy”, but I guess it’s the same concept), and I have also looked at Yocto.
Yocto might be the solution for 3) when we get to our own hardware, but is there a simpler concept during development?
Thanks!
Hi Derek, I am very new to BBB world. I have a brand new BBB in hand and a brand new PC with Ubuntu 20.04 installed in it. My question is, can I directly access BBB from the Ubuntu PC? I have gone through your book where you have mentioned about installing putty software. But Putty does not support Ubuntu 20.04. So is there any other way to access BBB from PC with Ubuntu 20.04?